VIRTUAL TEE Navigation
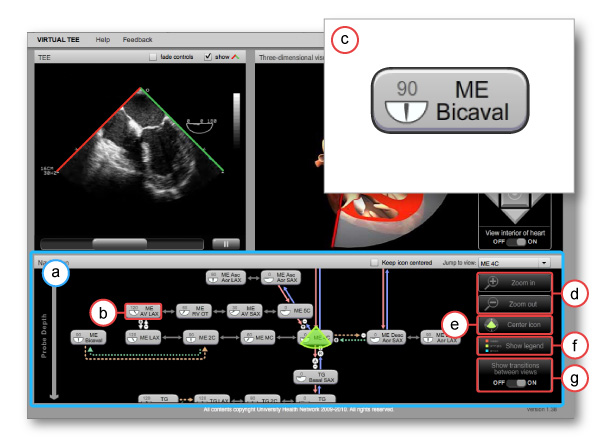
To navigate between TEE standard views use the tools provided in the section labelled 'Navigation' (figure 1a).

Figure 1: Virtual TEE examination navigation tools. a) Navigation section, b) button with view name, c) close up of a button with view name and omniplane angle, d) diagram magnification tools, e) center green pie-shaped icon in panel button, f) show legend button and g) show transitions between views button.
The navigation section contains a graphical representation of the relationship between the twenty standard two-dimensional transesophageal echocardiography views. Each view is represented as a box with the abbreviated name of the view printed on the inside. Each box contains an omniplane angle icon (figure 1b & 1c) that suggests the approximate omniplane angle required to obtain the view. The arrows and other symbols between views indicate the relationship bewteen the views. To learn the meaning of each symbol, click on the check box marked 'View legend' (figure 1f), this will open a descriptive legend to assist you. The views are arranged in the vertical axis by depth with views requiring deeper insertion of the probe located lower on the chart; views aligned horizontally can be found at approximately the same probe depth.
The entire navigation chart can be rescaled and repositioned to make reading easier or to frame certain views, respectively. To rescale the navigation chart, click on the magnifying glass icons (figure 1d); the magnifying glass with a plus sign zooms in on the chart while the other zooms out. To move the navigation chart or reframe certain views within it, position your mouse within the chart so that it is not resting over one of the standard view buttons, you should see an open hand icon; click and drag to move the chart. On a PC, the chart can also be moved up and down using your mouse's scrollwheel.
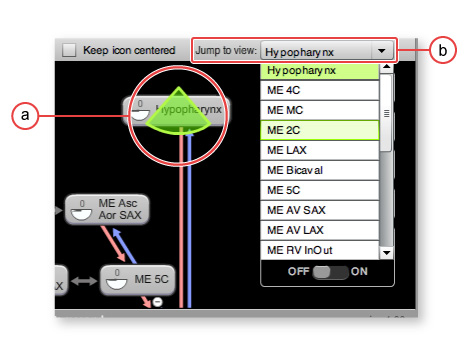
Your current location within the virtual examination is indicated by the position of the green pie-slice-shaped or TEE plane-shaped icon (figure 2a). This icon will move over and between boxes as you choose to move the probe during the virtual examination. When the examination begins, you should see the current position icon centered over a box labelled 'Hypopharynx'.

Figure 2: Close up of navigation section of Virtual TEE application. a) Current position indicator, b) 'Jump to view' menu.
To navigate bewteen views you can take one of the following two actions: 1) Drag the green pie-slice-shaped icon from one grey button to another, 2) Click on any of the grey button's in the navigation diagram or 3) Click on the drop down menu labelled 'Jump to view' (figure 2b) to move directly to a standard view without an animated transition. You can also disable the transition animations bewteen the standard views by turning the button labelled 'Show transitions between views' to the 'off' position (fig 1g).