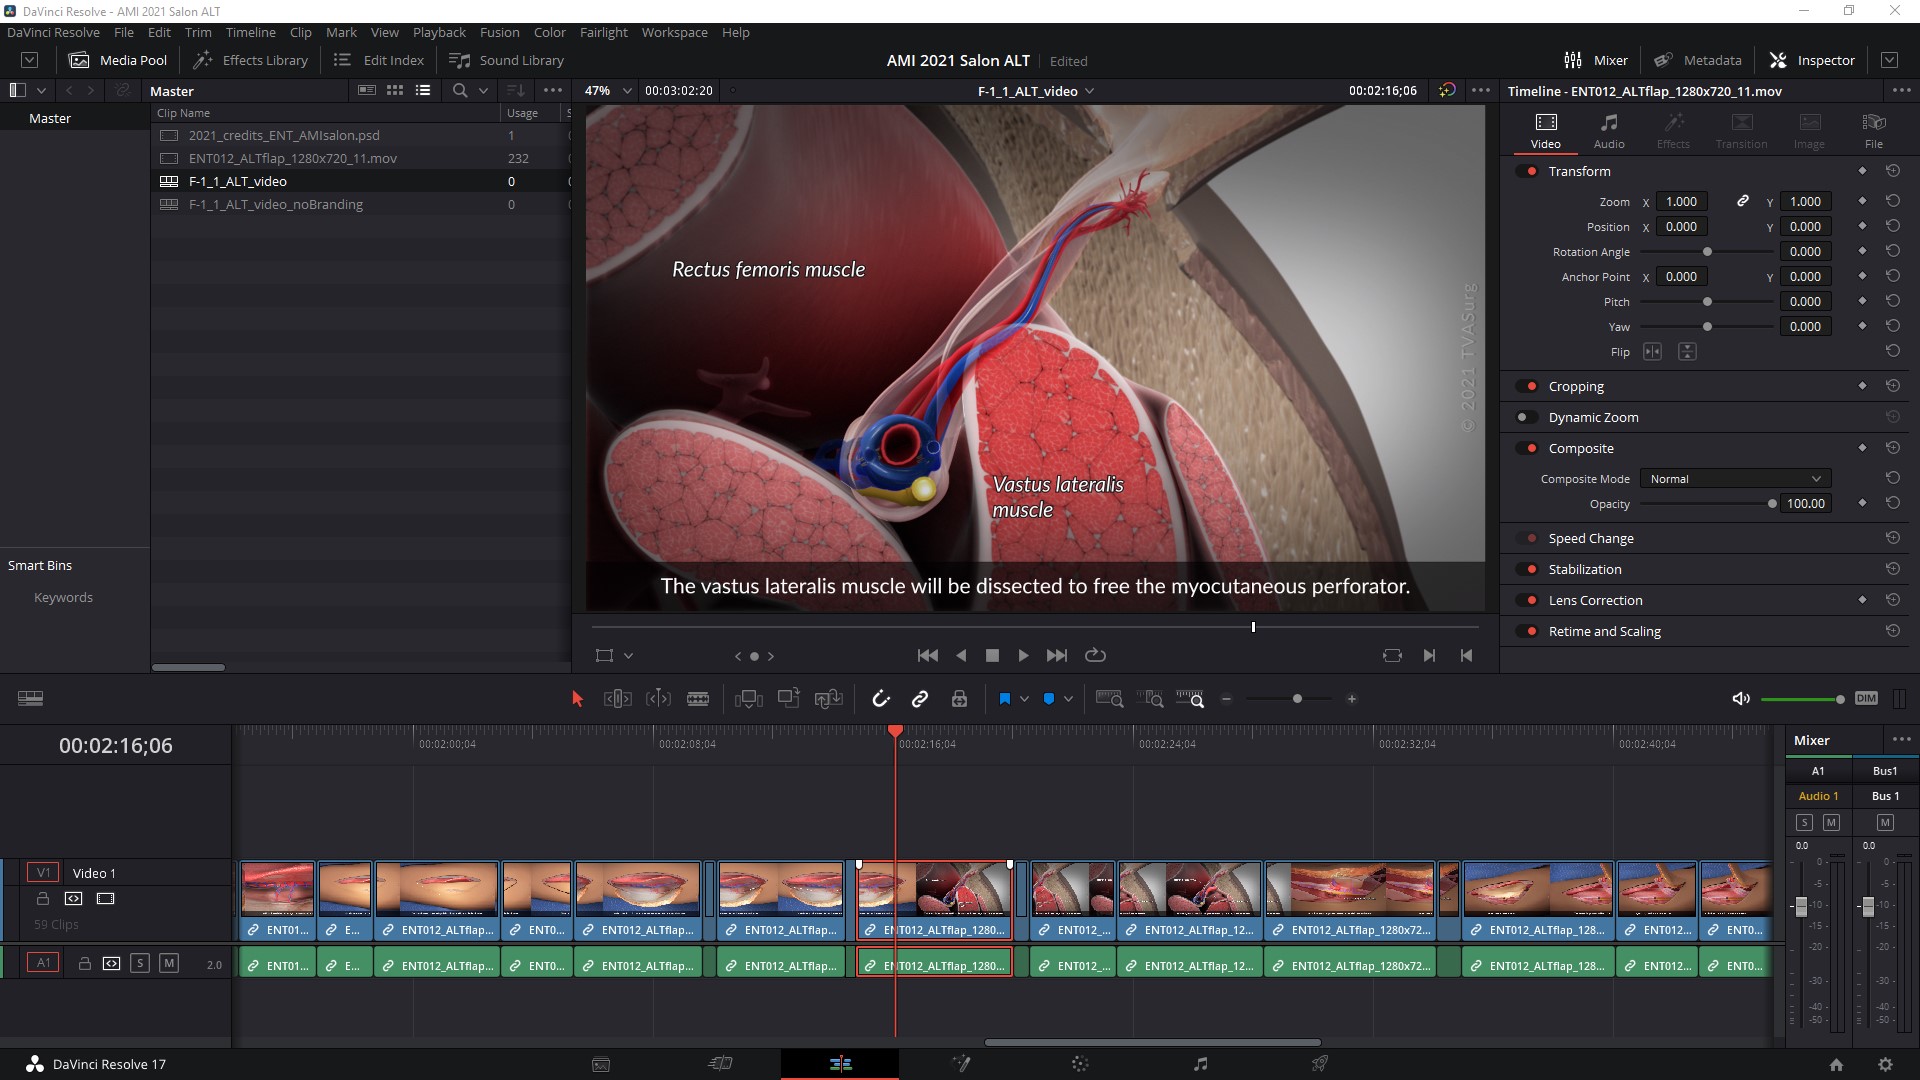
In a previous blog post, TVASurg team member Jean Lin described the basic workflow we use for editing surgical video footage using DaVinci Resolve, and in the summer of 2021, Jean and Paul presented an in-depth analysis of this workflow at the Association of Medical Illustrators virtual annual conference.
In June of 2021, the Biomedical Communications Alumni Association launched the first round of its BMClasses, a series of webinars from students, faculty, and alumni of the BMC program to share their knowledge of production software, with an emphasis on free or low-cost tools. TVASurg team member Paul Kelly presented a BMClass on video editing basics with DaVinci Resolve by Blackmagic Design. In the BMClass, Paul goes through the basic functions, commands, and hotkeys of the software:
OVERVIEW
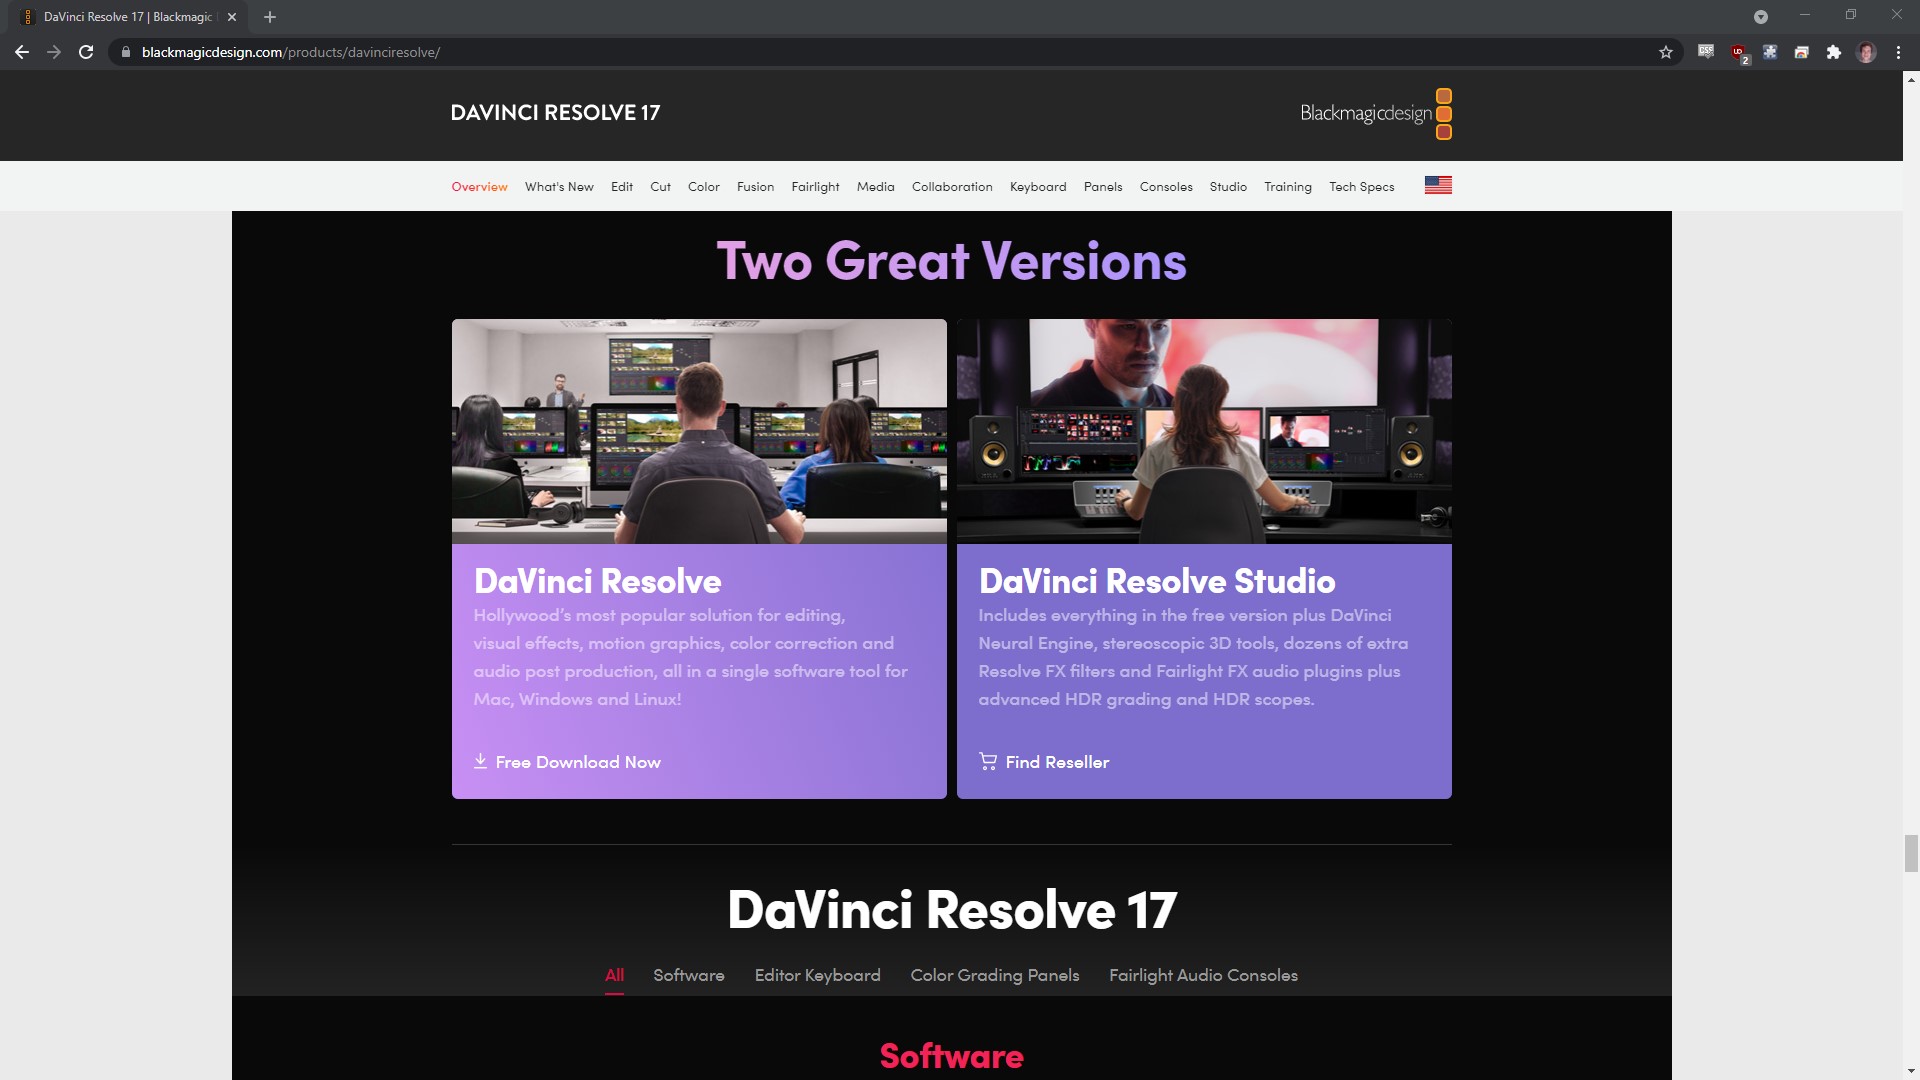
DaVinci Resolve is available for free–there’s also a paid version available with additional features.
DaVinci Resolve by Blackmagic is one of the most powerful open source software options available for video editing and colour grading, but it also has robust audio and compositing features. There is a paid version of DaVinci Resolve (still a decent price of $300usd) with additional features such as multiple GPU support, 4K output, motion blur effects, 3D stereoscopic tools, and collaboration tools that let multiple users work on the same project at the same time. One of the other great things about DaVinci is, similar to Blender, Blackmagic keeps all their old versions of the software accessible, so whatever system you’ve got, you can find a compatible version.
After installing, open the software and select “New Project” and name it. Once Resolve is open you will see tabs, called “pages,” along the bottom that follow a left-to-right workflow:
- Media
- Cut
- Edit
- Fusion
- Color
- Fairlight
- Deliver
- Share
Here’s a few nice features of the software to know about as you get settled in:
- You can set the dimensions and frame rate for your Timeline in the Project Settings: click on the gear icon in the lower right or File > Project Settings.
- You can add annotations to your file for group projects by going to File > Project Notes. If you go to File > Media Management you can convert files from one type to another. As you edit your video, at any time you want to go back you can go to Edit > History.
- When working in the EDIT or FAIRLIGHT pages, you can add flags (G) or markers (M) to help with organizing key points in your timeline. The difference being a flag will mark an entire clip, whereas a marker will mark an exact frame. Once added, if you double click on a marker you can give it a name or add notes, and if you double-click on a flag you can add notes.
- While editing, you can search through your markers in the EDIT page by going to the three dots in the upper right of the source monitor, go to “Markers >” and you’ll see all your markers on the active Timeline.
- You can also assign colors to clips in your timeline (Rt-click on clip > Clip Color) which helps to visually organize your edit as well.
- You can also use markers to indicate chapters or segments when your video is uploaded to YouTube.
MEDIA page
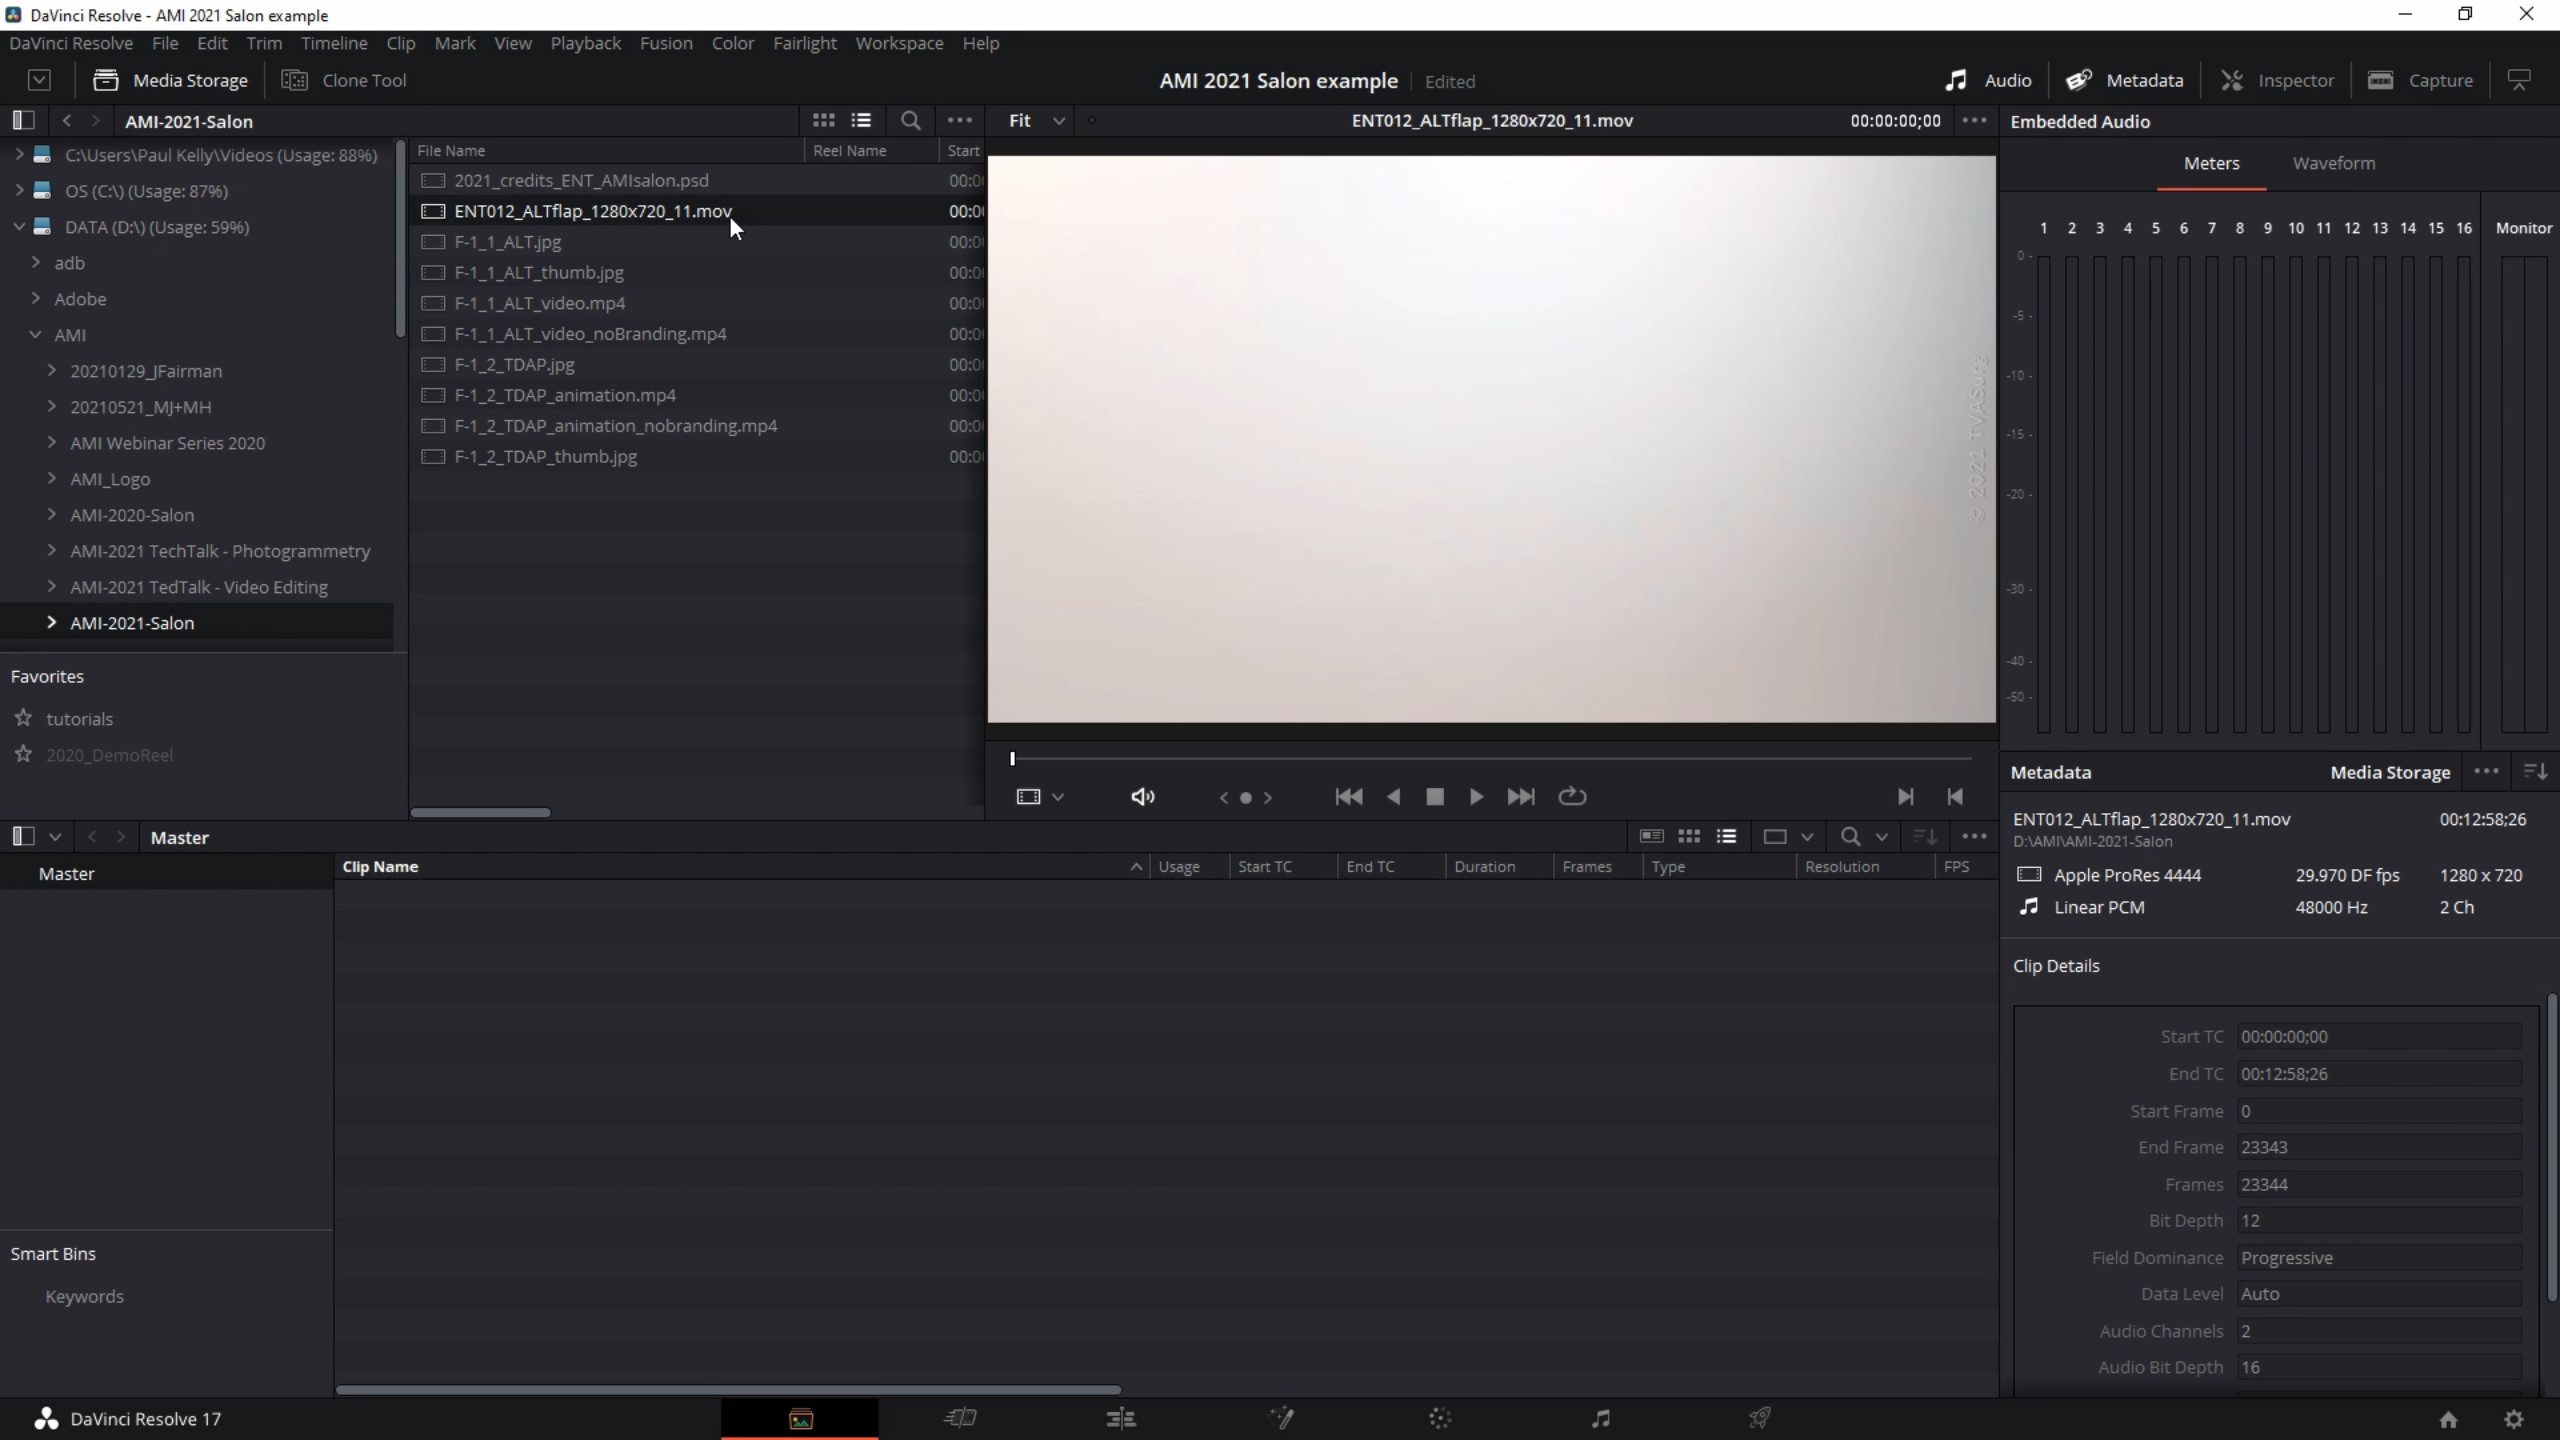
The Media page is where you’ll import the assets for your project. In the upper left there’s a window you can use to search all the hard drives connected to your computer.
In the left-most page icon along the bottom of the DaVinci Resolve UI, we can import, preview and sort video, audio and still images. Use the File Explorer to locate your source files, and double-click on a footage file to preview it. Click and drag your files into the Media Pool to add them to the project.
TIP: Shift+S turns audio scrubbing on and off. This option is also in the Timeline drop-down menu.
You can quickly edit multiple clips in your Media Pool by going to the 3 dots in the upper right of the Source window, and selecting “Live Media Preview.” Now when hovering over clips in Media Pool, the clip will scrub, and you can mark in and out points for the edit by hitting “i” & “o”.
CUT page
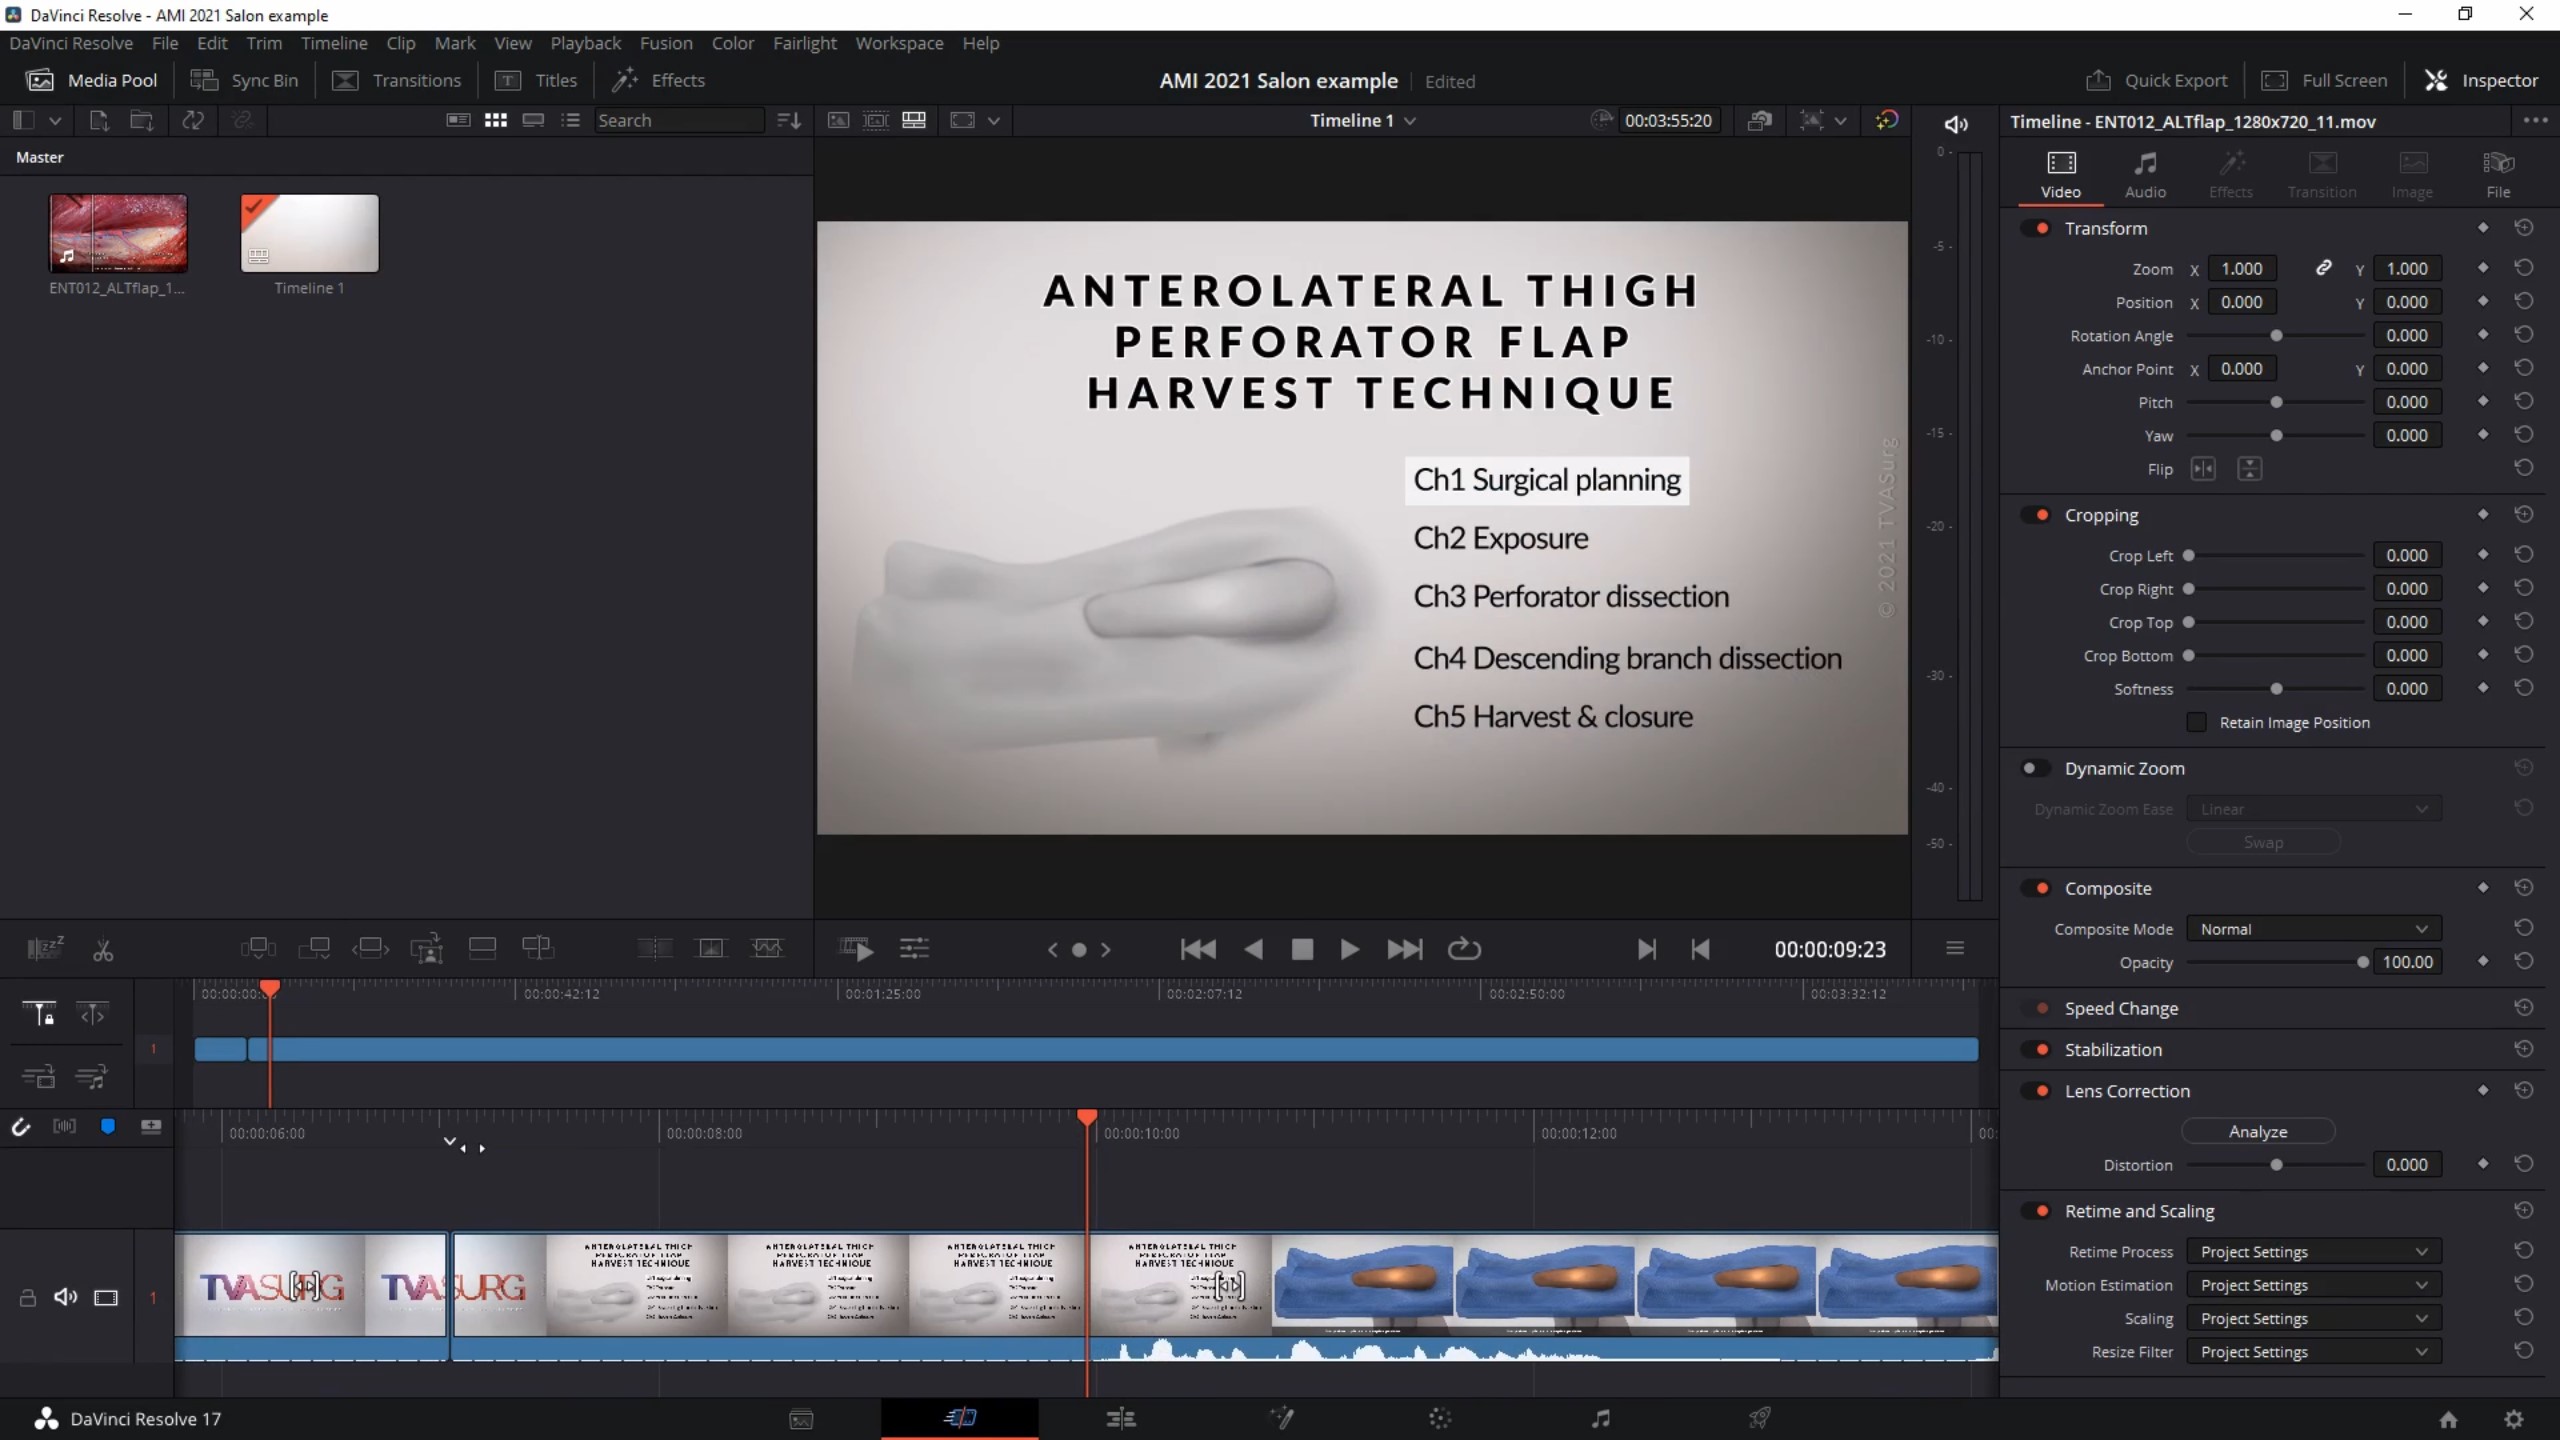
The Cut page is great for making a quick rough cut of your video. Your clips will be placed in the Timeline at the bottom of the UI, and above you’ll see a preview bar where all your cuts have been made. You can jump quickly to different parts of your video by clicking anywhere on the preview bar.
This is where you make your rough cut, or slap together something for a quick turnover.
Probably the most useful aspect of the CUT page is the ability to see your entire video laid out along the top of the timeline. This always adjusts to show you everything that you have, and you can click in this space to immediately jump to any point in the timeline. You can also select entire groups of clips, which you may want to do for example if you want to re-assign that group a new clip color for organization.
When you first enter this tab, or page, you’ll see your imported footage in the top “Master” window area. Go to File > New Timeline or Ctrl+N / Cmd+N to add a New Timeline.
- Edit > Duplicate Timeline
- Timeline > Ripple Timeline Markers will keep markers in place when deleting clips
- Timeline > Find Current Timeline in Media Pool
- Rt-click on Stop button under Timeline viewer, uncheck “Stop and Go to Last Position”
Click on a piece of footage and it will show up in the source window to the right.
Select IN (“I) and OUT (“O”) points with the source timeline beneath it, to clear hit Alt+X
Now Edit > Insert into Project Timeline (or with shortcut F9) This will also add new clips to wherever your playhead is located.
Let’s talk about some basic navigation features. Use the ↑ and ↓ arrow keys to jump from clip to clip, and the left and right arrow keys to move the playhead forward or backward one frame at a time. If you hold shift while hitting left and right, it will move the playhead forward or backward by 1 second increments, or you can jump quickly from marker to marker by holding shift and hitting the up or down arrow keys.
While hovering over the timeline, use the scroll wheel on your mouse while holding “Ctrl” on PC or “Cmd” on Mac, to move forward or back on the timeline. While hovering over the source monitor, use the scroll wheel on your mouse to zoom in and out on the image, and click and drag the middle mouse button to pan around.
To add additional clips, select the next one from the Master window, set in and out points in the Source monitor, and either drag into Timeline or Edit > Append… (Shift+F12) to add it to the very end of the clip sequence. If you want to replace clips, you can use the Edit > Ripple Overwrite tool (or Shift+F10)
You can refine your cuts with the Trim tools:
- Ripple Edits can be performed by hovering the mouse cursor over the very end, or very beginning of a clip in the timeline and dragging.
- Roll edits can be done by placing the cursor between the clips and dragging (moves the cut point while expanding and contracting the adjacent clips simultaneously)
- Slip edits can be performed by clicking on the middle of the clip in the timeline and dragging
You can use the “Quick Export” option in the top right of the CUT page to render out something immediately without going through the EDIT or DELIVER pages
EDIT page
The Edit page is where you have the most amount of options and flexibility for fine-tuning your video editing.
This is where you’ll have more control to fine-tune your video edit. You can actually jump straight here and skip the CUT page if you want. The EDIT page is set up quite similar to Premiere:
- Media is accessed from the panel on the far left
- You can use bins or folders to organize your project files
- Source clips are previewed in the left video preview window, or monitor
- Sequence/Timeline clips are previewed in the right monitor
- The clips the Timeline is made up of are seen along the bottom
- Effects Library is in the lower left (transitions can be found here)
Along the bottom you’ll find the Timeline where all your clips are, this is where you’ll edit. To zoom in and out on the timeline you can use the “+” and “-” buttons or slider, but this can be a bit cumbersome, so instead, I suggest using the scroll wheel on the mouse while holding “Alt”. Same as in the CUT tab, if you scroll the mouse wheel while holding “Ctrl”, you’ll move forward or back on the timeline while maintaining that zoom level.
Basic editing commands and hotkeys:
- A is the selection tool, allowing you to select clips,
- but use Timeline > Selection Follows Playhead, to reduce the need for this
- B is for the razor blade tool, allowing you to make a cuts on individual clips
- N will toggle snapping
- With clip selected, Ctrl+Shift+X will ripple cut
- after which, Ctrl+Shift+V will insert paste back in the clip that was just cut
The Inspector in the upper right will be the window that gives you access to the Scale/Position/Rotation as well as Effects properties. This is essentially the same as the Effect Controls window in Premiere Pro.
To make a freeze frame of a clip, just rt-click on it and go to “Change clip speed” and check the checkbox for “Freeze frame”
You can mask off a clip using the “Cropping” attributes in the inspector if it’s just a rectangular crop you need, for more customized mask shapes, that can be done in the Fusion or Color Correction tabs.
Inspector attributes (position, zoom, cropping, etc.) can be copied by selecting and copying (Ctrl+C) the main clip and then right-clicking the target clip choosing paste attributes (Alt+V).
Text can be added through the Effects Library, just search for “Text” in the Effects Library.
If you want to add guidelines to a shot to help you with alignment, you can add a “Grid” effect, by going to Effects Library > OpenFX > Filters > ResolveFX Generate > Grid
FUSION page
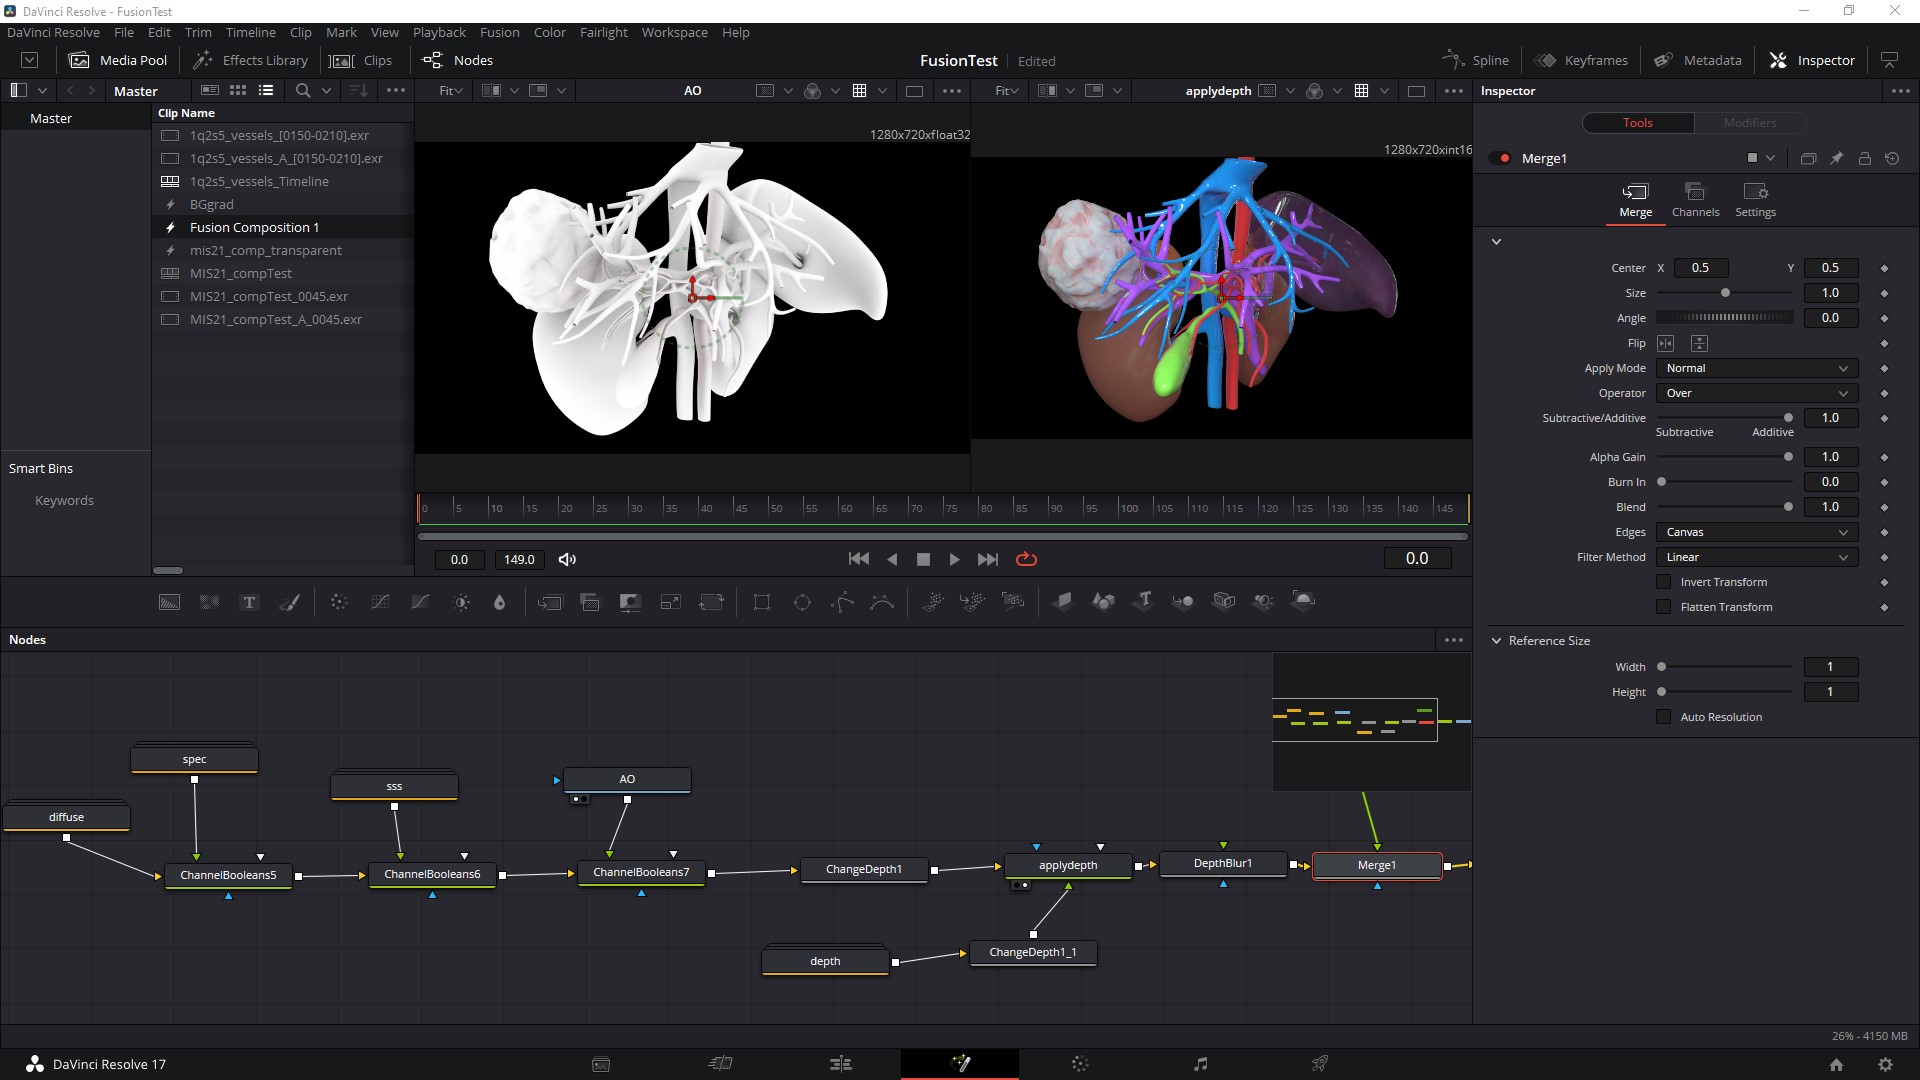
The Fusion page is actually a “lite” version of another software by Blackmagic. Fusion is a node-based compositing system that can be used for 2D or 3D graphics.
Compositing can be done in DaVinci Resolve using the Fusion tab in the workflow icons along the bottom of the UI. This is actually a “lite” version of the Fusion program, built-in to DaVinci. There is a node editor workspace along the bottom, with input and output nodes, and a toolbar along the top of the node network window. The default input node is the source footage coming in (Media#), and the default output node is the Master sequence to be rendered out (Saver). VFX and compositing can be done by adding nodes in between these two.
- Click and drag in the node network space for a marquee selection. The mouse scroll wheel will move vertically in this space.
- Use the MMB to click and drag in the node workspace to move around.
- Ctrl+Scroll wheel / Cmd+Scroll wheel will zoom in and out on your node network
- To add an Effect, go to the Effects Library > Effects > Tools in the upper left corner. This will add the node to the node tree and open its attributes in the Inspector (in the top right).
- Masks can also be found under Effects > Tools and you can select which style you want.
- A Merge node can be added to combine various effects. Merge or Channel Boolean nodes will allow you to combine render passes.
- Ctrl+Spacebar (PC) or Ctrl+Spacebar (Mac) will bring up the “Select Tool” search menu that will let you search for tools and effects, which includes access to all nodes you can add to your node tree in the Fusion workspace.
Just like Timelines for video sequences, all your compositing work in Fusion will be saved to a comp. The first item you drag into the Fusion workspace will determine the name of the comp, or you can create it from scratch by rt-clicking in the Media Pool and selecting “New Fusion Composition”.
COLOR page
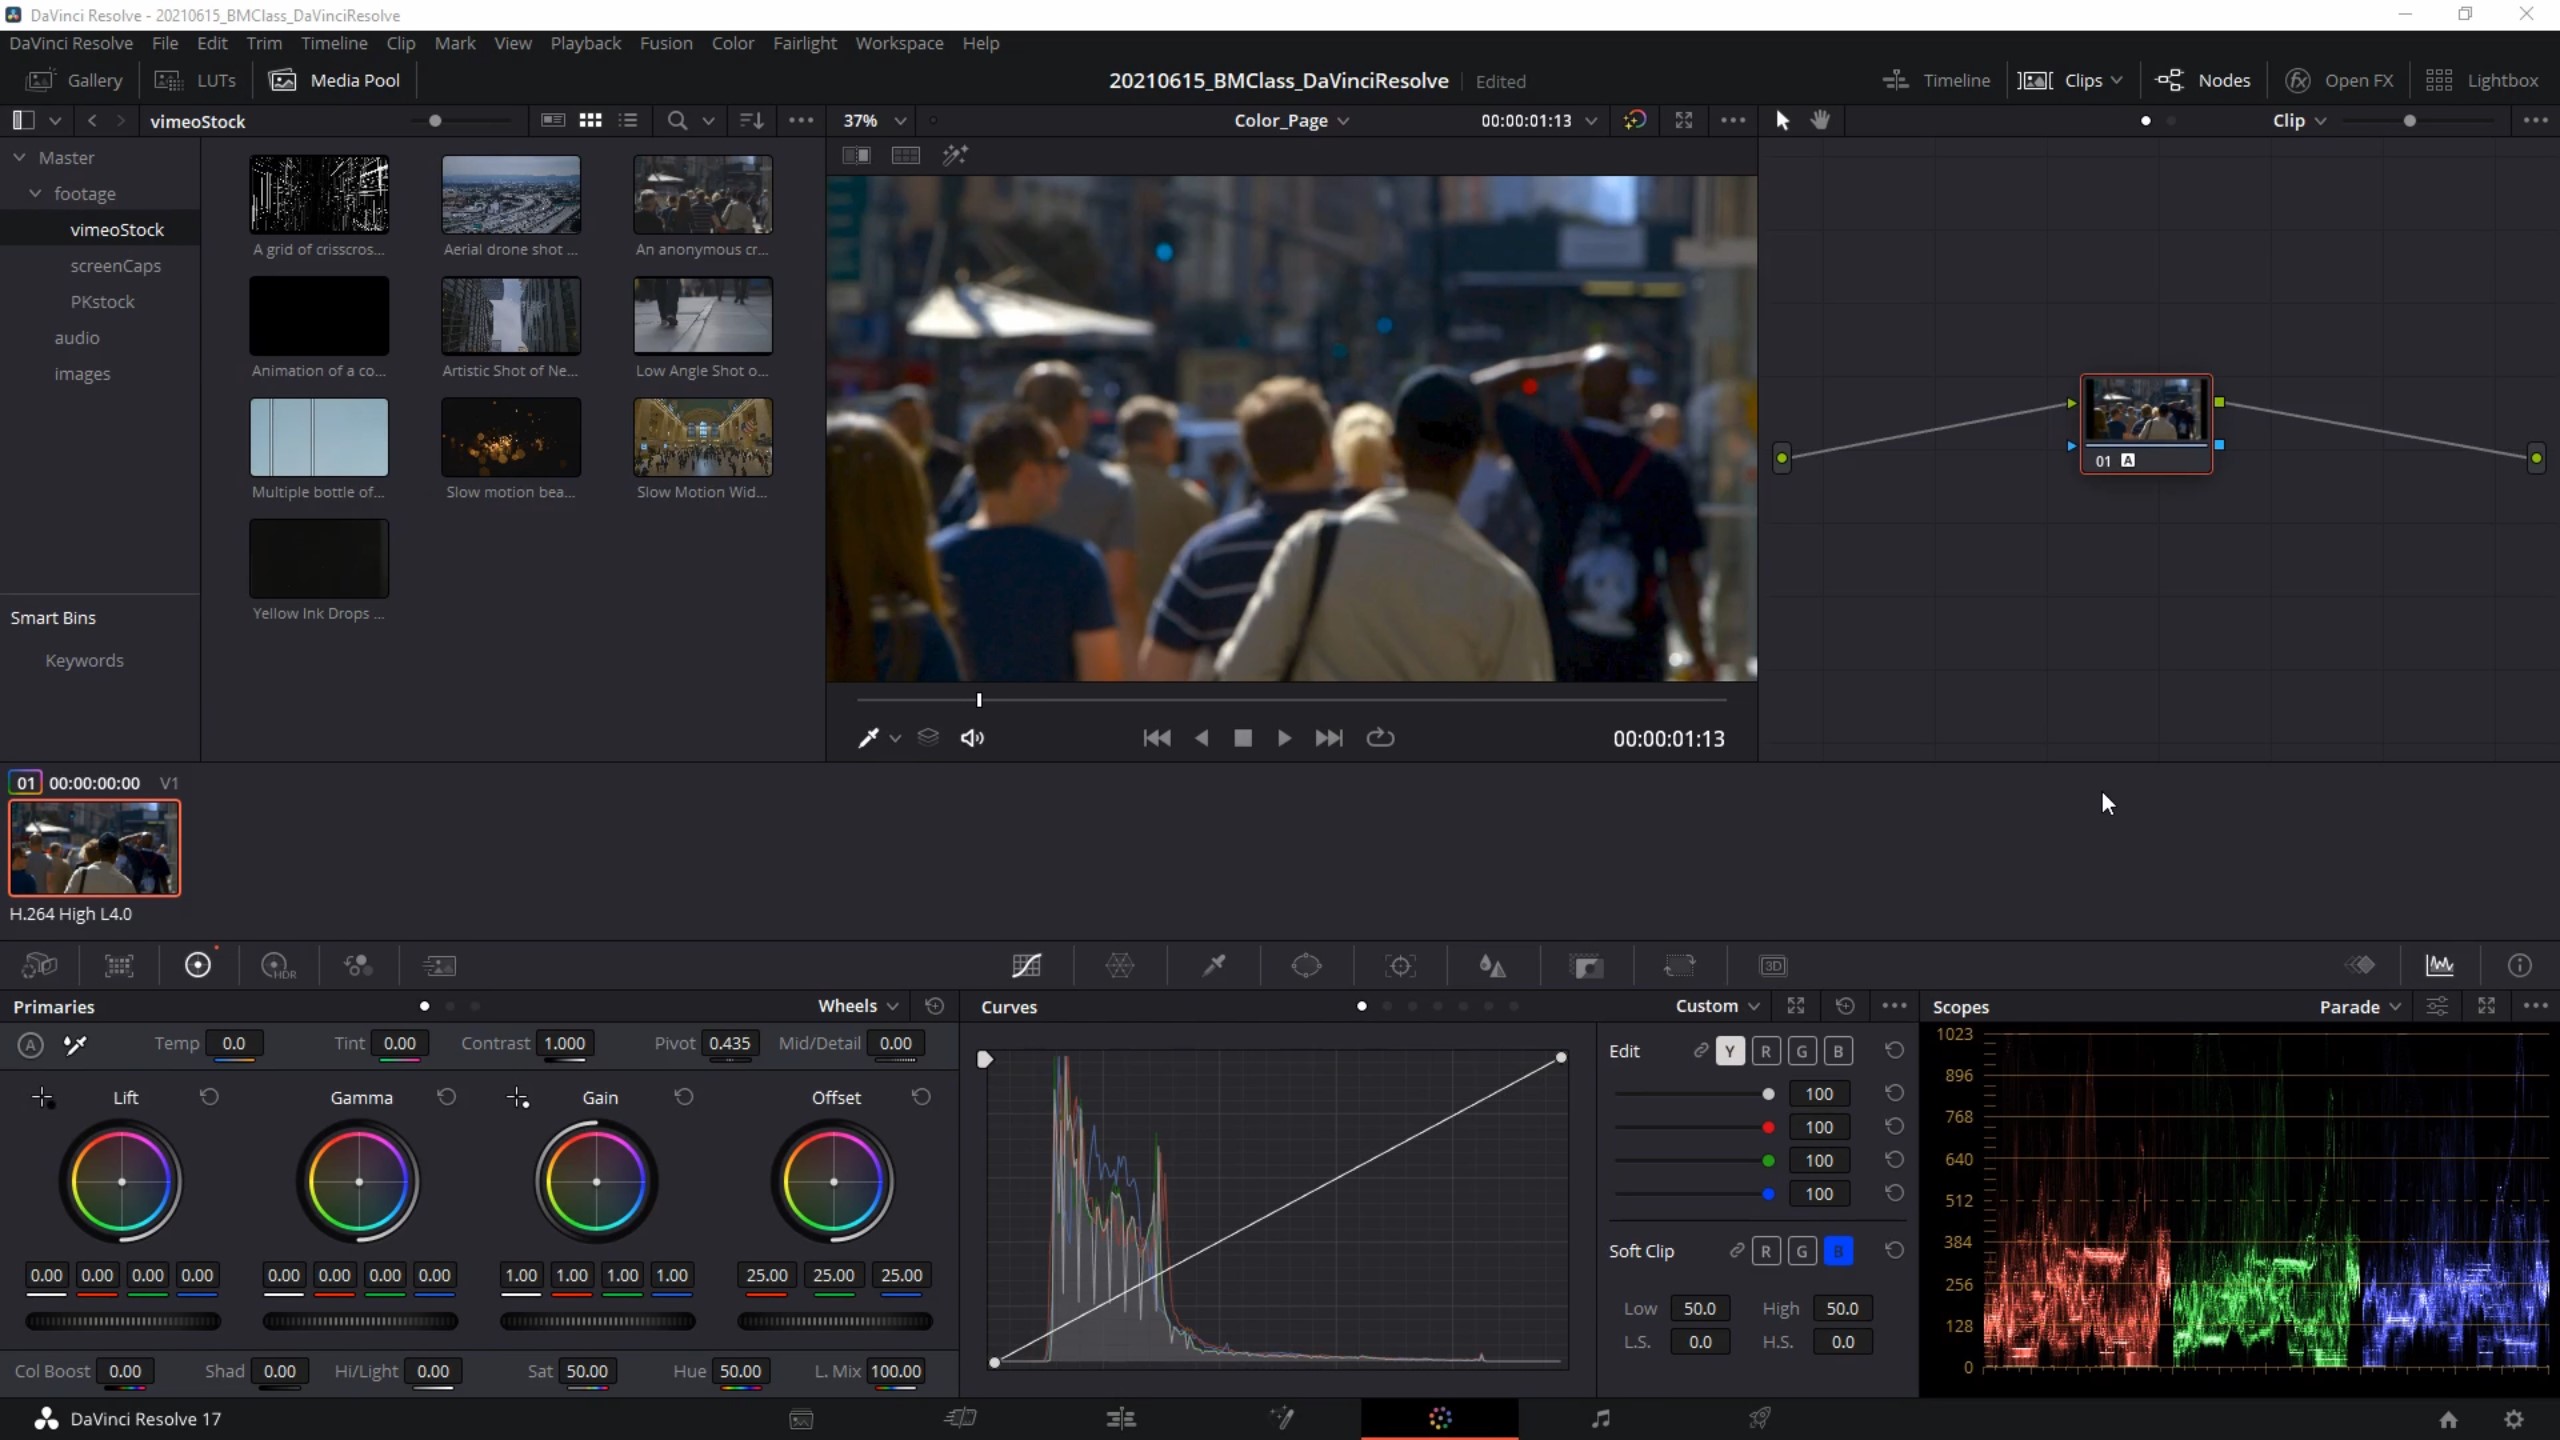
DaVinci Resolve is actually best known for its robust colour grading and editing features. Colour corrections and grading can make a big difference in the final look and feel of your video.
Here is where you’ll do your colour correction and colour grading. What’s the difference?
Colour correcting is adjusting source footage to closely match how those colours actually appeared in life. This usually involves fixing the white balance, but it can also include bumping up the contrast and similar lightness/brightness adjustments.
Colour grading is applying a set of adjustments synced across multiple clips to create a “look” and “feel” that is usually intended to add an emotional aspect to the video for storytelling. For example, a warm tone for pleasant scenes, bluish tones for depressing scenes, etc.
Your project sequence will show up in the upper left, and the Color Grading node tree in the upper right. Each node is a set of effects applied to the active clip, you can add new nodes by hitting Alt+S. You can think of each node as an adjustment layer in After Effects. You’re working non-destructively here, you can always get back to your original input by toggling off an individual node’s effects by clicking on the number underneath it, toggling off all the nodes by clicking on the “Bypass” button above the viewport, Rt-clicking on a node to reset it, or deleting nodes if you want. To solo a node, hit Shift+H to highlight it.
All clips in the project will be represented as thumbnails in a horizontal strip across the middle of the interface, and beneath that in the bottom section is where you’ll find all the colour tools.
Resolve uses these terms for colour grading: HUE, SATURATION, and LUMA (for brightness)
–Still frames
Here in the color page you can export still frames from your footage. To save a still frame just Rt-click the video in the viewport and select “Grab still”. This will now save the frame in the Gallery, which can be accessed in the top left of the UI. Rt-click on the saved still, and go to “Export” and select file type.
Here is a recommended workflow for colour correction:
- Correct exposure (rich colours, no blown out speculars or crushed blacks)
- Fix white balance (orange-blue colour temperature)
- Adjust saturation
To use the Color Wheels, the slider along the bottom will adjust the exposure, and the pucks in the middle adjust the hue.
Lift = Shadows or darker areas
Gamma = Midtones
Gain = Highlights or brightest areas
Offset = Entire image correction, not used often
–Scopes
Hopefully you’re familiar with using a histogram in Photoshop to see the range of values in an image. In video editing they display color information for video in a variety of graph formats known as a Scopes, and an RGB histogram is one of these. In the lower right corner of the color page you can select different scope types, let’s select the “Parade view” and we’ll see how the RGB pixel values are distributed for our video. If you scrub your video you’ll see that this updates for every frame. Let’s switch to the “Waveform” view to see R G and B overlaid on top of each other.
–Correct exposure
For the first step of correcting exposure, we can use the Waveform Scope as a guide, and pull down the Lift exposure slider until the bottom of the waveform in the scope sits right above zero. Then increase the Gain until the peaks of the waveform reach just below the top. Then pull down the Gamma to adjust the overall image brightness and contrast.
–Fix white balance
Look at where the Blue trace is in relation to the R and G in the Waveform scope. Look for something white in the frame of the video. Using the eyedropper found in the very bottom left corner, click on the area of pure white in the footage and wherever you have neutrals in your RGB channels, you should see an even overlap.
Next to this eyedropper along the bottom left of the COLOR page, is a set of sliders:
Temperature, Tint, Contrast, Pivot, and Mid/Detail.
As mentioned, Temperature adjusts the orange vs blue colour shift, while Tint adjusts the green vs magenta color shift.
Contrast and Pivot work together. Contrast will increase or decrease the degree of difference between dark and light values, and Pivot will change where along the brightness scale the contrast effect is applied.
The Mid/Detail slider adds sharpness or blur to the overall image.
Along the bottom of the color wheels we have adjustment controls for Color Boost, Shadow boost, Hi/Lights boost, Saturation, Hue, and Luma Mix. You can play around with these sliders to see how they work.
Here’s a good point to go over to our Scopes window and check out the Vectorscope view. As we make adjustments, we see the pixels in our image represented here. The centre represents colours that are completely mixed to produce pure white, and as we go out from the centre of the scope we see pixels that are gravitating towards specific colours. This method of measuring how your adjustments are changing the way colors are represented is so powerful, professional video editors and color graders sometimes have dedicated screens just for their Vectorscopes, so they can see this information in precise detail.
As you move to other clips and want to apply the same colour settings, go to the clip with the settings you want, rt-click and select “Grab Still”, to add it to the Gallery. Open up the Gallery and with the un-corrected clip selected, right-click on the still and select “Apply Grade”
–Color matching
Click on Gallery, then with selected clips highlighted, change to split screen view in upper right of the Source window and change the dropdown to Selected Clips.
Ctrl or Cmd click on other thumbnails to bring them up in the Selected Clips Preview window.
Selected clips shown side-by-side in the preview window will also show up side-by-side in the Waveform. Here is where the Offset slider will help move an entire image waveform in line with another clip so their colors match.
To correct specific portions of a clip, add a new node by Rt-clicking on the source node in the tree and selecting Add Node > Add Serial
A useful tool for secondary color corrections is the HueVsHue curve which can be selected at the bottom of the COLOR page in the Curves section. Click points on to the line through the middle of the color spectrum and pull them up and down to adjust those colour values.
You can also mask any colour correction by going to the Window panel, which swaps out for the Curves panel. The next panel over is the Track panel, which will allow you to have your mask track with the footage.
HSL Qualifier Tool
is an additional node you can add in the color grading node tree that will act as a colour screen.
Add a new Serial Node and go to the Qualifier panel, then use the colour picker to select the colour for your key, and use the HSL sliders to further refine it, then finally the Matte Finesse tools.
If you right-click on nodes in the COLOR page node tree, you can “Save as Shared Node” (then name it). Now copy w Cmd/Ctrl+C, Add a new node to other clips with Optn/Alt+S, and paste it with Cmd/Ctrl+V. If you want to apply a change to this shared node and have it show up on all other instances, be sure to Rt-click on the node first and select “Lock node” to unlock it first. Then make your change and it will be propagated across all the shared nodes.
Creating a custom look
Select all clips in thumbnail strip using shift, then rt-click and select Add to New Group
Change drop-down in the upper right of the Node Tree window from “clip” to “Group Post-Clip”
The changes made to the Group node tree will affect all the clips in that group
- Name the first node “Contrast” and adjust the main image Curve shape
- Add another Serial node and name it “Teal”, by pulling down the puck in the Offset color wheel
- Rt-click on the Teal node and Add a Parallel node, this time naming it “Skin Tones”. Go to HueVsSat Curve, use eyedropper to select skin tone colour from the footage, which will add points to the spectrum curve that isolate that colour range. Drag up the middle point to increase saturation of skin tones without affecting anything else.
Lum vs Sat curve will allow you to affect the saturation for a specific part of the tonal range.
FAIRLIGHT (Audio) page
The Fairlight page is where you’ll do your audio editing in DaVinci Resolve. You can even record audio directly into your video project here.
Fairlight is the audio processing workstation of DaVinci Resolve. Simple audio controls like level adjustments can be done in the Edit page, but in Fairlight you have high end audio finishing and mastering. Note that the Effects panel in the upper left will have a different set of Effects specifically for audio.
TIP: You can reset any “knob” controller for audio controls to its default setting by double-clicking it.
You can record directly into Resolve.
- Go to the Fairlight page and rt-click in the left-hand vertical bar where audio tracks are listed, go to Add Track > Mono. Note the Audio track #, it will probably be 2 if you already have an existing video clip in the project. Now click on this new audio track to activate it.
- Navigate to the Mixer on the far right and select your input (Mic), Mixer > A2 > Input > Input…
- Patch the input to your audio track in the “Patch Input/Output” pop-up window. Find the recognized input sources along the left side, set the destination (A2) along the right side, then click “Patch” at the bottom of the window and then close it.
- Hit the “R” button on the far left under the “Audio” options to arm the track
- Hit the Record button along the top of the UI to start recording and a new audio file will be created.
Similar to the EDIT page, Crtl+B will cut your track, the navigation tools work the same as well.
Normalizing Audio (This doesn’t need to be done in Fairlight)
For dialog/voiceover/narration, you want roughly -10 dBFS (Decibels Full Scale, where max point is zero, so values should be negative)
In the Edit tab, open the Mixer (icon located in top right of UI). With the mixer open, as you scrub through your edit you will see the audio levels bouncing in the mixer, and wherever it jumps past -10 it will go from yellow to red–that’s where the audio will be heard as too loud. Wherever you see the audio level in green will be heard as too quiet.
Highlight all clips, rt-click and go to “Normalize Audio Levels…” Leave the “Normalization Mode” on default, set dBFS to -10, and then for “Set Level” try both “Relative” or “Independent” and see which gives you better results.
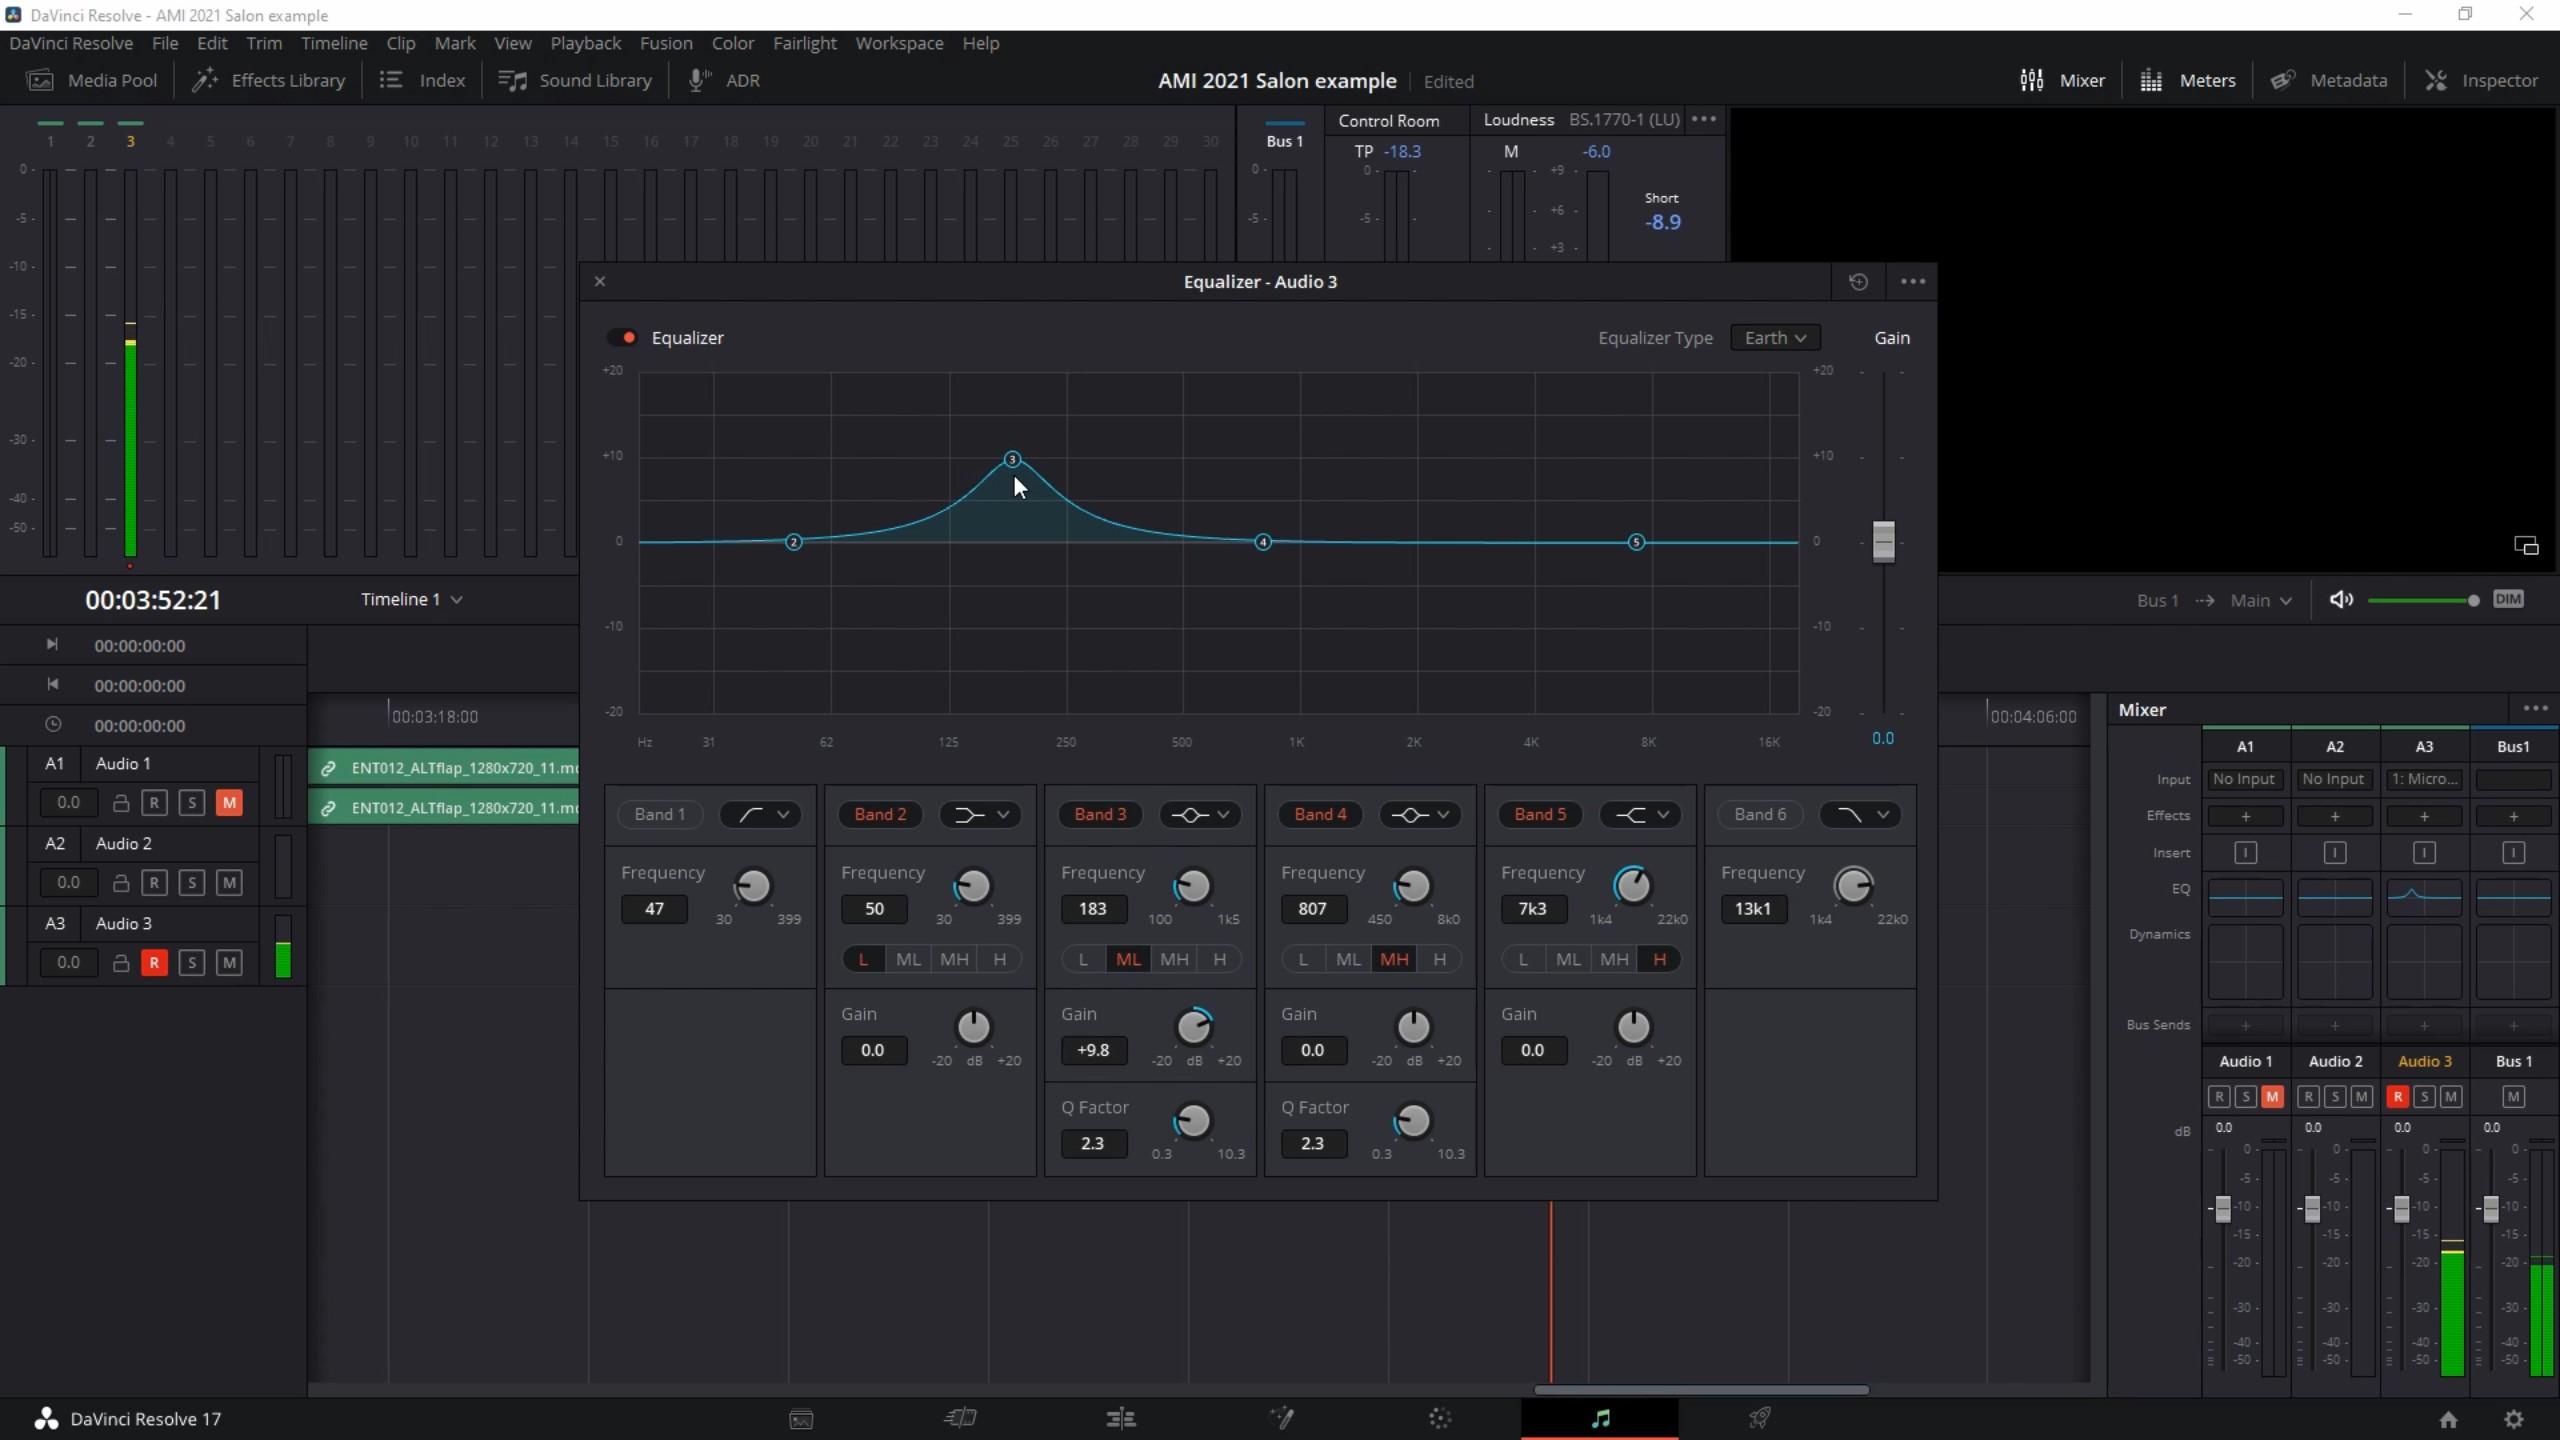
In the Fairlight tab, navigate to your Mixer on the right hand side, and click the teal line next to “EQ” for the audio stream you want to equalize. A window will pop up.
First we’ll remove the super low frequency sounds with a high pass filter. Click on the “Band 1” button on the left of the window, which will add a new control point, and turn the knob to ~100 Hz (depending on source audio perhaps even to 120 Hz. Playback to ensure voice audio doesn’t sound “tinny”). This will eliminate low rumbles, hums, etc. from the audio.
Now we’ll remove the super high frequency sounds with a low pass filter. Click on the “Band 6” button on the left of the window, which will add a new control point, and turn the knob to ~13k Hz (there will not likely be useful voice sounds above that frequency). This will eliminate high pitch sounds from the audio.
Click on the “X” in the upper left corner of the Equalizer window to exit.
Now in the right hand Mixer tab, beneath the EQ, click the box for the Dynamic Equalizer and a new window will pop up. The only thing to concern yourself with at this stage is the “Compressor” in the middle bottom of the window. Click on the “Compressor” button so it turns red.
The Threshold control will determine the level at which the compression affects the audio. If it’s set at “0” it will have no effect. The Ratio determines how much the audio gets reduced. The higher the Ratio value, the more the loudest audio gets reduced.
Threshold and Ratio are the key attributes to tweak, and the amounts to use differ in every situation.
Remove Background Noise
There are a few different approaches you can use to remove background noise from audio.
In Fairlight with Mixer open, Look for “Effects” on the right-hand menu, beneath “Input” and above “EQ”. Click the “+” icon for the audio stream you want to apply the effect to and go to Noise Reduction.
You can try out “Auto Speech Mode” or use “Manual”. With Manual selected, you’ll have to click the “Learn” button for DaVinci to find background noise to eliminate.
In the right hand Mixer tab, beneath the EQ, click the box for the Dynamic Equalizer and a new window will pop up. In the bottom left panel, click on “Gate” so that it turns red. A gate is a level at which anything below is reduced. Try adjusting the Threshold and Range knobs for the Gate and see if you can eliminate the noise.
Alternatively, you can also try the Equalizer. With a clip of the audio looping, try dragging the Band points one at a time to see if you can isolate the frequency where the noise is and take it out.
DELIVER page
The Fairlight page is where you’ll do your audio editing in DaVinci Resolve. You can even record audio directly into your video project here.
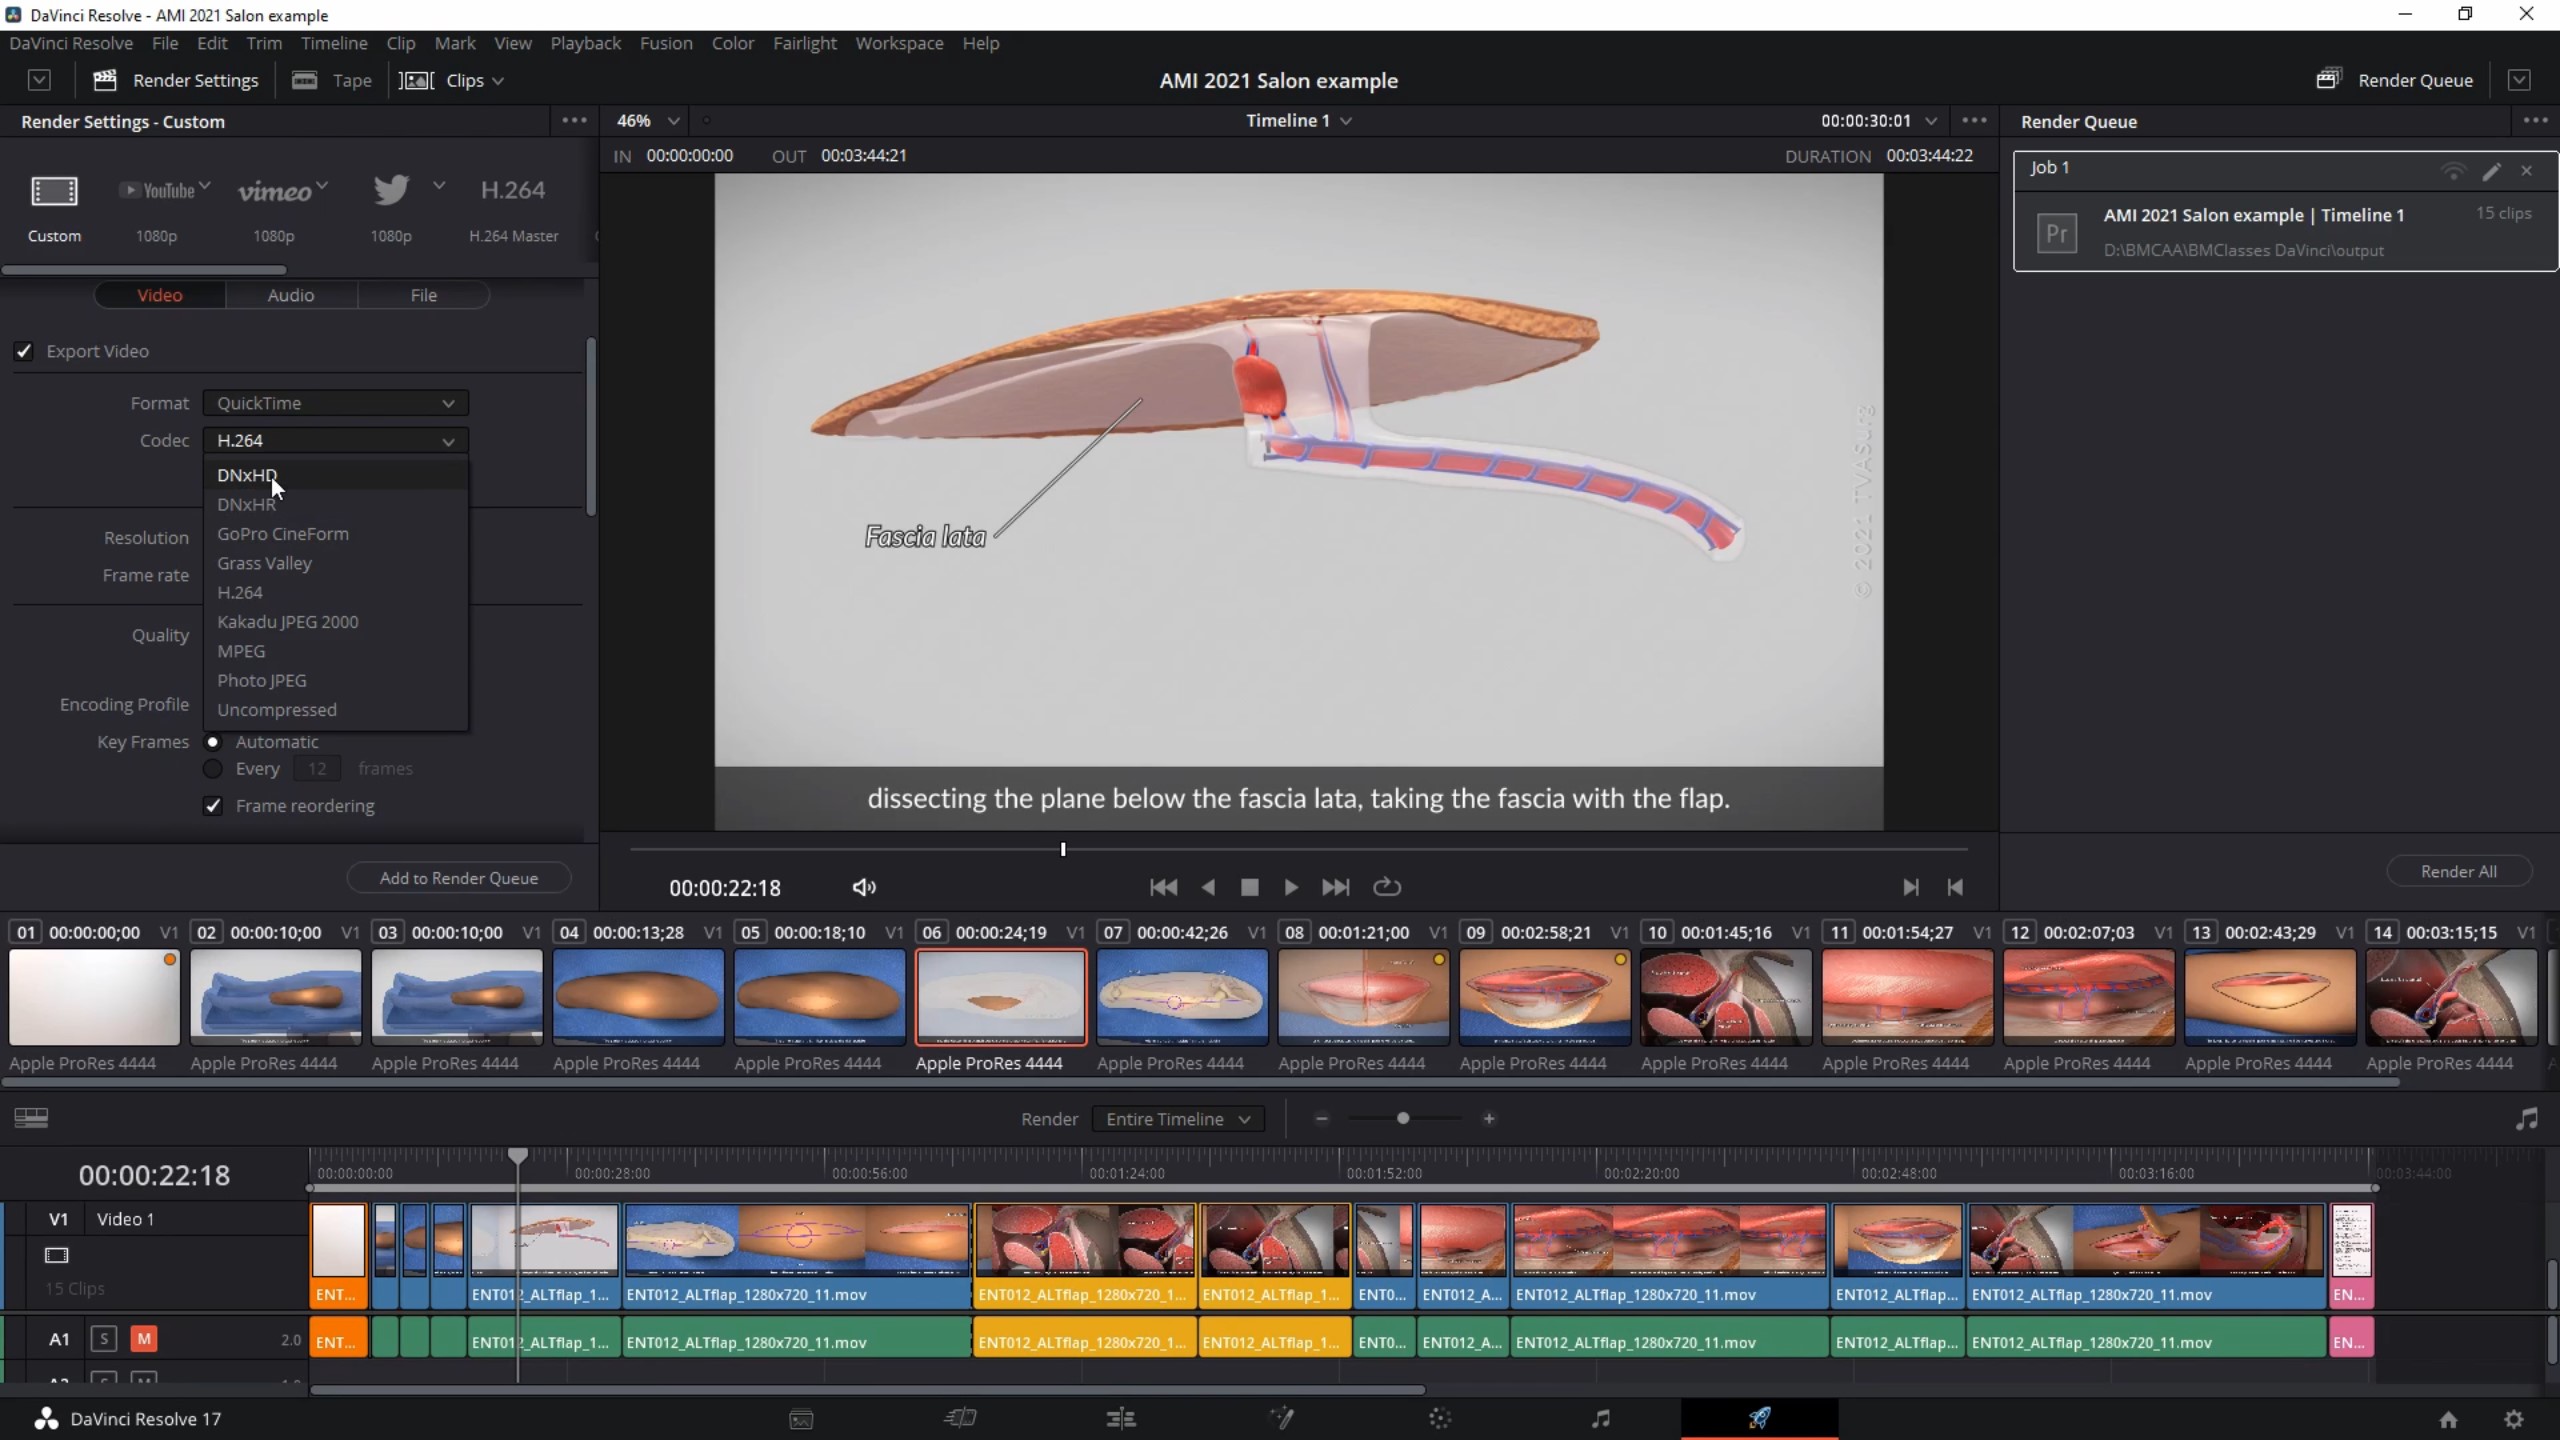
Time to render out your final. The Deliver page has four sections:
- Render Settings
- Viewport
- Timeline
- Render Queue
here we’ll just cover the render settings since the other sections are self-explanatory.
Render Settings
There are several presets you can use for YouTube, Vimeo, and also presets for making files to be used in other software.
- Select the name and destination for your video.
- Set the codec and format. If you render to MP4 you can only use h.264 codec, but if you select QuickTime, you’ll have more codec options.
- DNxHD is the PC-equivalent of Apple ProRes 422 (only for 1280×720 or 1920×1080 formats), DNxHR is newer and is what you’d use to render out 4K. Either is fine and can be used with the Quicktime format, giving you a lossless .mov file
One checkbox you may want to always click on is to “Use optimized media”. This will ensure that all clips in your timeline are rendered out at the maximum resolution available.
Set your resolution and in some cases framerate, but your framerate may be limited by your Timeline framerate or the Format and Codecs you’ve chosen. It’s recommended to not make these changes here unless you have to because if you’re converting frame rates in the rendering phase, that’s extra calculations that can result in glitches or crashes, or just take a lot longer.
You can also export subtitles as SRT files, and you can adjust the Audio settings if you need to.
Click “Add to Render Queue”, then in Queue window, click “Start Render”. If you’re rendering straight to MP4, 720p, DaVinci Renders super quick. It’s really impressive.
SHARING
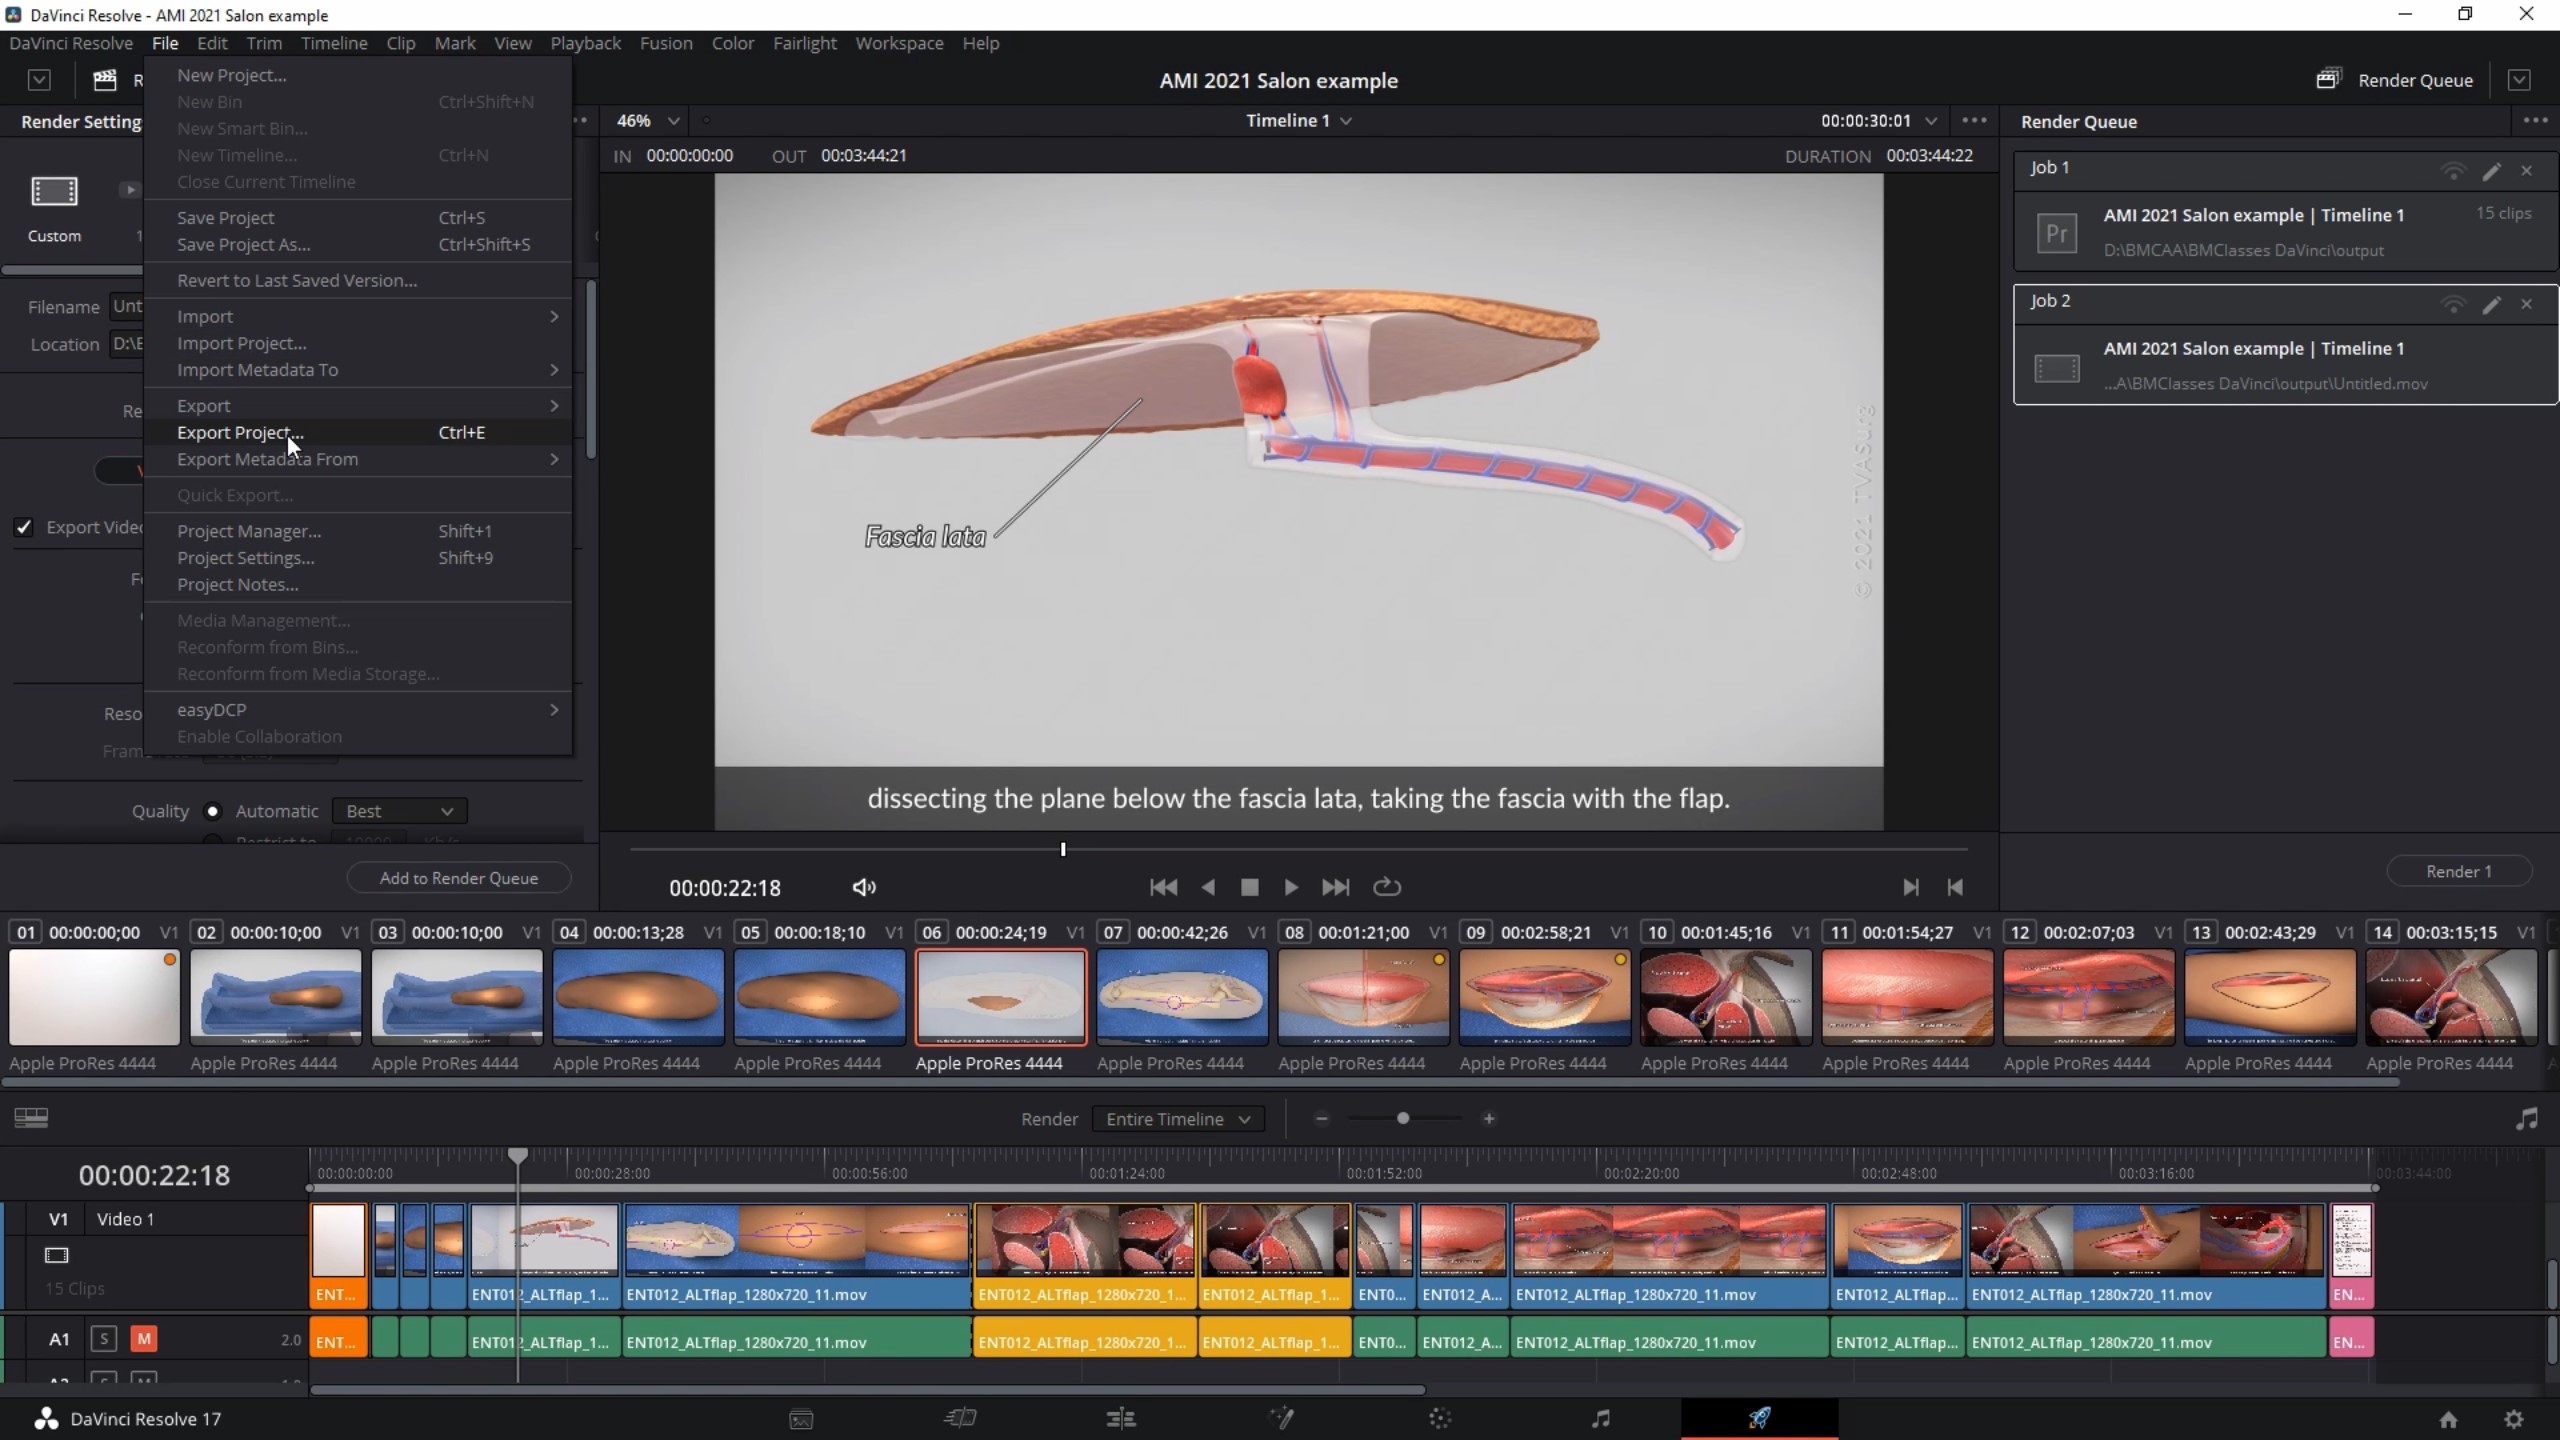
Most projects are saved within DaVinci Resolve’s internal folder structure, so you don’t need to worry about individual production files, but if you need them they can be exported for moving to another workstation or sharing with colleagues.
Resolve is unlike other programs in that it stores all project files in an internal database. Hit Shift+1 to bring up the Project Manager window here. Here’s all your projects. Now technically you can find these files if you navigate through a maze of hidden folders but they hide these for a reason. If you mess around with these files you can break DaVinci and have to re-install the software so don’t do that.
If you have to move your project to another computer you can still produce a file if you have to. Go to File > Export Project to export the project to a DRP (DaVinci Resolve Project) or Export > Timeline to create a DRT (DaVinci Resolve Timeline) file.
When opening on a new DaVinci workstation, simply go to File > Import and select the DRP or DRT file. You’ll have to have the project assets in a matching folder structure and re-link them.
To re-link assets (they’ll be shown with red icons in the Media Pool), Rt-click on them and select “Relink Selected Clips…) at the bottom of the menu.
That works fine if you just have one link that’s broken, but for multiple files that are located in the same place, you don’t want to re-link each one at a time. So to relink a whole set of missing clips, select them all, Rt-click and go to Change Source Folder…
If you want to transfer over a project to Premiere, you can select the Premiere XML tab in the Render Settings. This will render it out as a single clip or as separate video files for each clip in my timeline, that way you can re-build the project in Premiere using the exported media and included XML file.
To import a project into DaVinci from Premiere, in PP go to File > Export > Final Cut Pro XML.
Thanks for reading! If you’d like to get deeper into learning DaVinci Resolve, one of the best resources out there is a fellow named Alex Jordan who has the site FilmSimplified.com. I’ve also learned a lot of DaVinci Resolve tricks from Casey Ferris, much of the Fusion compositing I picked up from Branden Arc (one of the friendliest, happiest youtubers I’ve ever encountered btw), and for general video editing knowledge check out Kelsey Brannan, aka Premiere Gal. Specific video references have also been linked to the section headings throughout this blog post.
As always, stay safe.
The TVASurg team

