
DaVinci Resolve by Blackmagic is a fantastic video editing application that's completely FREE!!
We've shown an overview of our process on using DaVinci Resolve for surgical video production in a past blog, and recently released a video presentation we gave at the Association of Medical Illustrators on using education and design principles in our videos. In this month's blog and accompanying video tutorial, we're going to focus on one of the most critical elements in educational videos--TEXT. You can click the video thumbnail below to watch the tutorial:
Adding text in the form of labels and captions to accompany audio narration in educational videos is a must. People learn in different ways. Some are more visual learners while others prefer to listen. Some prefer to read while others prefer to watch and absorb. By providing the same information through multiple sensory inputs, you are maximizing the impact on a large audience.
Captions and labels also allow people to learn the information if they are watching the video somewhere where they can’t play audio, if they are hearing impaired, or if they want to scrub through the video where narration would then be disabled or inaudible.

A subtitle track can be added to a Timeline in DaVinci Resolve by rt-clicking on the Timeline at the bottom of the UI when in the Edit page.

"Add subtitle track" > "Add subtitle" and a new caption will be added to the subtitle track.

The content of the subtitle can be updated in the Inspector panel in the upper right of the UI.
SUBTITLES/CAPTIONS
Text captions can be easily added in DaVinci Resolve with pre-made effects.
- In your DaVinci project, once you have a Timeline to work on, you can add text captions by Rt-clicking on the space where Video 1 and Audio 1 are listed to the left of where your clips are, or will be.
- Select “Add Subtitle Track” and a new track will be added above Video 1. Rt-click in the empty space and select the only option “Add Subtitle”
- Now in the top right of the UI in the Inspector, you can change the text of the subtitle.
- To change the position of the text, click on the “Style” tab to the right of the “Caption” tab in the Inspector.
- Here we can adjust the font and appearance as well as the position. Go to Transform > Position and adjust the X and Y values to your liking.
- If you find your text is cutting off and wrapping to a second line prematurely, you can change the character limit per line by clicking the gear icon in the lower right and going to the "Subtitles" menu.
- The Drop Shadow effect can be helpful to have your text stand out against any color background. Switch it on and adjust the Offset parameters to see it–you can also change the blur radius and opacity.
- In our videos we’ve found that often you can’t always predict how light or dark the footage behind the text will be, and in our content we often have the full value range during the course of a video, so adding a caption bar behind the text ensures it always stands out. To add this in DaVinci Resolve, check on the “Background” parameter.
- Adjust the width and height sliders, and other sliders as well if you want to really customize the appearance.
- Lastly, adjust the opacity as well.
- When you want to add the next caption, you can either stretch out the first one and cut it using the Blade tool (B) or the keyboard shortcut (Ctrl+B on PC), and then change the text content in the new subtitle clip.
- When your project is ready to export, in the Delivery tab, make sure you remember to check on the “Export Subtitle” option, and set the Format to “Burn into Video”. While it’s annoying you have to remember to do this every time you export, it’s also pretty cool that DaVinci Resolve automatically gives you the option here of turning off or exporting the captions instead to a sidecar file like an SRT, because this means that with this Export Subtitle option, you can turn off captions for the entire video with one click!
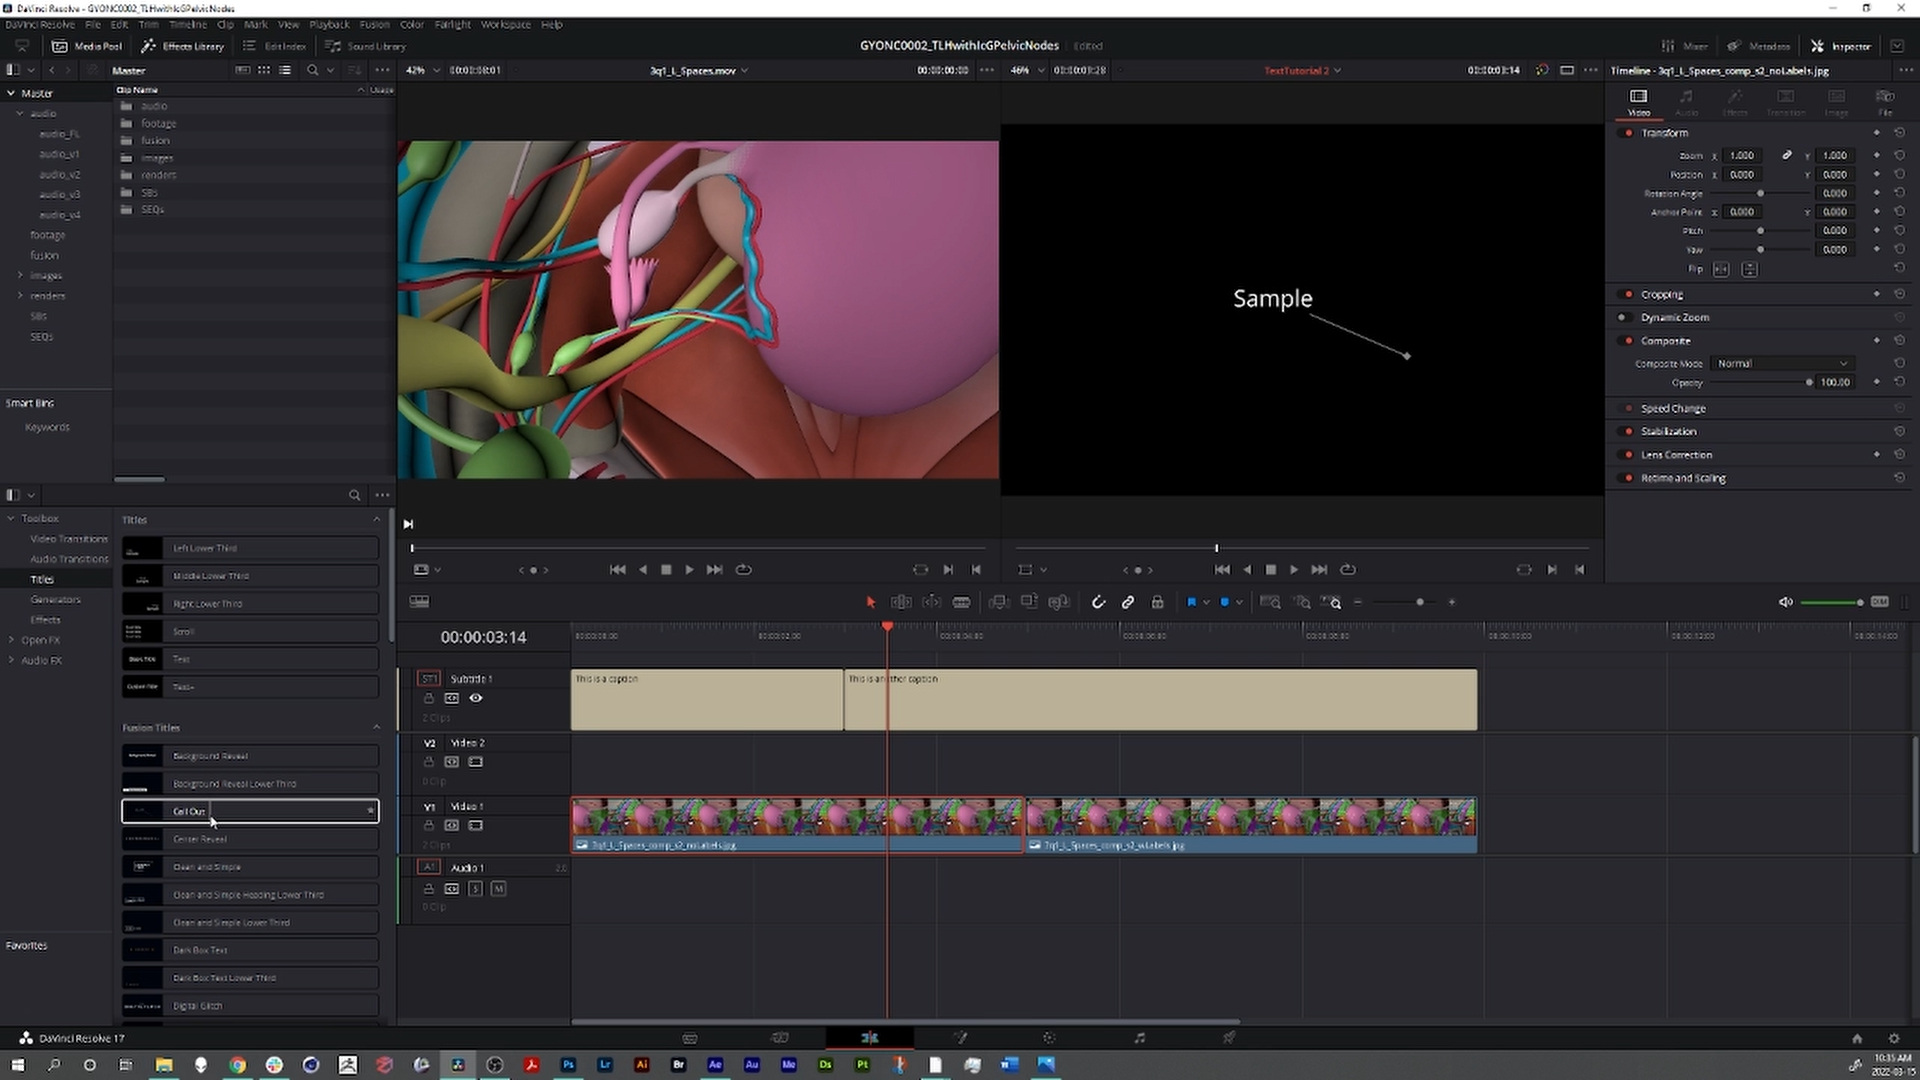
Several text presets for titles and labels can be found in the Effects Library of DaVinci Resolve.
CALLOUT LABELS
There are two great tutorials out there I’ll recommend for setting up labels (see references below, they’re the ones with asterisks), these tutorials describe how to build labels from scratch, so check them out if you want maximum control over the look and feel of your text elements.
Here’s the simplest way I’ve found to set up labels that skips some of the steps from those tutorials.
- Rt-click on the Timeline and make a new track, similar for subtitles but this one is just an empty track. So hover over the left-hand side of your Timeline and Rt-click, then select “Add Track”
- Now, in the upper left of your UI, click on the tab for “Effects Library” if it's not already active.
- In the Effects Library, navigate to Toolbox > Titles > Fusion Titles
- Select the “Call Out”. If you double-click this it will insert it into your Timeline, but it might not go to the right track, so click and drag instead to get exact placement.
- Hover the playhead over the “Call Out” and go to the Fusion tab. This is important to remember for later. Whenever you click the Fusion tab in DaVinci Resolve, it will open up the Fusion nodes for whatever element is in the top-most track your playhead is over.
- Click on the “Call Out” node and you’ll see a bunch of options open up in the Inspector along the right side of the UI.
- Adjust the font type and size, tracking, etc.
- Next adjust the position of the text in relation to the leader line. Use the "V Anchor" and "H Anchor" controls to do so.
- Next we can change the label’s position on the screen with the “Text Position” controls, and the end of the leader line with the “Line Position” controls.
- The default leader line is kind of ugly, so adjust it’s color and the appearance of the dot at the end with the Line > Color swatch and Line > Point Corners/Rotation controls.
To add multiple labels, duplicate the callout text node in the Fusion page of DaVinci Resolve.
MULTIPLE LABELS
Unfortunately we’ve lost quite a bit of control here for the label. How do we get back to all those attributes we had for the Call Out? And what if we want to add multiple labels? For this we need to back-track a little, because right now in our node space we have these MediaIn nodes for both the footage and the Call Out, and we can’t “open” those up or change their parameters. So let’s go back to the Timeline and un-do what we’ve done.
- In order to combine the Call Out label with the footage clip and retain all those controls, we’re going to copy and paste the Call Out node network into a Fusion Clip with the footage.
- Selecting only the footage this time, make a new Fusion Clip.
- Making sure our playhead is hovering over the Call Out, go to the Fusion tab, and select the Call Out node and copy it.
- Go back to the Timeline, move the playhead so it’s hovering only over the Fusion Clip, go to the Fusion tab and paste the Call Out node into the node space for the Fusion Clip.
- While holding shift, click and drag the Call Out node to the line connecting the MediaIn node to the MediaOut node, and the Call Out will be inserted with a Merge node. You can try to do this manually by adding a merge node first, but I found that doesn’t always work (sometimes the culprit is the order the nodes are being Merged in, which I’ll explain in a sec). Fusion can be glitchy sometimes, which is why it’s good to know multiple ways to achieve the same end.
- Now when we select the CallOut node, all our controls are available.
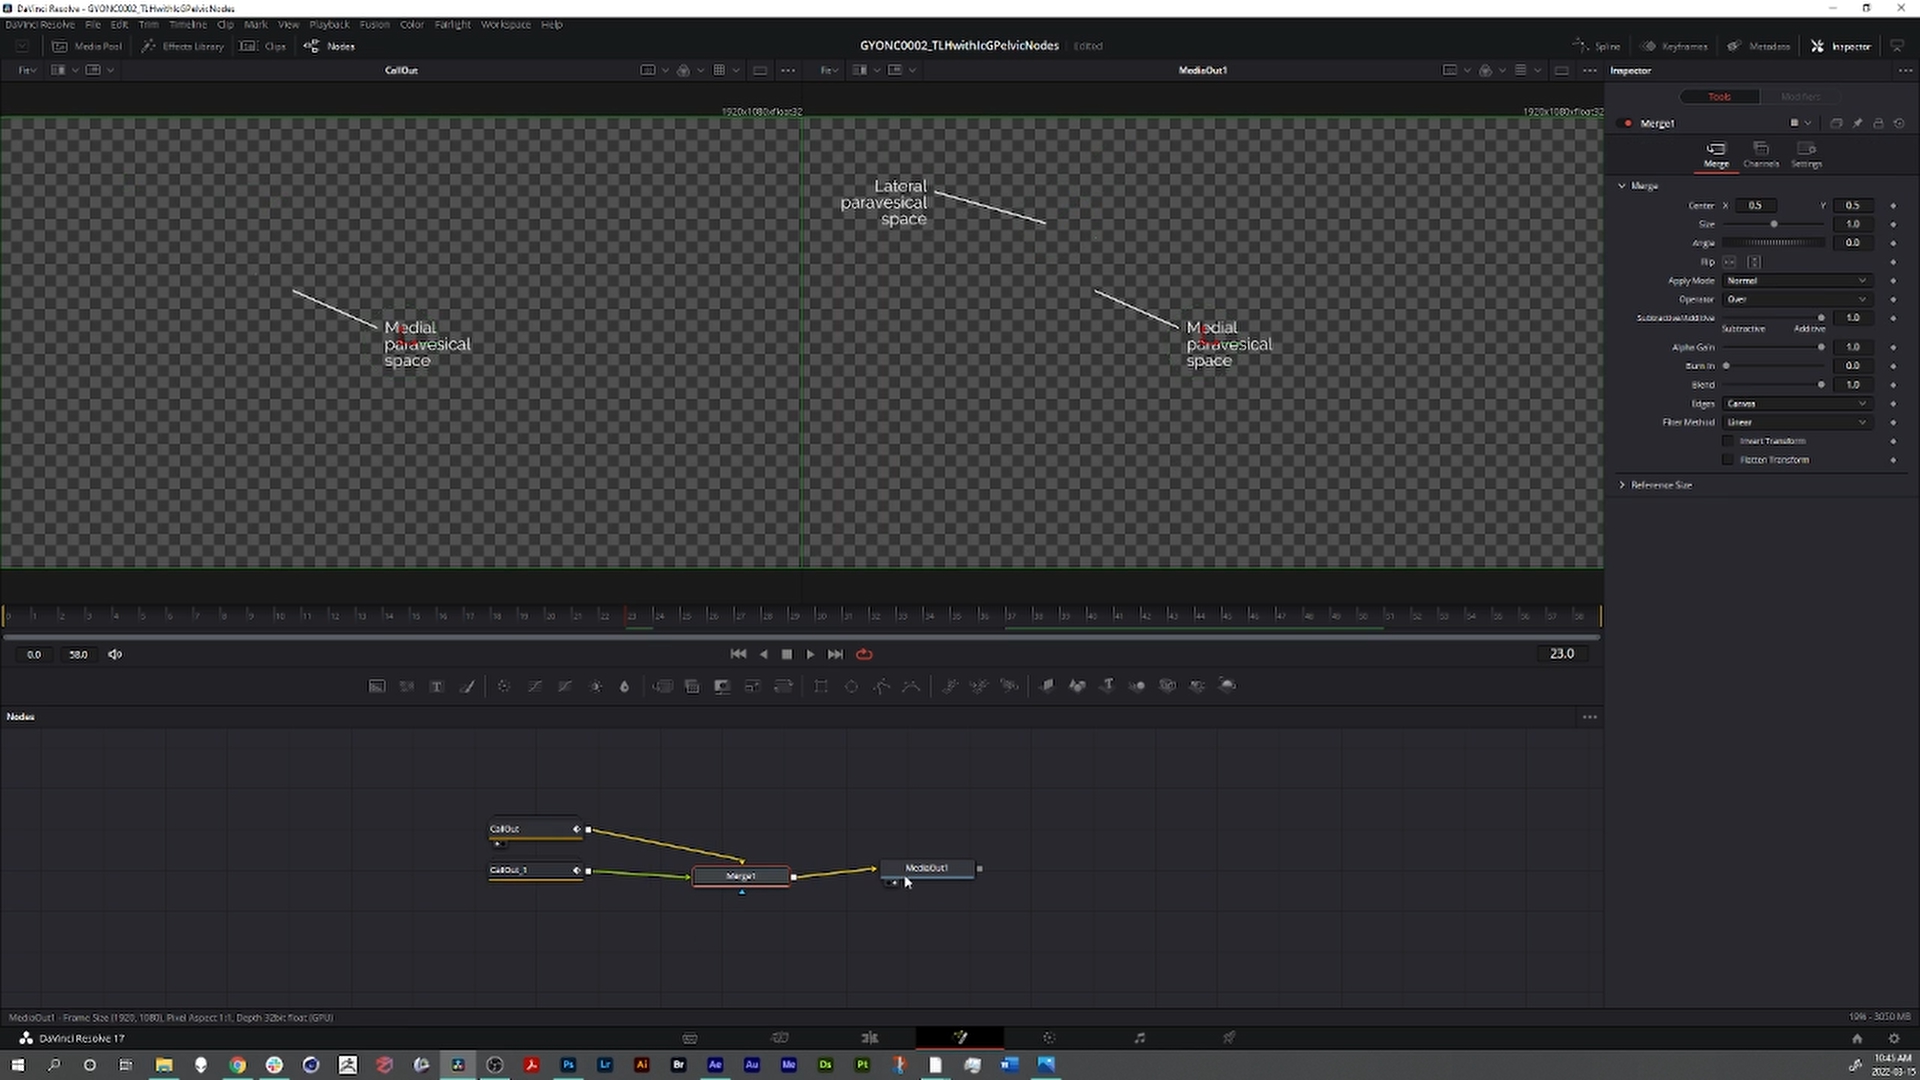
- To add more labels to the shot, copy and paste the Call Out node and it should come with a Merge node, then holding shift insert the Merge node between the first Merge node and the MediaOut. Rinse and repeat as needed.

By creating a Fusion Clip we can combine nodes from several sources, giving maximum control over editing.
FUSION CLIPS
So now we’ve got multiple labels set up, but they're just floating on a checkerboard background. How do we see our footage so we can see where we want to place our labels within the composition? For that we go back to the main Timeline, where we see the text labels and footage combined. However, the "Call Out" controls in the Inspector only change one label-we’ve lost the controls for the other label(s). The problem is that the “Call Out” features are adjusted only in the Fusion workspace, and when we enter the Fusion workspace, we’ve entered the “Call Out” clip alone, it’s not attached to the footage yet. So let’s do that.
- What we need to do is make a Fusion Clip that will combine the footage and the Call Out node, sort of like a precomp in AE or a nested sequence in Premiere.
- In your Timeline, select just the footage clip (not the Call Out sitting on top of it), and Rt-click and select “New Fusion Clip”
- Note that once you’ve made the Fusion Clip, it’s duration will be locked to whatever the source footage was, so set your in and out point of the clip first. If you Rt-click and select “Change Clip Duration” or hit Ctrl+D, you’ll get options to change it, but this only works in reducing the length of the clip, not extending it which is a bummer.
- Also, I HIGHLY RECOMMEND RENAMING THE FUSION CLIP. Think about it. We’re about to make a precomp for every label in the video, how are you going to keep track of which label is Fusion Clip ##? In the upper left of your UI you should see the Media Pool, the Fusion Clip you just made will show up in whichever Bin you had open when you made the Fusion Clip. Double-click on it and rename it.
- In your Timeline, hover the playhead over the CallOut and go to the Fusion page, you should see the nodes for your labels on the checkerboard background. Click and drag in the node workspace to select both CallOut node groups and the Merge node, and use Ctrl+C or Cmd+C to copy them.
- Go back to the Edit page and now move the playhead over the Fusion Clip, and go back to the Fusion page. Here you should see just a MediaIn node connected to a MediaOut node, insert a Merge node in between them.
- Use Ctrl+V or Cmd+V to paste the Callout node groups. Connect the Merge node with both CallOuts plugged into it into the Merge node you just made in between the MediaIn and MediaOut nodes, and now our footage and label are combined in the Fusion Clip.
- Click on either Callout node group to get its individual controls to pop up in the Inspector, and you can adjust either label with the footage visible beneath them!
DROP SHADOWS or BACKGROUNDS
You may have noticed that there isn’t a Drop Shadow or Background for the Call Out like there was for the Subtitles. Here’s how you can add a Drop Shadow for your labels:
- Hit Shift+Spacebar to bring up a node menu and type in “Drop..” to bring up Drop Shadow and add the node to the workspace.
- If we try the same rationale as before, just inserting the Drop Shadow with a Merge node, unfortunately we’ll get disappointed because this doesn’t work right away. We’ve got to do some rearranging of our nodes first.
- We need to make sure that the MediaIn node for our footage is the last node added into the network after the labels. So arrange your nodes such that Call Out1 is Merged with CallOut2 and so on for each label, then, the last Merge node all the labels combine with the MediaIn.
- After you’ve done this, if the labels are no longer visible on top of the footage, you may need to switch the order. If you click and drag on the gimbal in the last Merge node or the MediaOut, you may find that the labels are indeed below the footage.
- To easily and quickly swap the order in which these nodes are layered with the Merge node, select the Merge node and hit Ctrl+T (on PC) to swap the node order. The colored arrows entering the node tell you the order they are: yellow is bottom, green is top.
- Now we can insert our Drop Shadow between the Merge node that combines all the labels, and the Merge node that combines the labels with the footage.
- If you still have trouble with the labels or Drop Shadow showing up, try inserting a Background node set to white between the Label Merge node and the Drop Shadow node.
ANIMATION CONTROLS
Now for even MORE control over the label.
- You might have noticed that the Call Out node actually looks like a stack of nodes, and that’s because it’s not one node, it’s a node group! If you double-click it, it will open and show you all the node parts that make it up.
- We can gain instant access to the nodes that are animated by opening the Spline viewer. In the upper right of the Fusion UI, look for and click on “Spline”. This will open the Spline viewer, and we can see all the keyframes associated with this node group.
- If you click on a spline point, you can change its interpolation to easy-ease by hitting “F”, and you can control the amount of easing of the KF by hitting “T”
- If you navigate to the “Text” node within the “Call Out” node group, you’ll get some additional controls in the Inspector. A super useful one is “Write On”. Use the little diamond icon to the right of the slider to KF this effect.
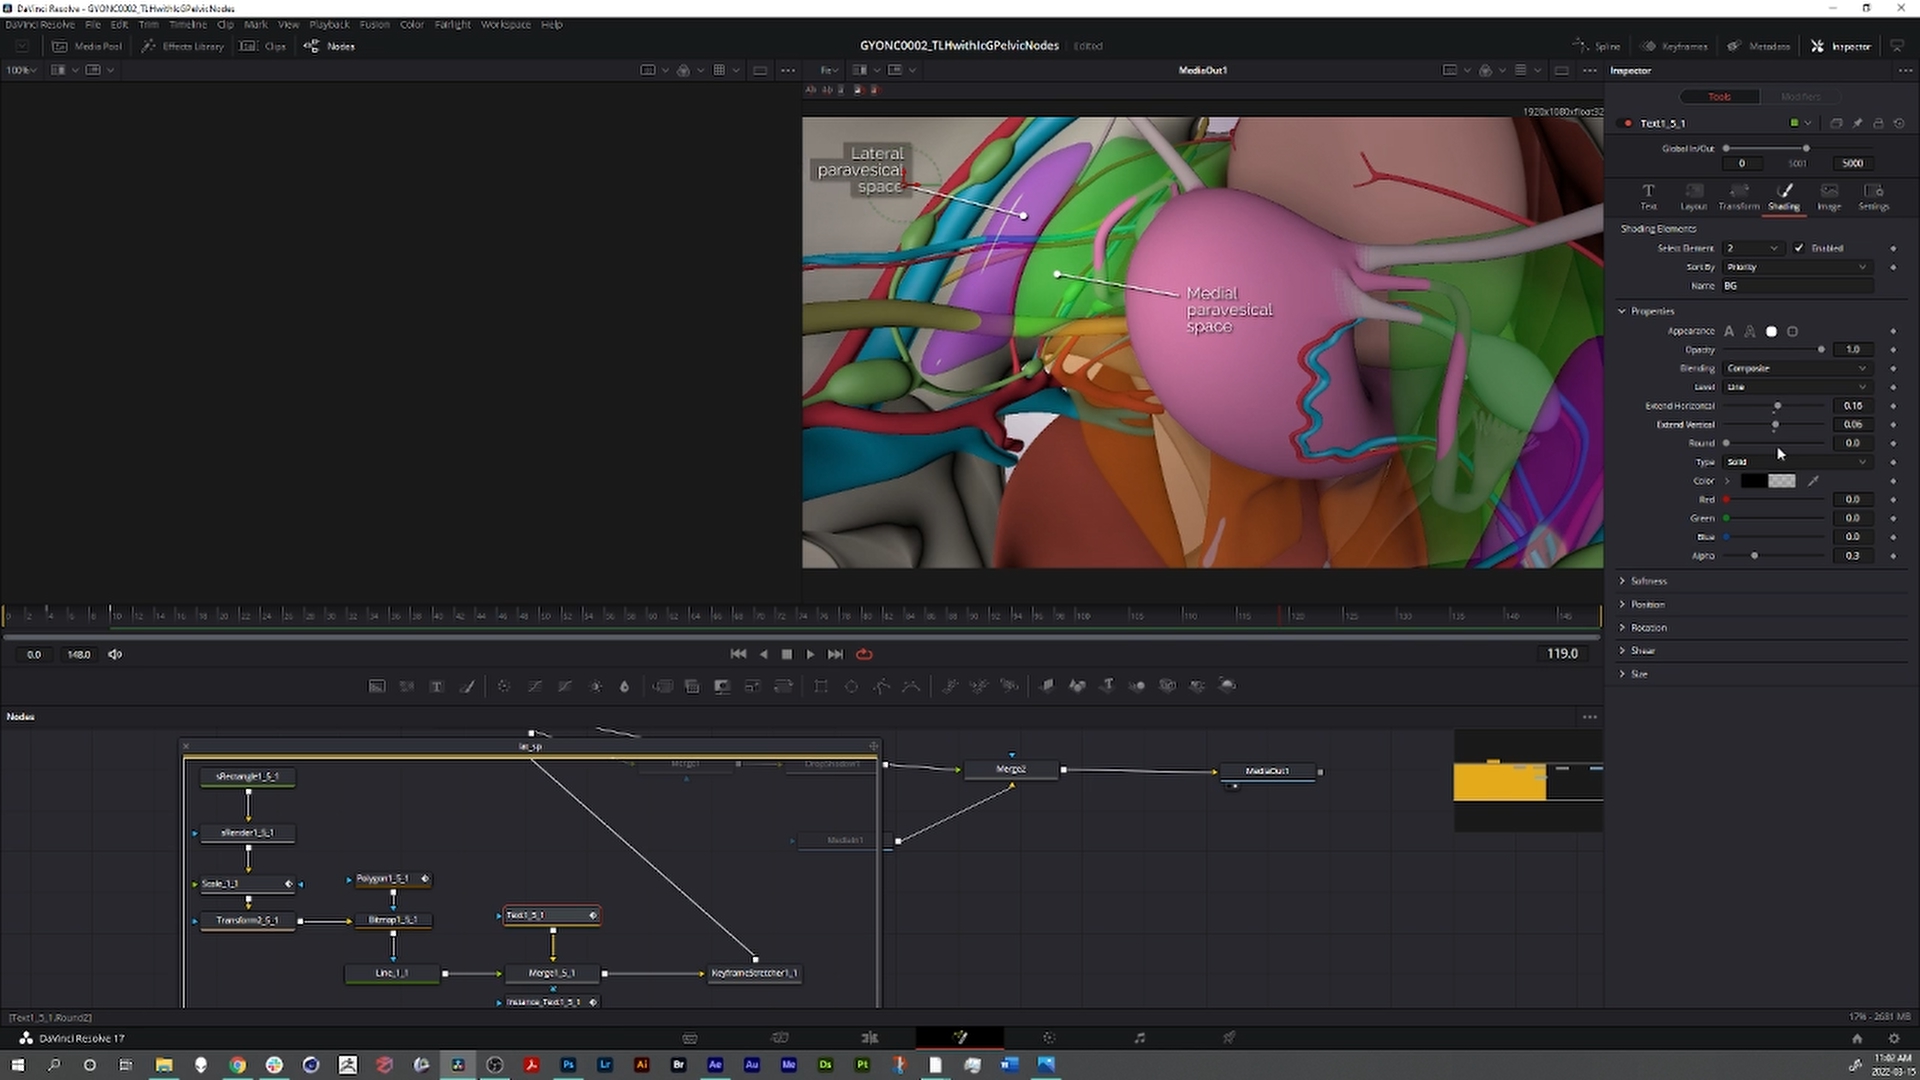
If we open the node group for the CallOut, we can navigate to the Text node, where we can access all it's editable attributes in the Inspector in the upper right. Go to the Shading tab, under Shading Elements > Select Element set the number to '2', then Properties > Appearance and click the square icon to add a background to the label.
LABEL BACKGROUND
Lastly, you may be asking well how do I add a background to my label so it really stands out against the footage? Setting this up “by scratch” with basic nodes is a pretty involved process in Fusion that even gets into some coding. Yikes! Luckily there is a shortcut we can take by “hacking” our existing node setup, whew!
- Open up the Call Out node group and find the “Text#_#..” node. It should be connected to the last Merge node in this group and also connected to an Instance of itself. Click on this node to bring up its attributes.
- In the Inspector attributes, go to the Shading tab. At the very top, you’ll see a drop-down menu for “Select Element”. Currently Element 1 is active and this is our text. We don’t want to add the BG here because it will essentially “take over” this element. So set the Select Element to “2” and now all the parameters we change will only affect this new element, the text will be left unchanged.
- Under Properties > Appearance, we can click the second-to-last box and get our text background that dynamically changes with the text length.
- Adjust the Opacity and set the Level to “Line” so you don’t get gaps between characters or words.
- Adjust the Extend Horizontal and Vertical, and the Round controls the corner rounding.
- Play around with these settings and add more elements if you wish. Also don’t forget, just about all of this stuff is keyframe-able!
- Have fun!
We hope you enjoyed this crash course on how to integrate text into your videos using DaVinci Resolve. Please let us know if you found this helpful by sharing it on social media, and if you'd like us to do more tutorials for making and editing surgical teaching videos, let us know what you'd like us to cover in future posts!
--TVASurg Team
REFERENCES
- DaVinci Resolve by Blackmagic
- All About Text+ Nodes by Casey Faris
- Make An Easy Callout Graphic in Resolve by Casey Faris*
- Building a basic callout and tracking it by JayAreTV*
- Get more out of the Text Tools for Fusion by JayAreTV
- Text boxes done right by VFXstudy
- Check out our surgical video editing process presented at the Association of Medical Illustrators:
