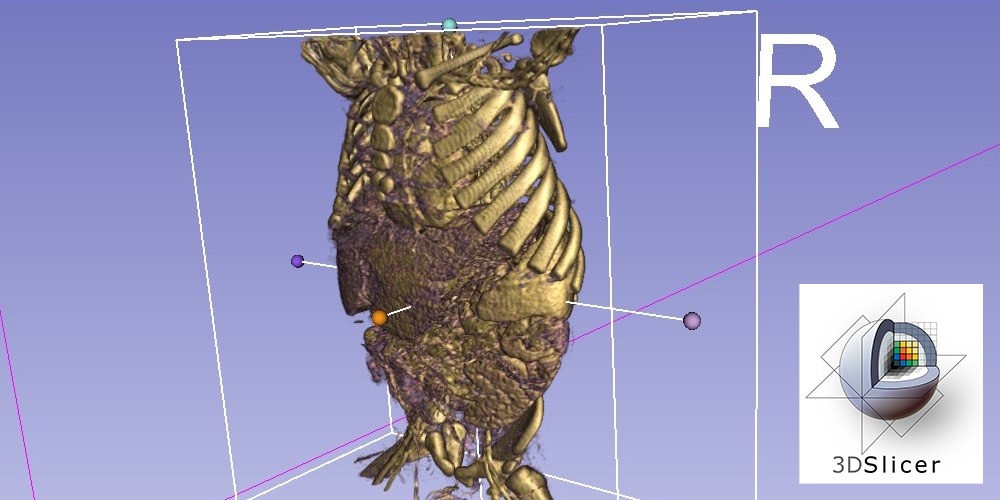
We are often asked about the tools and techniques used in our workflow. For the 3D animations in TVASurg videos, there are actually several different 3D software tools we use for different aspects of production. We always try to obtain patient-specific imaging scans to reconstruct into 3D models, as these rough reconstructions are the first step in the 3D modelling process.
There are many options for 3D reconstruction software available, both open source and paid. One of the main differences to be aware of is that paid software applications are approved for use in medical diagnosis in healthcare settings. Open source tools can still be used to create 3D reconstructions for use in animation, but not by surgeons when they are using the 3D reconstruction software to take measurements or plan procedures. The paid software options also usually offer more functions for precise and specific 3D model reconstruction, as well as collaborative review features.
When it comes to 3D reconstruction software, paid or open source, it must be noted that your results will depend heavily on the quality of the image series you start with. Widely-spaced and/or low-resolution scans will always be a challenge, whereas thin slices in high resolution will produce a higher degree of precision in the 3D model reconstructions no matter what software you are using.
Medical illustrator Melanie Connelly published a blog reviewing many open source medical visualization applications. Of these, we have experimented and made use of three in particular, for situations when our paid software was not an option or lacked specific functionality. The open source medical imaging apps we have used are InVesalius , Horos (formerly Osirix), and 3D Slicer. What follows is a basic workflow for 3D Slicer, version 4.11.20200930, which describes the process of producing a 3D model of several different anatomical structures for export to use in animation.
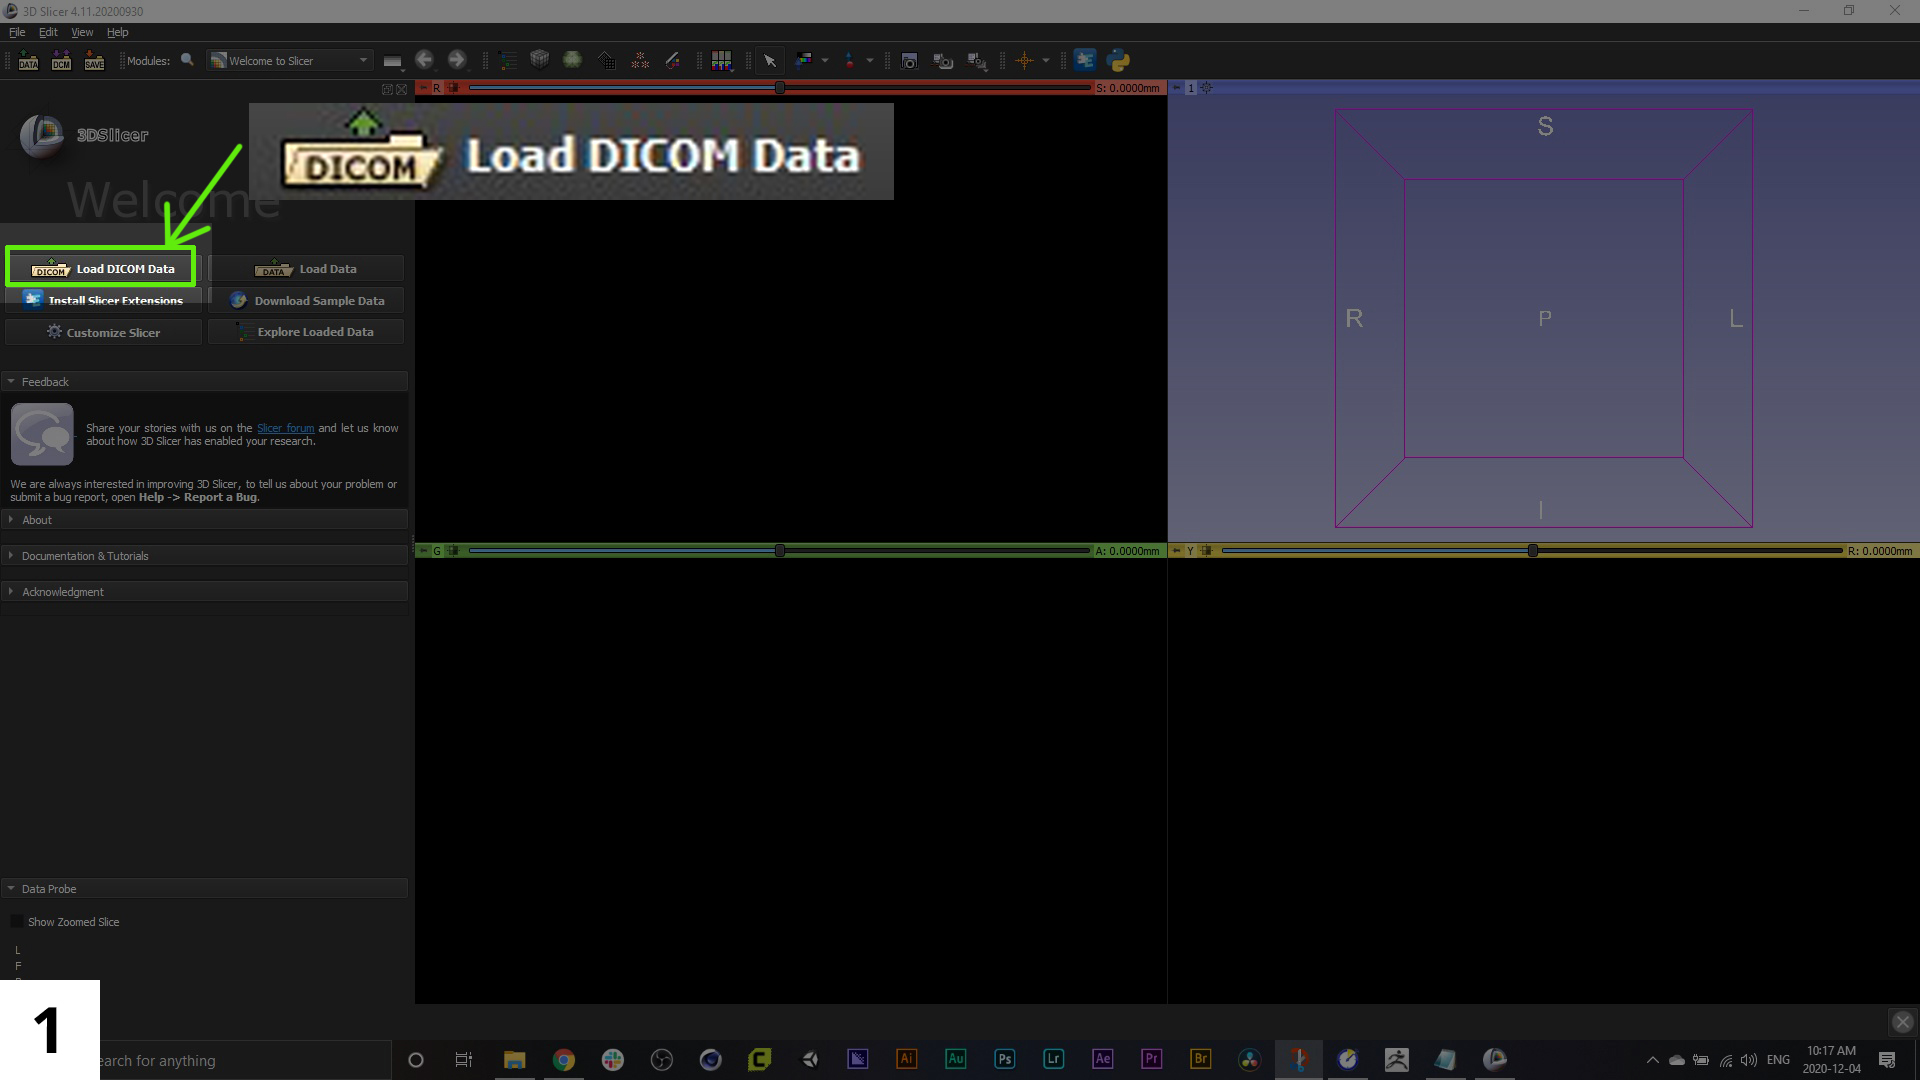
01. The first step will be to import your dicom image series, which you can do from the menu items along the left sidebar.
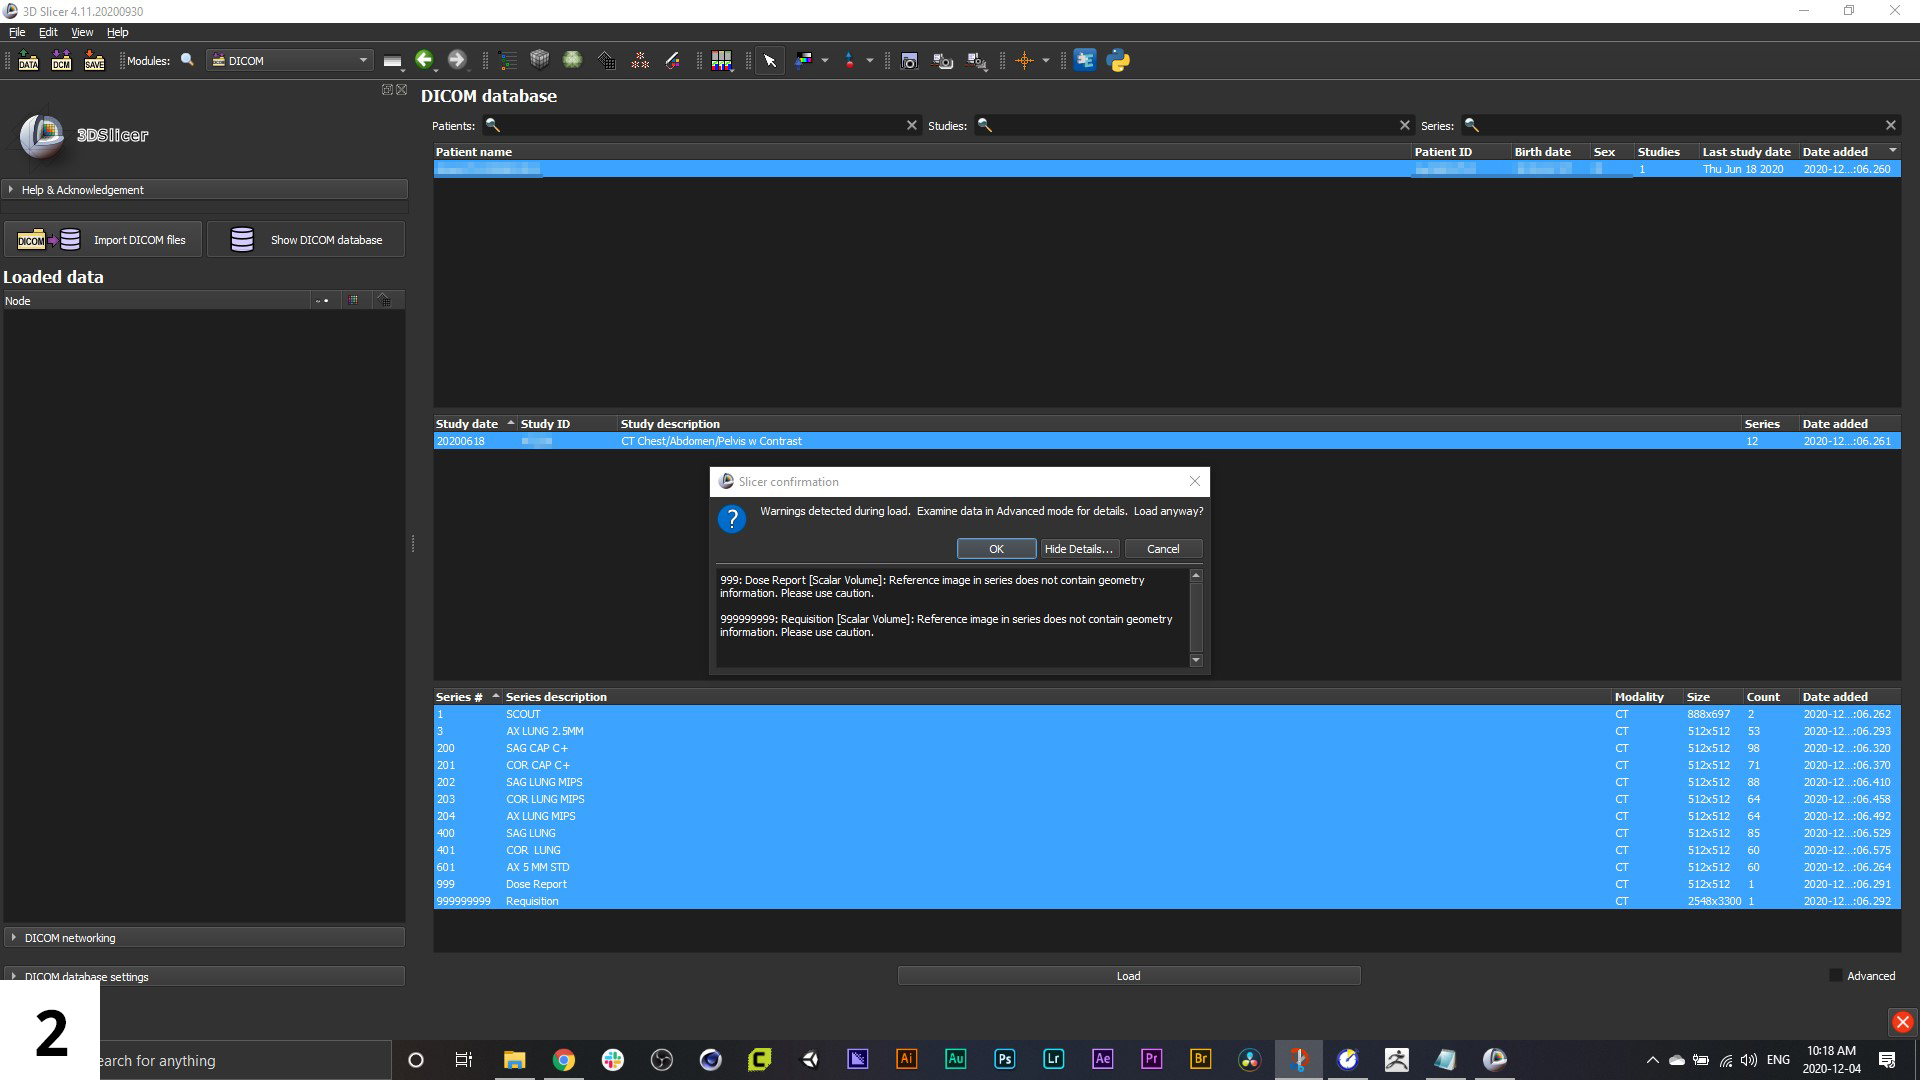
02. Once loaded, you will have to hit "Load" at the bottom of the interface. You may get a warning message, but just click "OK".
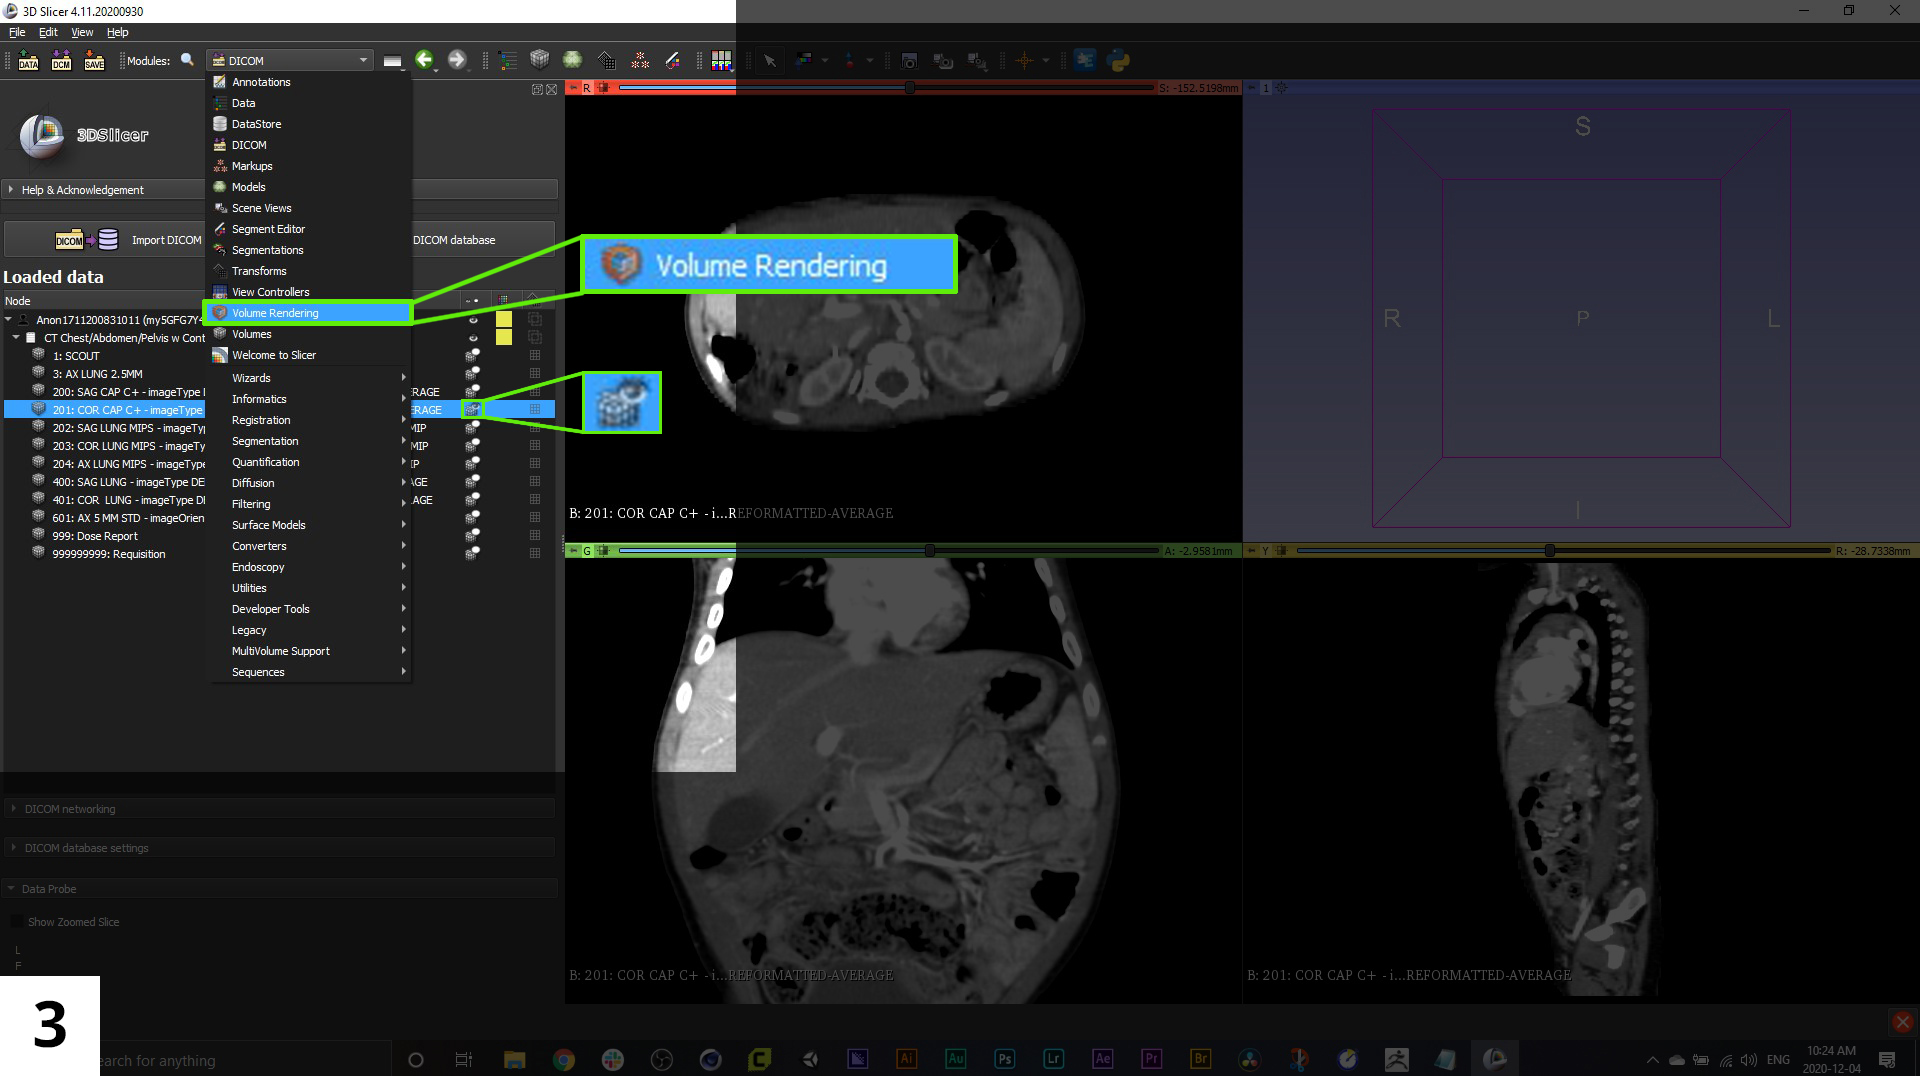
03. Now you will select the imaging series you want to use for your reconstruction. Once selected, click the cube icon to the left of the series name and an eyeball icon will appear over the cube, this will activate the series in the 4-up window pane view to the left.
You can quickly create a 3D view of the anatomy in the scan series by switching to the "Volume Rendering" module-use the dropdown menu that is currently set to "DICOM". Be aware though, that this method of creating a "3D model" is not yet exportable to a format that we'll use in our 3D animation software, but it can be helpful when reviewing the data contained within the scans.
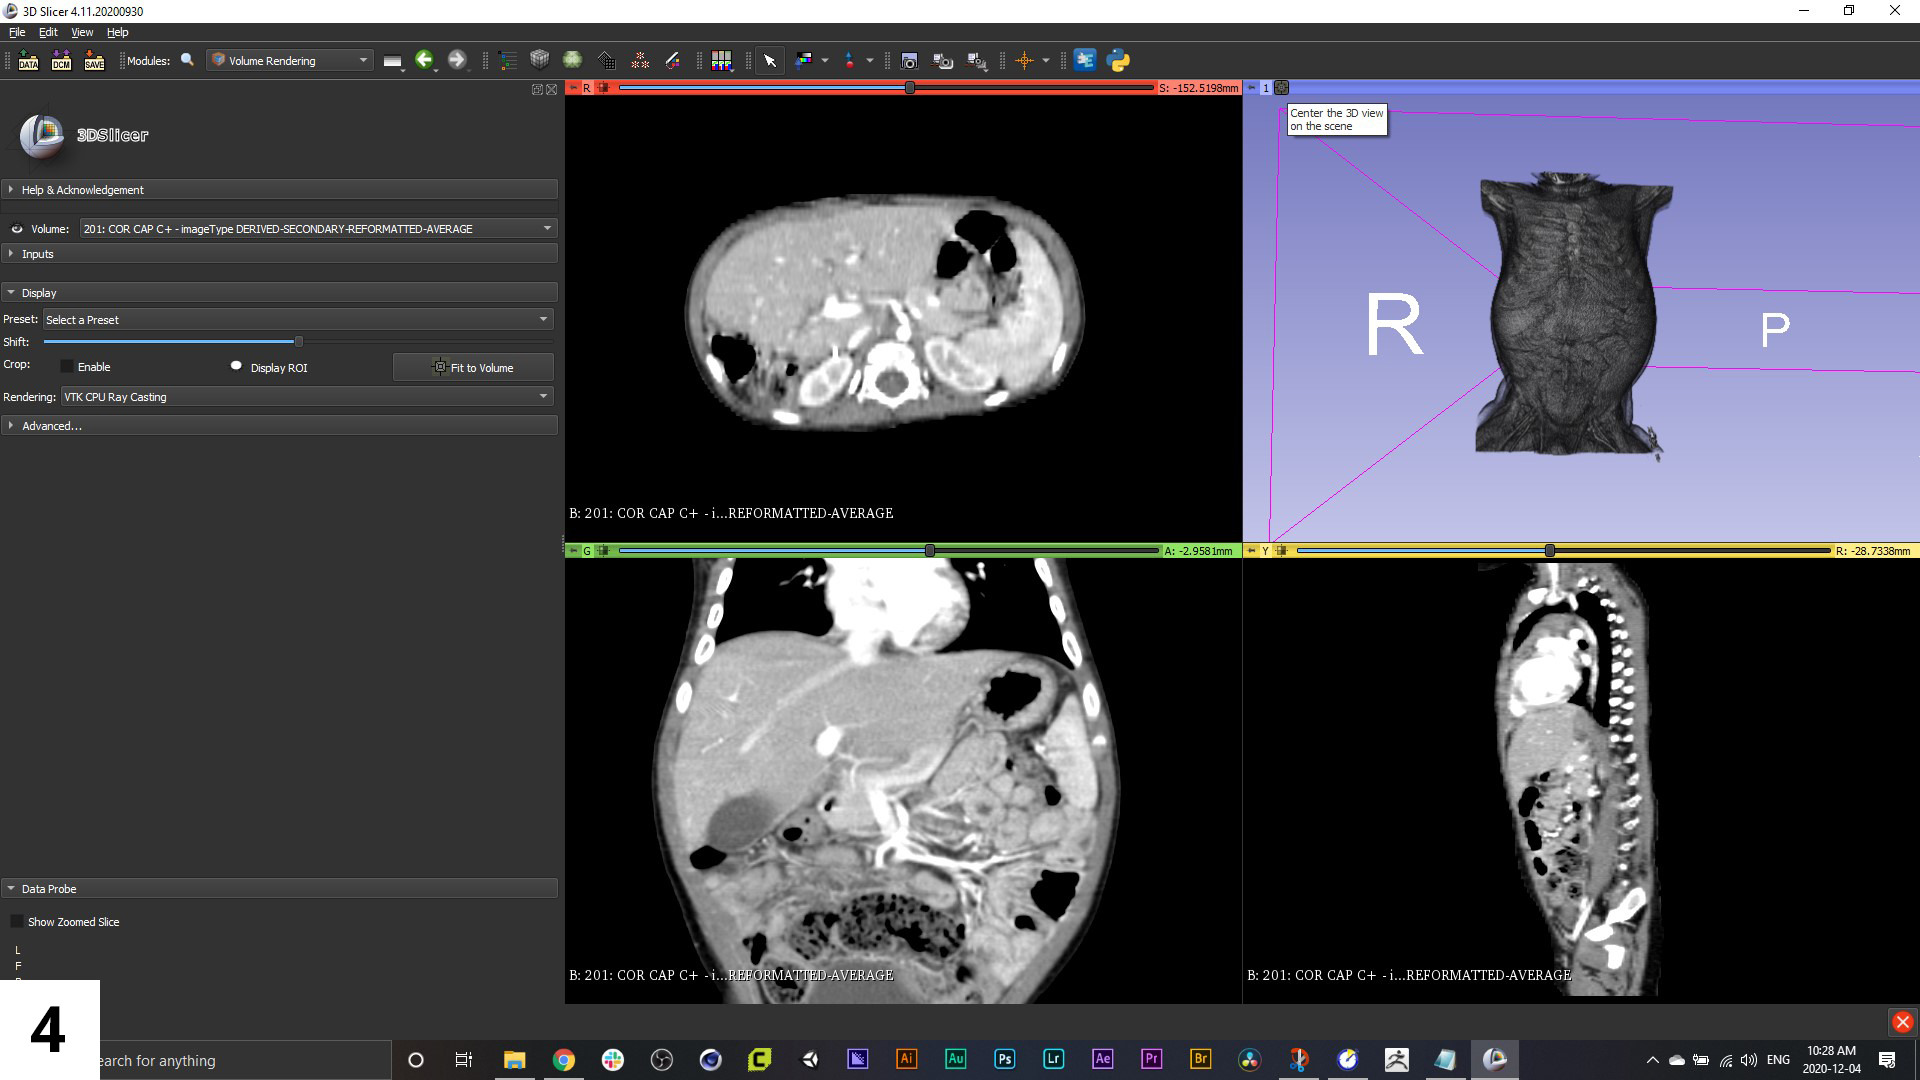
04. Volume renderings are one of several ways of displaying scan data in 3D, they use specific file formats that some software can't read, and they treat the entire image set and resulting 3D render as "all in one". What we are looking to achieve in our workflow is separate models for each of the major anatomical structures we want to animate: the solid organs and associated vasculature.
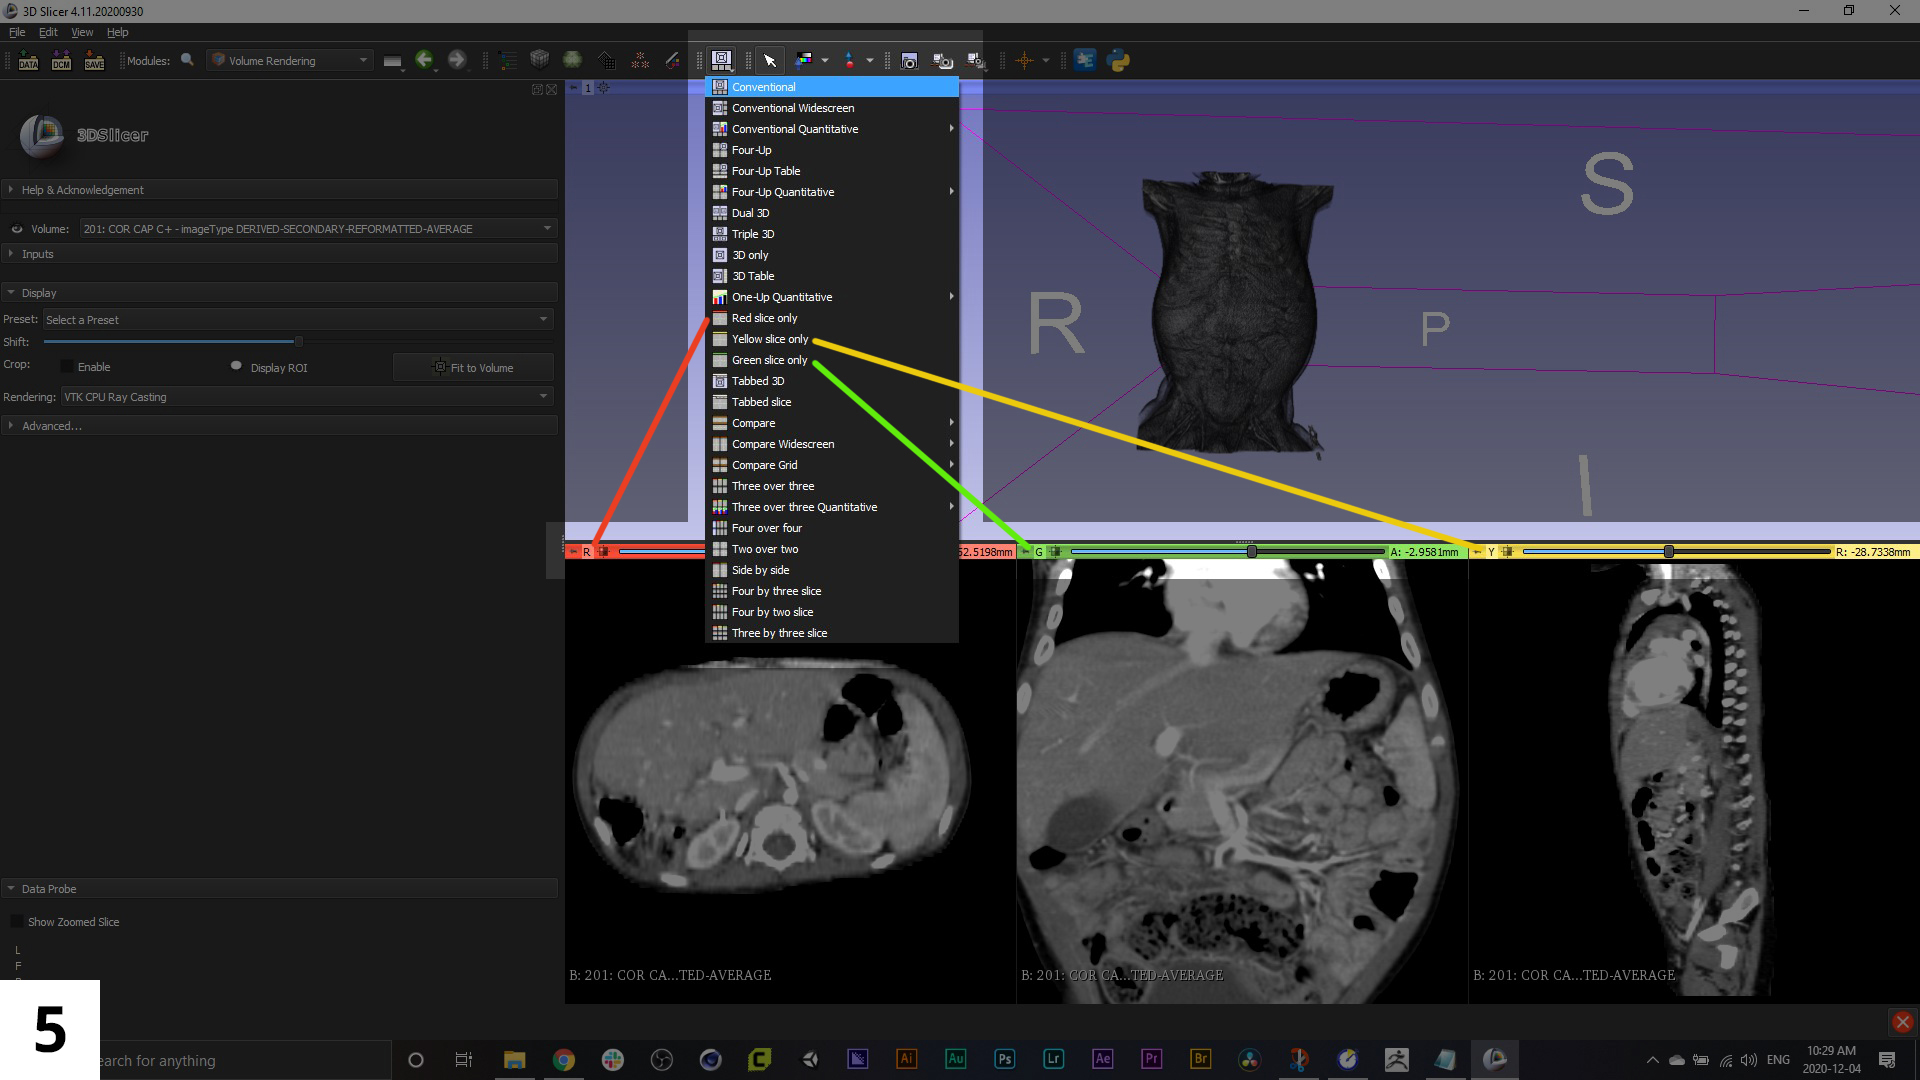
05. Along the top of the 3DSlicer interface there is a row of icons. In the middle of this row of icons is one that is a light-coloured square, with a smaller black square outline inside of it. This will let you change the view orientation.
You'll notice the imaging scans have been re-sliced so that you have all three standard views: axial, frontal, and sagittal. Each one has a colour bar above it (red, green or yellow), and this is how you'll pull up that slice from the window options. From the drop-down menu to select different window view arrangements, find the slice ("Red slice only", "Green slice only", or "Yellow slice only") that correlates to the original imaging series, you'll probably notice it has the sharpest resolution of the three views.
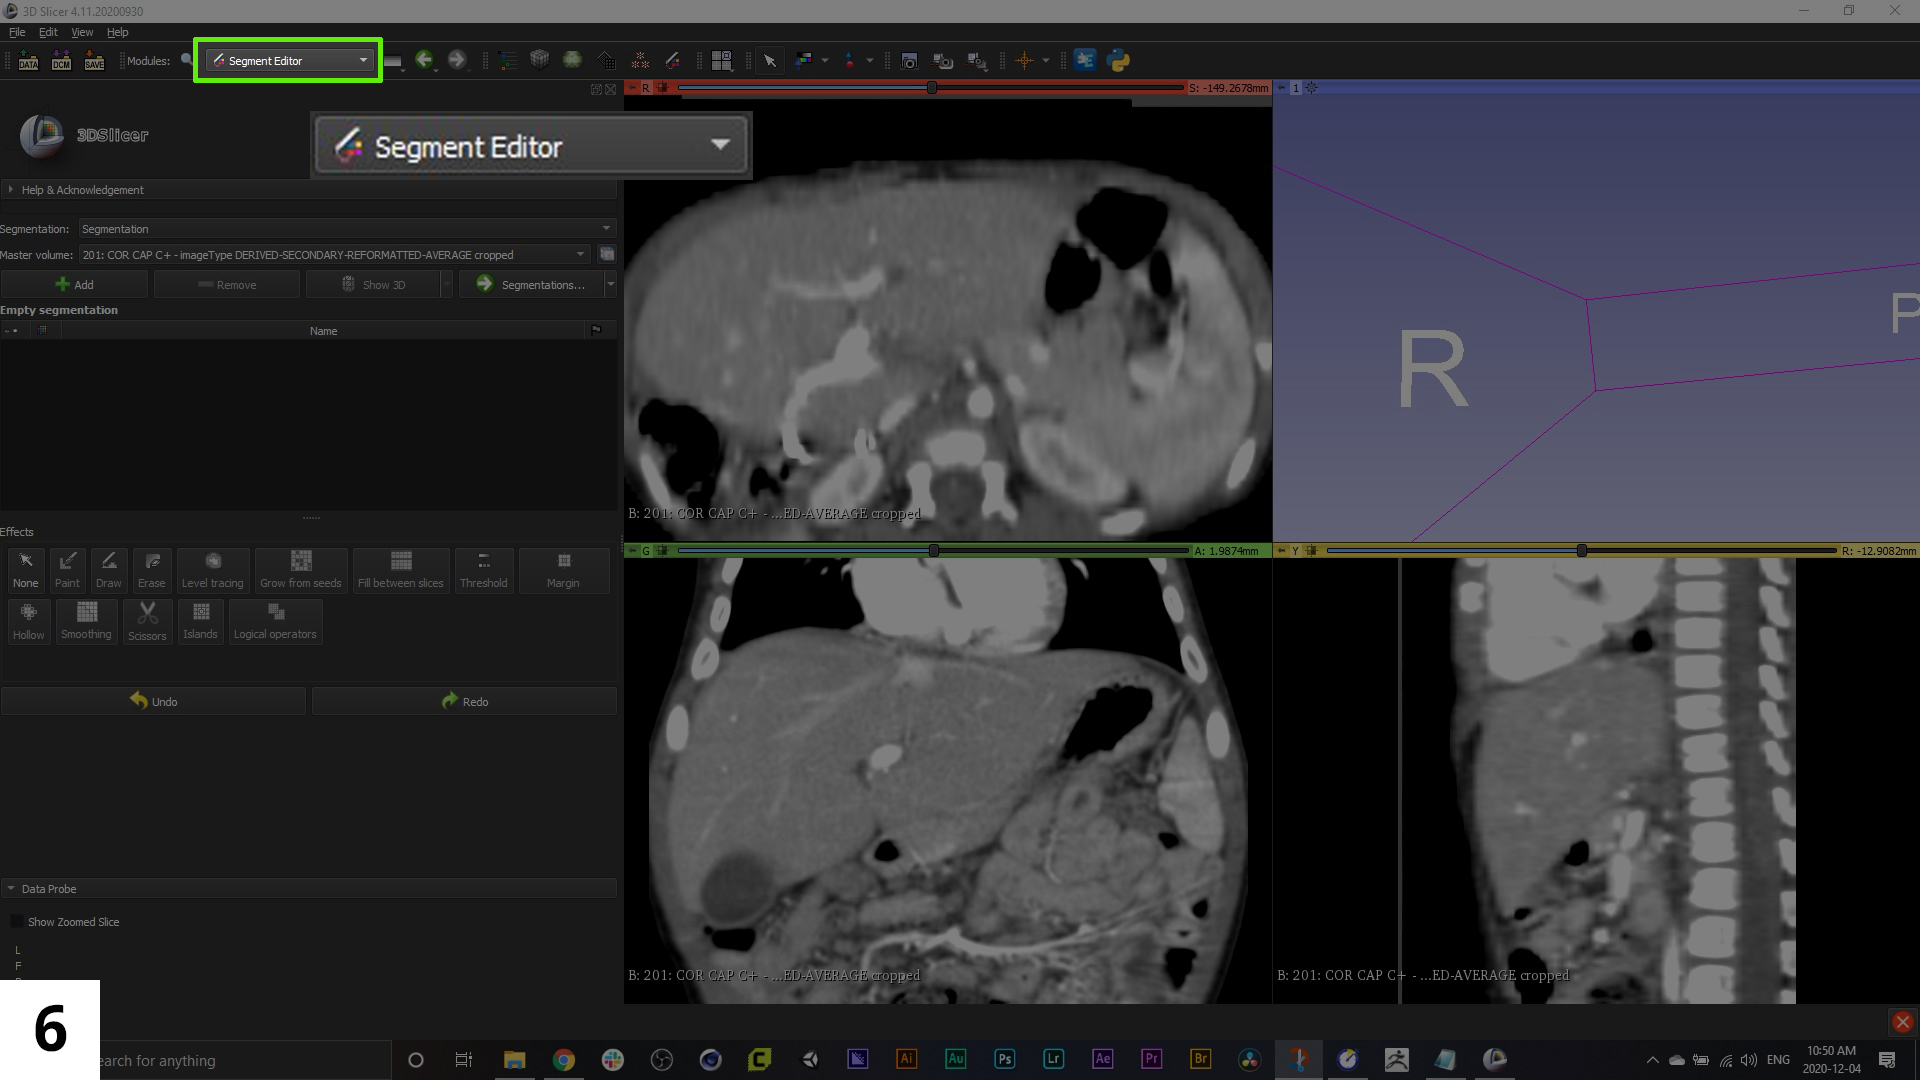
06. We'll navigate to the 'Segment Editor' module from the dropdown menu. In previous versions of 3D Slicer there was an 'Editor' module that performed similar functions to what we'll now be doing (isolating specific anatomical structures and individual organs). Each "segment" will end up being a separate piece of geometry in our 3D model file.
The legacy 'Editor' module can still be accessed through the module search menu. Both the "Segment Editor" and "Editor" modules have a series of presets for different anatomy structures, but these presets are really just colours that correspond to an organ or tissue, they don't necessarily help in identifying those tissues.
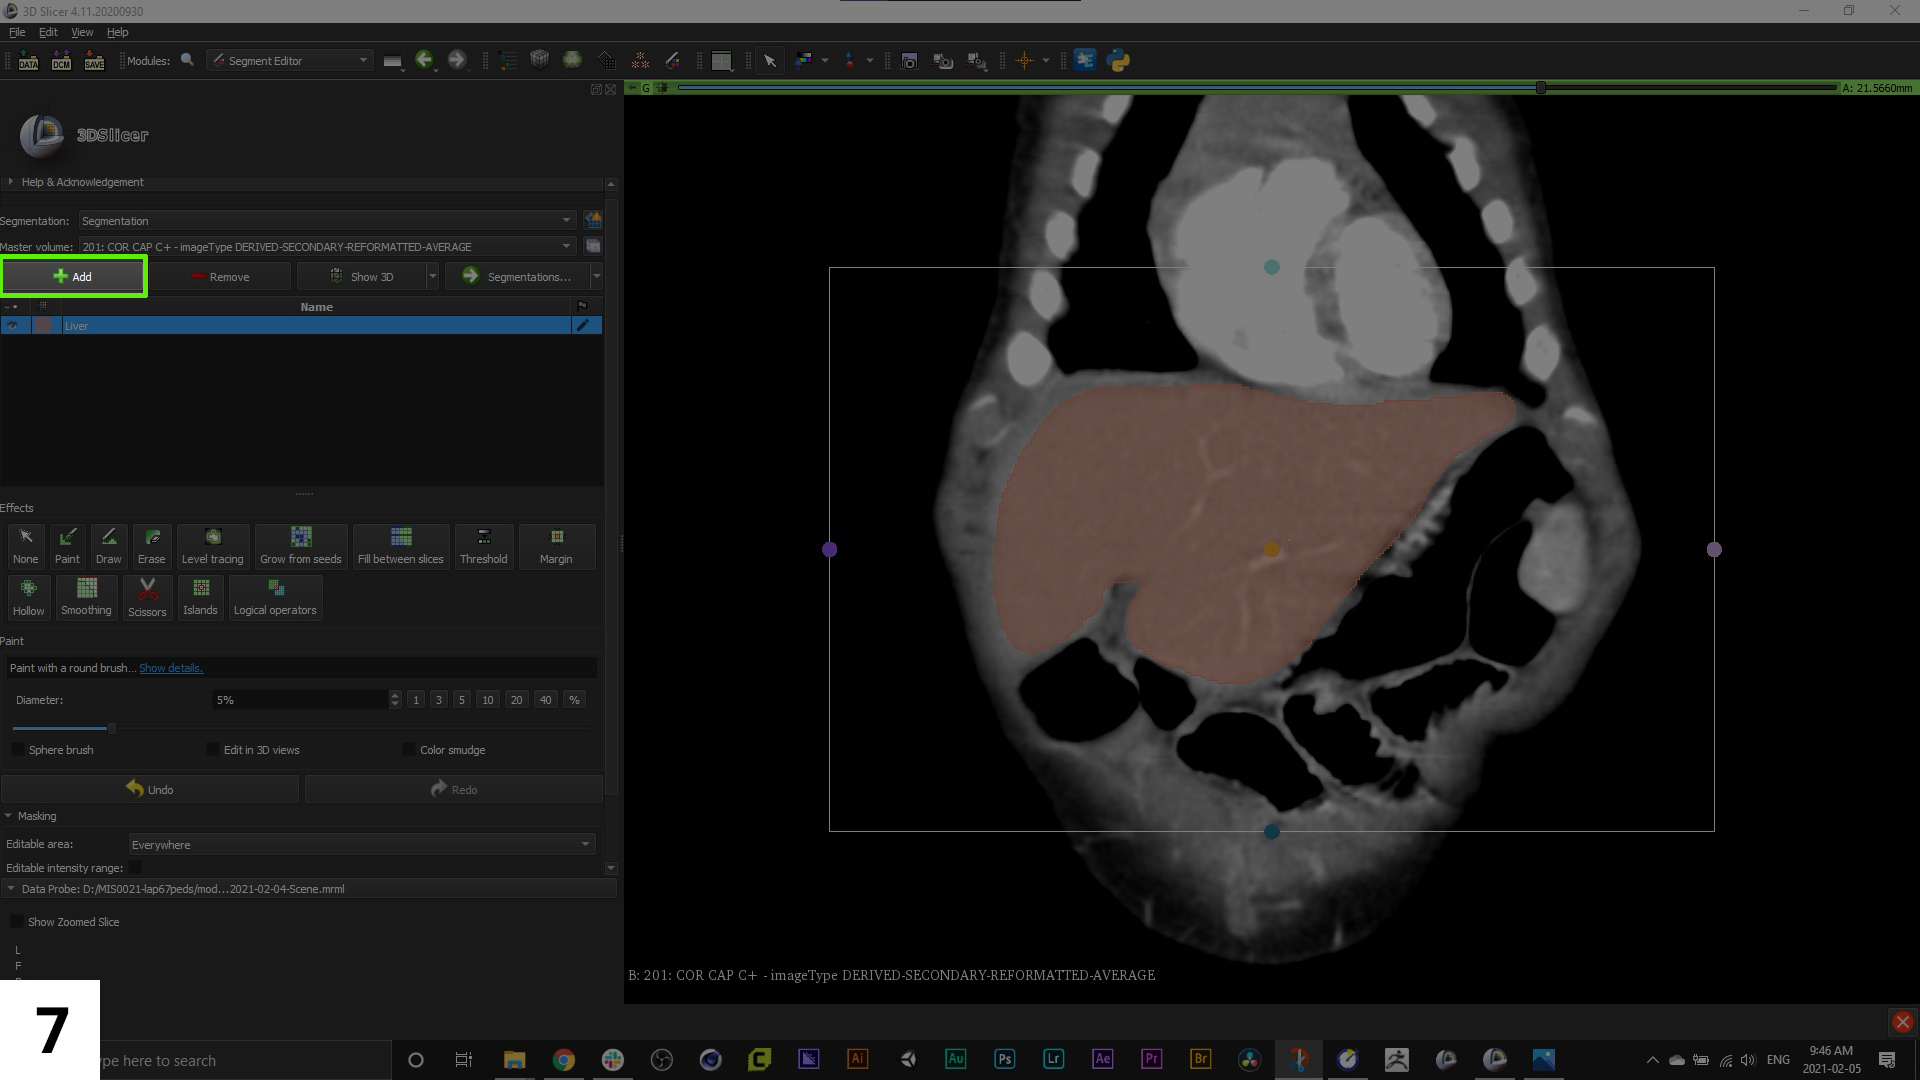
07. Use the "+" button to add new segments, and double click the name to re-name them. If you click on the colour swatch next to the name you can also re-assign the colour. This colour will now be used to mask off parts of the scan to isolate specific anatomy. When doing this, change your view to one scan only. If the 3D model view window is open during mask editing, it might slow down your machine.
08. At this point in the workflow, we haven't done anything too intensive but we are starting to build the framework for our eventual export, so it's a good time to save our progress. Simply go to "File > Save" and choose your location to save to. 3D Slicer will export a whole series of files associated with the project, but the most important is the scene file, in .mrml format.
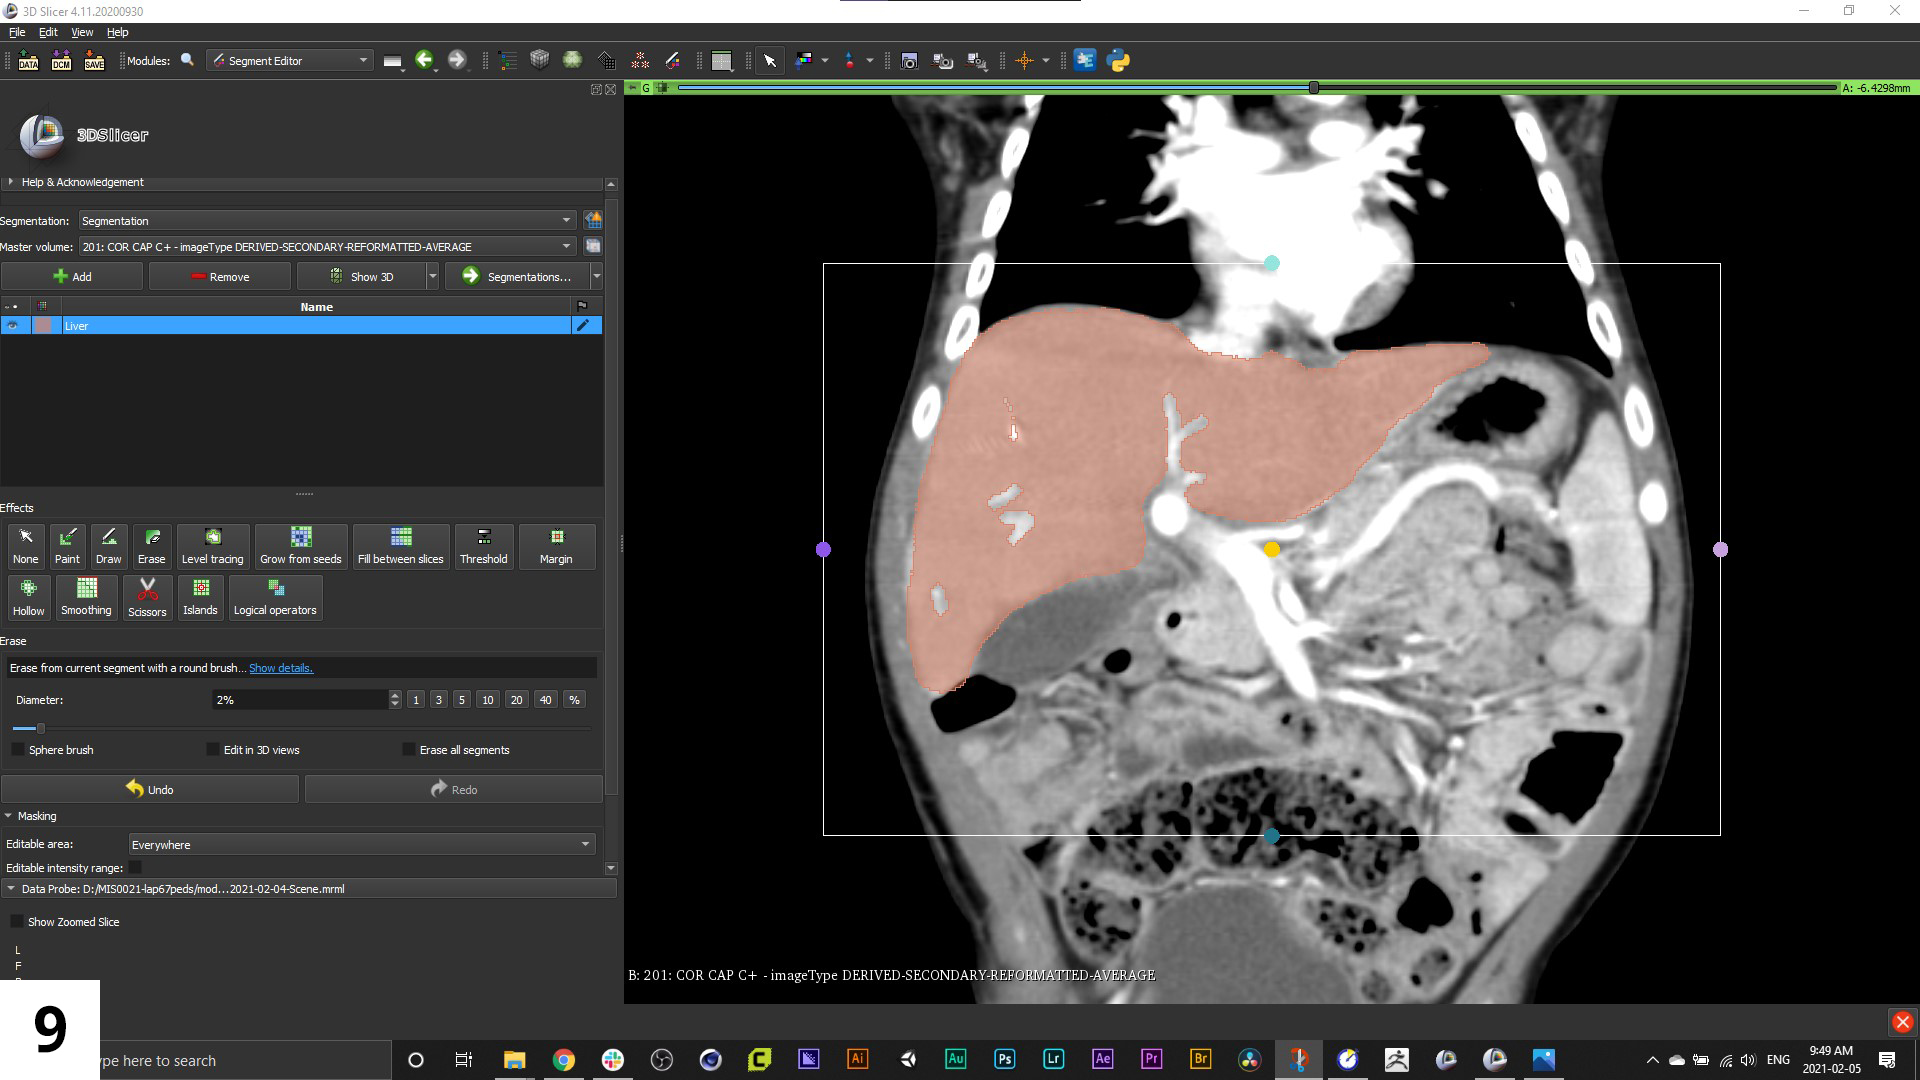
09. With the named segment active in the left-hand menu, select and use the draw tool to outline structures on the scans (preferably the slice set that was the original orientation of the series), when done, Rt-click to fill in with the colour you've set for this segment.
10. You can also use the paint tool to fill in large areas or adjust, and the erase tool to refine the mask. Scroll through the series and do this for the first and last scans where you see the structures you want, as well as a few in between. Now, click on the menu icon for "Fill between slices" and click "Initialize".
11. A preview of where the mask has automatically filled in will show up in a slightly faded version of the segment colour. Click "Apply" to accept.
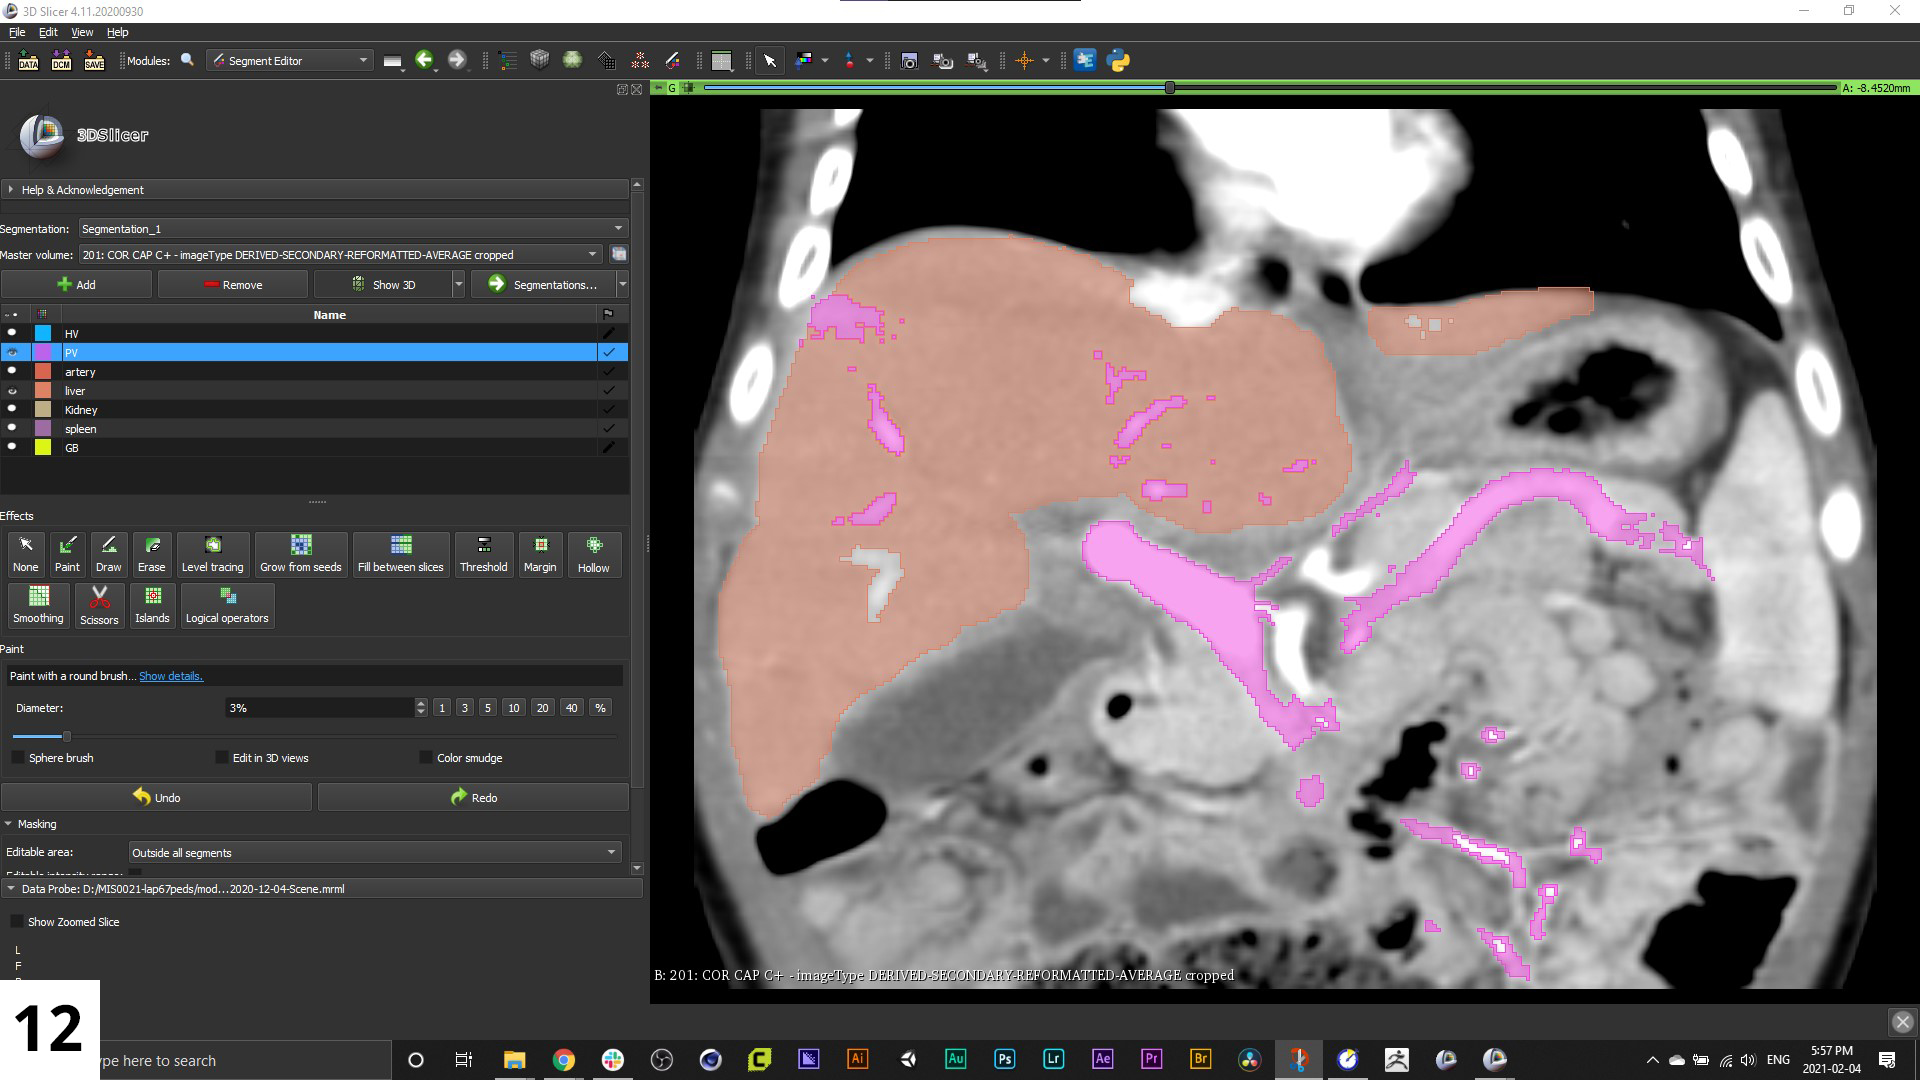
12. The resulting mask that appears throughout the series may be a bit crude on some of the interpolated scans, so you'll want to go in and refine those.
When you want to see the 3D reconstruction you are making, click the "Show 3D" button above the named segments in the left hand "Segment Editor" menu.
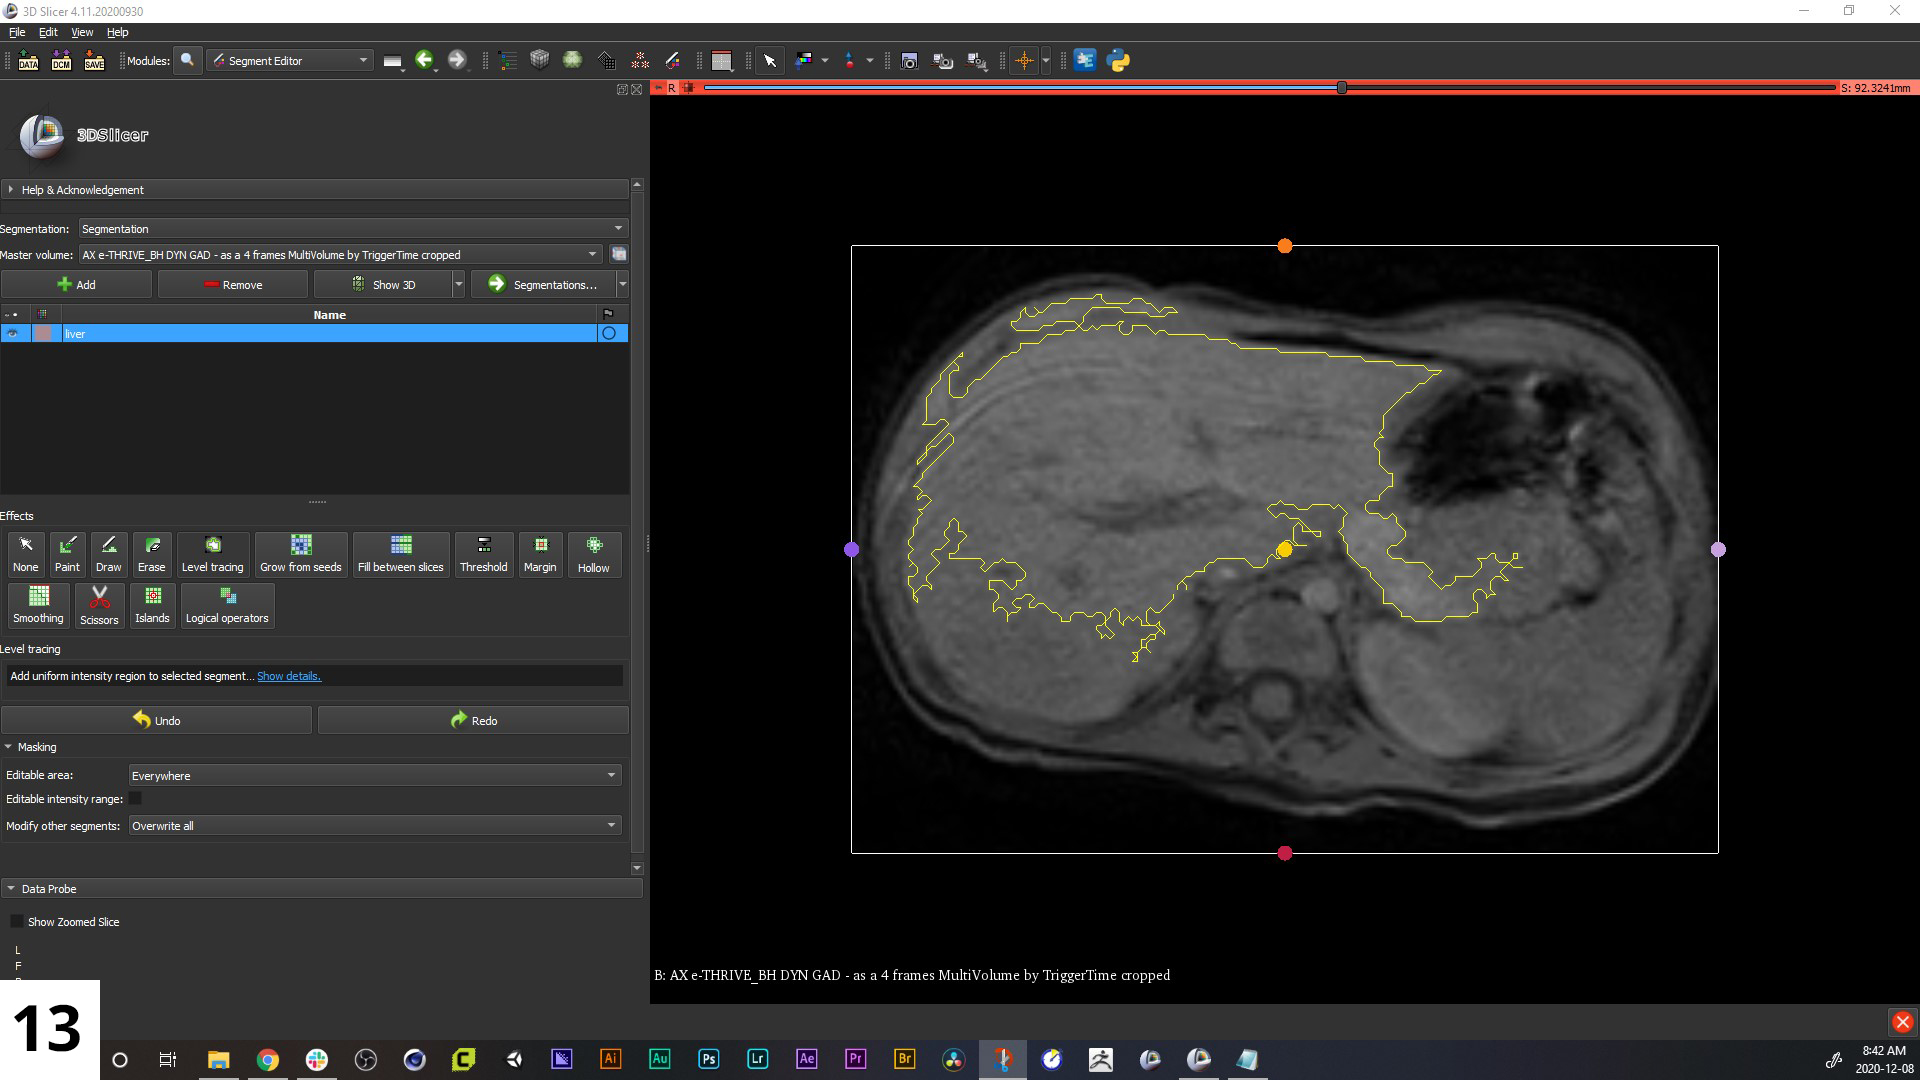
13. There are various tools available to help you speed up this workflow (for example "Grow from seeds", "Level tracing", and "Fill between slices"), but you will almost always have to do some manual fine-tuning. You always want to find the balance between including important details, but not spending too much time trying to add details the scans are lacking. The guideline we always try to follow is to focus on the anatomy we will need to tell the story.
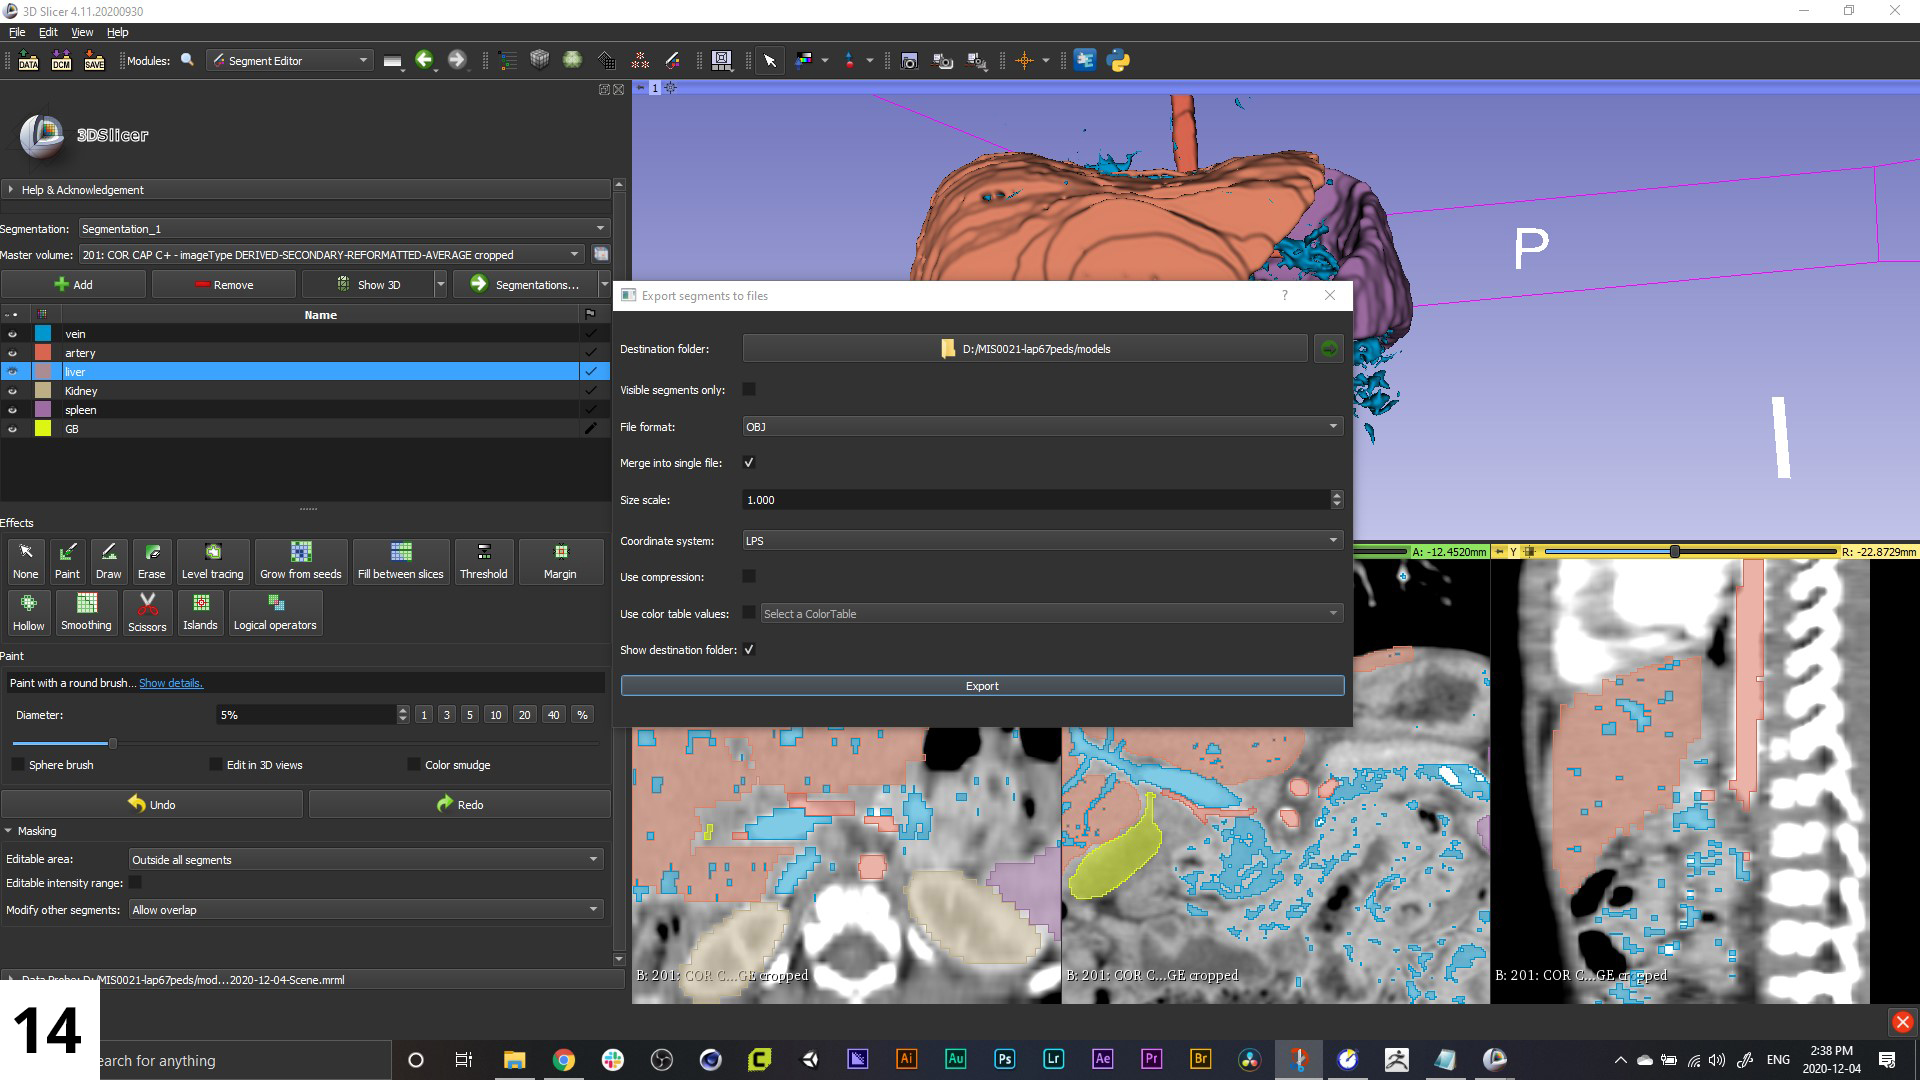
14. Once you're happy with the 3D model reconstruction you're seeing in your viewport, it's time to export you model set. Select "Segmentation > Export to File" from the left-hand menu, set file destination and file format, and hit "Export"!
The formats we use the most are OBJ and STL. Either can be imported into animation software, but STL files will be what you want if your end goal is 3D printing.
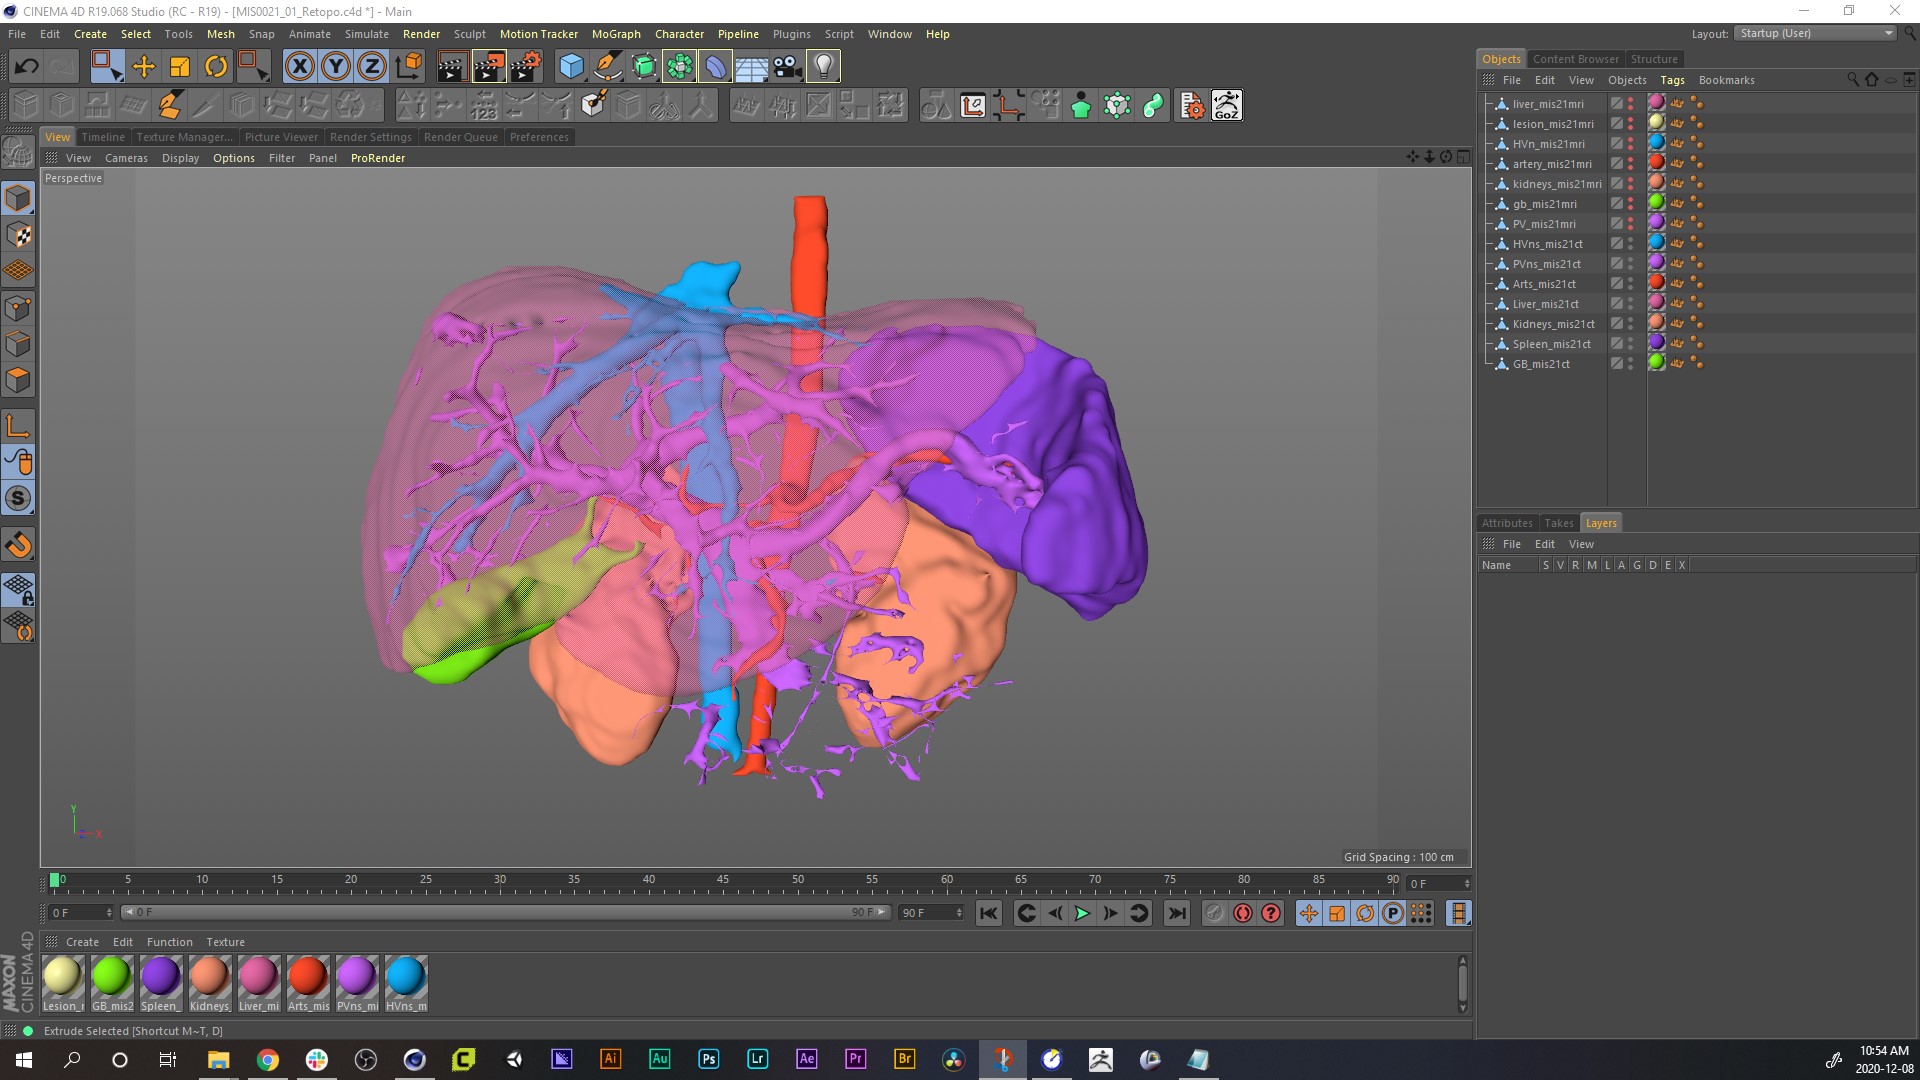
15. What you see above is the model set imported into our animation software, Maxon Cinema4D. There is enough detail to make out some surgically significant landmarks, but the models are rough and fragmented in certain areas. As we demonstrated in our 3D modelling process blog, the models exported from 3D reconstruction software always have dense, messy topology, that will make animation clumsy or problematic, so, we will refine them further.
So that's a basic walk-through on making 3D model reconstructions from medical imaging scans using 3D Slicer. There are some great tutorials on YouTube that go into this process in more depth, in particular, we found these to be very helpful:
• 3D Slicer tutorials from Service de Chirurgie Visc'erale et Oncologique
• 3D Slicer official YouTube channel on preparing models for 3D printing
REFERENCES
Brazina, D., Fojtik, R., & Rombova, Z. (2014). 3D visualization in teaching anatomy. Procedia-Social and Behavioral Sciences, 143, 367-371.
Crossingham, J. L., Jenkinson, J., Woolridge, N., Gallinger, S., Tait, G. A., & Moulton, C. A. E. (2009). Interpreting three‐dimensional structures from two‐dimensional images: a web‐based interactive 3D teaching model of surgical liver anatomy. HPB, 11(6), 523-528.
Lewis, T. L., Burnett, B., Tunstall, R. G., & Abrahams, P. H. (2014). Complementing anatomy education using three‐dimensional anatomy mobile software applications on tablet computers. Clinical Anatomy, 27(3), 313-320.
Nickel, F., Hendrie, J. D., Bruckner, T., Kowalewski, K. F., Kenngott, H. G., Müller-Stich, B. P., & Fischer, L. (2016). Successful learning of surgical liver anatomy in a computer-based teaching module. International journal of computer assisted radiology and surgery, 11(12), 2295-2301.
Numminen, K., Sipilä, O., & Mäkisalo, H. (2005). Preoperative hepatic 3D models: virtual liver resection using three-dimensional imaging technique. European journal of radiology, 56(2), 179-184.
Pugliese, L., Marconi, S., Negrello, E., Mauri, V., Peri, A., Gallo, V., ... & Pietrabissa, A. (2018). The clinical use of 3D printing in surgery. Updates in surgery, 70(3), 381-388.
Pujol, S., Baldwin, M., Nassiri, J., Kikinis, R., & Shaffer, K. (2016). Using 3D modeling techniques to enhance teaching of difficult anatomical concepts. Academic radiology, 23(4), 507-516.
Sergovich, A., Johnson, M., & Wilson, T. D. (2010). Explorable three‐dimensional digital model of the female pelvis, pelvic contents, and perineum for anatomical education. Anatomical Sciences Education, 3(3), 127-133.
Yeo CT, MacDonald A, Ungi T, Lasso A, Jalink D, Zevin B, Fichtinger G, Nanji S. (2018). Utility of 3D Reconstruction of 2D Liver Computed Tomography/Magnetic Resonance Images as a Surgical Planning Tool for Residents in Liver Resection Surgery. J Surg Educ. 2018 May-Jun;75(3):792-797. doi: 10.1016/j.jsurg.2017.07.031. Epub 2017 Aug 17. PMID: 28822820.
Zilverschoon, M., Vincken, K. L., & Bleys, R. L. (2017). The virtual dissecting room: Creating highly detailed anatomy models for educational purposes. Journal of biomedical informatics, 65, 58-75.

